Results 1 to 13 of 13

Thread: Tip for transfering dovetails marks

  1. #1
    Join Date
    Feb 2004
    Location
    Perth, Australia
    Posts
    9,494

    Tip for transfering dovetails marks

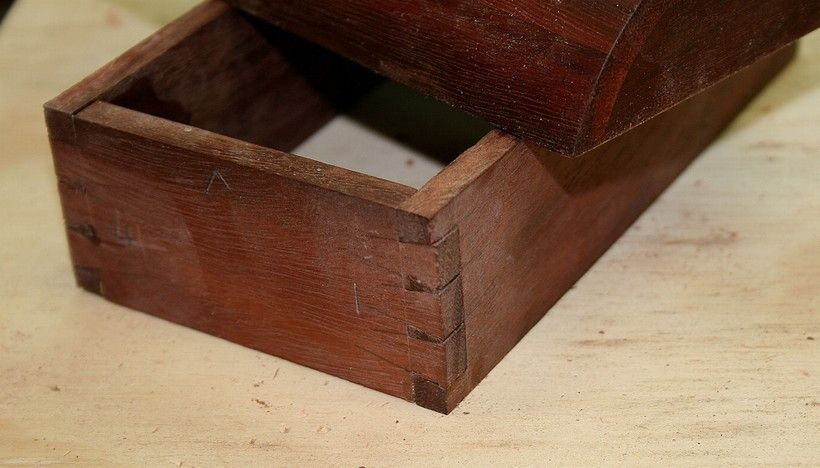
    I was building a dovetailed box today, busily transfering the tails to the pin board (as you do) ..

    I had placed the tail board between the pin board and a rest ..


    .. was holding it down with one hand while I scored the pins with the other ...


    .. and it occured to me that this could be easier. No, BB, there is no room to use a mitre clamp!

    Perhaps I am slow and have not read this somewhere (I really don't recall doing so), and I can't think why I haven't done it before ...

    ... I just glued 400 grit sandpaper on each side of the rest...


    It worked like a champ! Rock steady.
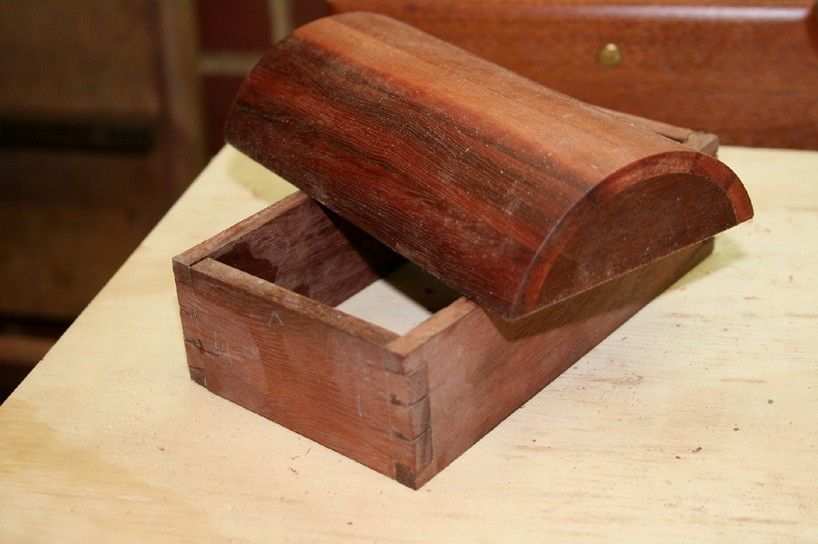


    What am I building?

    The dovetails are cut and glued together, but the box is still rough ...


    The box will be another with a coopered lid (this one ordered by Lynndy) ..


    More later.

    Regards from Perth

    Derek

  2. #2
    Join Date
    Sep 2007
    Location
    Longview WA
    Posts
    27,454
    Blog Entries
    1
    Great idea Derek.

    A similar idea came to me whilst sitting at my bench eating cookies.

    jim
    "A pessimist sees the difficulty in every opportunity; an optimist sees the opportunity in every difficulty."
    - Sir Winston Churchill (1874-1965)

  3. #3
    Join Date
    Nov 2007
    Location
    Sioux City, IA
    Posts
    804
    Blog Entries
    3
    I would love to try the "Cosman" tails first approach and have the video, but not having much luck. The probelm I have is finding something thin enough to mark through so that there is a viable mark on the pin board to cut to. I've also discovered that in using the fret saw, there is no support when chiseling back to the line such as there is when you use the chisel for everything - do you do this in stages even though it's a small area?

    Seems that I give this a try every now and then but usually just return to my normal method of pins first, also Frank. Derek - it's obvious that you have it under control. Your idea is great and I'd be happy to try it, but it seems like it's step 7 and I'm still struggling with step four, so to speak.
    Last edited by Don Dorn; 11-01-2009 at 1:32 PM. Reason: Attempted better explanation

  4. #4
    Join Date
    Aug 2003
    Location
    extreme southeast Nebraska
    Posts
    3,113
    I clamp the piece to be marked flush with the top of the vise, then use a holdfast to hold the top piece in place. sometimes I even clamp a square caul to the back then clamp the top piece to the top of the caul.
    Last edited by harry strasil; 11-01-2009 at 11:37 PM.
    Jr.
    Hand tools are very modern- they are all cordless
    NORMAL is just a setting on the washing machine.
    Be who you are and say what you feel... because those that matter... don't mind...and those that mind...don't matter!
    By Hammer and Hand All Arts Do Stand

  5. #5
    Join Date
    Sep 2007
    Location
    Longview WA
    Posts
    27,454
    Blog Entries
    1
    Quote Originally Posted by Don Dorn View Post
    I would love to try the "Cosman" tails first approach and have the video, but not having much luck. The probelm I have is finding something thin enough to mark through so that there is a viable mark on the pin board to cut to. I've also discovered that in using the fret saw, there is no support when chiseling back to the line such as there is when you use the chisel for everything - do you do this in stages even though it's a small area?

    Seems that I give this a try every now and then but usually just return to my normal method of pins first, also Frank. Derek - it's obvious that you have it under control. Your idea is great and I'd be happy to try it, but it seems like it's step 7 and I'm still struggling with step four, so to speak.
    If you can find an old junk saw, cut it with a dremel cut off wheel and make a marking knife from it. Not difficult at all.

    Saw Blade Marking Knife.jpg

    The ferrule is from a Parker tubing fitting. The handle was made from a piece of scrap rosewood.

    If you do not have a lathe, you can make wood scale type handles.

    jim
    "A pessimist sees the difficulty in every opportunity; an optimist sees the opportunity in every difficulty."
    - Sir Winston Churchill (1874-1965)

  6. #6
    Derek, have you tried the "shallow rabbet on the inside of the tails board" technique? I've seen it a few places but not tried it yet. Seems like it would help line everything up.

  7. #7
    Join Date
    Feb 2009
    Location
    Whitehorse, Yukon, Canada
    Posts
    1,148
    Great idea Derek, I realy like using sand paper... when not used for sanding!!

  8. #8
    Join Date
    Feb 2009
    Location
    Whitehorse, Yukon, Canada
    Posts
    1,148
    I did try it and it work great... Oups... I'm not Derek!

  9. #9
    Join Date
    Feb 2004
    Location
    Perth, Australia
    Posts
    9,494
    There are many ways to skin a cat. I tend to revert to the easiest/quickest/simplist eventually. Such as using the side of a handplane to rest the end of the board on, and press down hard to keep it steady. Which is what I was essentially trying here but with a piece of scrap hardwood) - but the rest was slippery and the tail board tended to move, and when you are marking such tiny pins, then any movement is a killer.

    For large boards I do, as Harry suggest, use a mitre clamp. It is not practical with small boards. Rob Cosman has demonstrated the use of a fine rebate on the tail board to keep it in place. This just seems one more thing to do. I plan to may a couple of different size wooden rests (with sandpaper) to use in future. Simple and unintrusive.

    Don, with regard the thin knife, I make them out of HSS jigsaw blades. There is a full tutorial on my website: http://www.inthewoodshop.com/ShopMad...Dovetails.html

    Regards from Perth

    Derek
    Last edited by Derek Cohen; 11-02-2009 at 12:52 AM.

  10. #10
    Join Date
    Apr 2008
    Location
    Dayton Ohio
    Posts
    964

    Be inventive Derek

    Instead of making several blocks for different sizes, how about an adjustable one instead? You can do it Derek. I know you can!

    Eric

  11. #11

    Nothing "new"

    I have done almost exactly as Derek, other than I use the collection of broken hacksaw blades that I have gathered over the years.... I like that they are thin and have made many marking knives and scratch stock out of them.

    Robert

  12. #12
    Join Date
    Oct 2008
    Location
    Tidewater, VA
    Posts
    53
    To each their own. The entirety of the above conversation is a useful illustration as to why I think I will always be a pins first guy. With accurately cut pins, (with the exception of very large panels, i.e. blanket chests etc), I simply lay the prepared tail panel on the bench with the joint end facing out. I then rest the pin board on top of where the joint will be, flush things up carefully, and mark out all my tails with a .05 mechanical pencil. The gaps are much larger and I don't have to fool with trying to get a knife blade in from the top to mark a line I can't see at the bottom of the the pin hole.

  13. #13
    Quote Originally Posted by Mac Houtz View Post
    To each their own. The entirety of the above conversation is a useful illustration as to why I think I will always be a pins first guy.
    I'm still working on sawing accuracy, and I find it easier to saw accurately straight down. This makes cutting the tails first a bit easier, since if I screw up slightly on the tail angle it doesn't matter...the pins just get cut to match.

Posting Permissions

  • You may not post new threads
  • You may not post replies
  • You may not post attachments
  • You may not edit your posts
  •