What are the steps for routing an juice grove into a cutting board?
Thanks
Richard


 [OP]
Member
[OP]
Member
What are the steps for routing an juice grove into a cutting board?
Thanks
Richard
Member
1. Do some research (check some commercial offerings):
1.a. Are they all the same, or do some differ?
1.b. If some differ, find one you like best.
1.c. How far in from edge is the groove?
1.d. What is width of groove?
1.e. What is radius of groove in corner?
2. Understand your tool(s).
2.a. I would use a router with a Core Box bit to make the cut.
2.b. I would also guide bushings on the router.
2.c. I would build a template out of 1/4" hardboard,
with MDF guides to position the template over the cutting board.
2.d. I would probably route "free-hand", looking at the work,
rather than using a router table.
3. Plan out your board and template:
3.a. Make a full size sketch of the cutting board, with juice groove,
with the center line of the groove.
You need to mark the center point of the radius of the curve.
You can do this on paper or on a computer.
If you are using paper, make a couple of copies.
3.b. Draw the template edge.
This is measured by adding the radius of the BUSHING (not the
CUTTER), to the center line of the juice groove.
Note: The cutters and bushings are measured in diameter,
so you have to divide by two.
You will also need to make a circle at that radius at the corners,
so if you are using paper, you can have some fun with a compass.
4. Cut out the template:
4.a. Make a copy and attach to the hardboard with spray adhesive.
4.b. Make a starting hole, somewhere inside the waste area.
4.c. Cut close to the line with a jigsaw or coping saw.
4.d. Fine tune by sanding to the line.
5. Make some test pieces.
5.a. First, use any cheap scrap to see if it looks right.
Keep the router bushing tight against the template!
If not, go back to your drawing and adjust accordingly.
5.b. Once it looks right, make a test cut in some scraps of your
final material. What you are looking for here is this:
- Can you make the full cut in one pass?
If so, you are less likely to have ridges that you will need to smooth.
- Do you get a lot of burning?
The faster you go, the less burning you will get,
but you will have less control and be more likely to wander.
You can accept some burning and do one final pass "climb cutting"
(going in the reverse direction).
6. Go for it!
6.a. When you are happy with the test piece cuts,
make your final piece.
6.b. It will probably need some sanding, so do this:
- Get a dowel with the same diameter as the cutter.
- Cut a short piece, wrap it with fine sand paper.
- Lay it in the slot and sand back and forth.
- The corners will just require some careful dexterity
in order to preserve your lines.
6.c. Finish: mineral oil.
 Contributor
A few weeks ago, I put a juice groove in a cutting board using the edge guide in my router kit. I layed out the lines and used the plunge base on the router.
Thank you,
Rich Aldrich
65 miles SE of Steve Schlumpf.
"To a pessimist, the glass is half empty; to an optimist, the glass is half full; to an engineer, the glass is twice as big as it needs to be." Unknown author
[OP]
Member
Hi Carl
That you for the detailed instructions, but what kind of bit did you used?
Thanks
Richard
[OP]
Member
Hi Rich
With the edge guide, How idid you make the turn?
Thanks
Richard
I would use a template bushing and a template to do this with a round nose bit using a plunge router.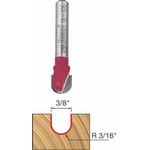
Lee Schierer
USNA '71
Go Navy!
My advice, comments and suggestions are free, but it costs money to run the site. If you found something of value here please give a little something back by becoming a contributor! Please Contribute
Member
I used a Bosch "Core Box" router bit. I have no idea why these bits have this name. I have used them with and without bearings. See the attached image.
Member
Core box bits are used in the patternmaking trade. They cut a half round depression, called a core print, in a core box to support and locate a core when making hollow castings.
 Member
When I was making all my cutting board I found that just about every board I made was a different size. So I would make a new template for each board out of 1/2" MDF. I use turners tape to tape it to the board, centered all the way around.
I then used my Bosch Colt with a bushing on it and cut the groove with a 3/8" bit like the one Lee showed.
The thing you have to watch out for is burning, it is very easy to burn the corners and they are really hard to sand. Take very light cuts and keep moving. Slow the router down also helps the burning problem.
Here is a drawing of the way I cut them and it worked very well for me.
http://www.pbase.com/wlhuber/image/86916112
[OP]
Member
Thank you for all the information
Contributor
In Rich's case it's to keep the turnip juice from making a mess when he cuts into his pasty...Originally Posted by Rich Aldrich

..
..
..
..

 Member
Bill, that pictorial you made is excellent. It makes the process instantly understandable. Mere verbal descriptions had me wondering.
Question: Why do you turn the board/template 180 degrees?
 Member
Yes, why wouldn't you just follow the template all the way around?
Member
I make the first cut and the flow just works better for me to pull the router down and around then to push it up and around.
I started out making the full groove in one pass, down and around and back up but I found I was still have a problem in the one corner with burning. Once I started doing it in 2 steps I was able to make the groove without any burning at all.
I also had a little problem with the one corner getting a little wide when I made it and started back up.
I am sure that is just me and most could do it in one complete pass.
Member
Sorry to break the news, but you are not as unique as you may think.
I've encountered the same problems that you describe and will be putting your solution into practice. Thanks for the post.
 Posting Permissions

 Reply With Quote

