Page 1 of 2 12 LastLast
Results 1 to 15 of 17

Thread: End caps on kitchen cabinets

  1. #1
    Join Date
    Sep 2006
    Location
    Sacramento, CA
    Posts
    207

    End caps on kitchen cabinets

    How do you make end caps on kitchen cabinets? I've seen many cases where the exposed end caps are simply edge banded plywood which seems rather plain. Also, if you chose this approach and your cabinets are made of prefinished maple with say, cherry face frames & doors/drawers, do you build the cabinet with the exposed side constructed of cherry ply, or is the entire cabinet made of maple with an extra piece of cherry covering the end? My wife wants me to tackle a fairly small kitchen, and I question my design/building expertise. Attached are some examples of "end caps" none of which seem quite right.

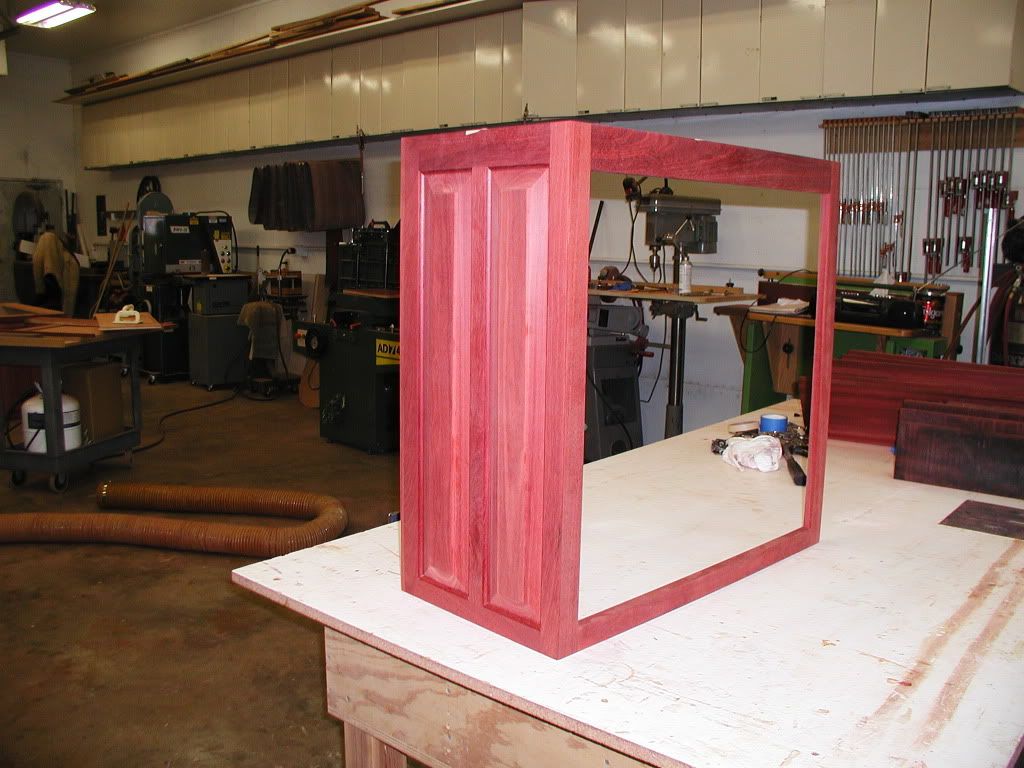
    Exhibit A: Mitered "folded face frame w/ 1/2" ply insert - I like this look but getting 1/2" stock might be problematic
    IMG_2065.jpg
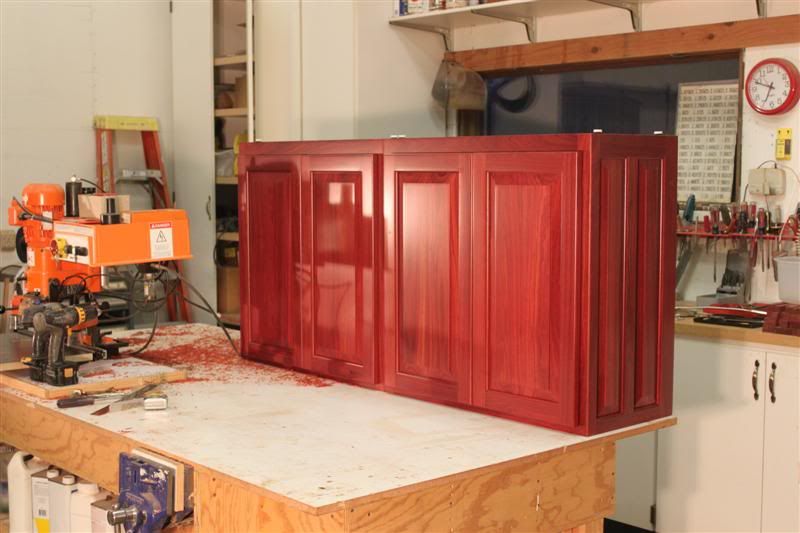
    Exhibit B: 3/4" trim on top - looks heavy

    Exhibit C: Face frame sticks out 1/2", horizontal pieces glued on - looks a bit cheezy _ and yes, I know the top is too light - I thought 1" would make it look top heavy & used 3/4" - I'll replace it someday (maybe)

    Also, LOML wants birdseye maple cabinets. Is this a really bad idea? I mentioned the cost of birdseye maple ply and she shrugged & asked "How many sheets do you need? I was thinking 3/4" birdseye for endcaps, 1/4" birdseye for doors, solid maple face frames and 1/2" birdseye ply (assuming I can find it) set in a rabbet in solid maple frames for drawers. All the solid maple would be plain w/birdseye only on the ply. I have a well equipped shop in a 2 car garage, and spray equipment but no place to spray. I'd need to make the cabinets one at a time & rent a storage facility for storage.
    Attached Images Attached Images

  2. In your three examples..........

    In exhibit B, the corners of the frame pieces were done with a router AFTER assembly. The rounded corners of the frames therefore look kinda cheap. Do it right -- create the profiles before assembly, and do whatever is needed to get the corners right.

    I can't tell much about exhibit C, since the pic doesn't show much detail. But overall, that pic looks good.

    Exhibit A is what I like, although I have no idea what you are talking about when you call this a "mitered folded" face frame. To me it looks like traditional design.

  3. #3
    Join Date
    Feb 2008
    Location
    Northwestern Connecticut
    Posts
    7,149
    I make a finished end panels exactly like one of the cabinets to which it will be applied. Frame and raised or flat panel. You can then either miter the corner of the face frame and end panel and glue them together, or run a rabbit on the back of the face frame, leaving maybe 1/4" from face to back, then glue the end panel in to the rabbit and flush trim later. For an open book case like your third picture you can take a different approach, but for basic kitchen cabinets with pre-finished maple interiors I find an applied end panel the simplest method. Its easy to construct in the context of making the doors, just size the corresponding FF parts accordingly.

  4. #4
    Quote Originally Posted by Dave Anthony View Post
    or is the entire cabinet made of maple with an extra piece of cherry covering the end?
    I like the approach of a full box, end to end of maple, then a non-structural cherry covering. The last thing you need to do is crack a nice granite counter top because the cabinet settled differently at the ends, and stressed the counter.

  5. #5
    Quote Originally Posted by Peter Quinn View Post
    I make a finished end panels exactly like one of the cabinets to which it will be applied. Frame and raised or flat panel. You can then either miter the corner of the face frame and end panel and glue them together, or run a rabbit on the back of the face frame, leaving maybe 1/4" from face to back, then glue the end panel in to the rabbit and flush trim later. For an open book case like your third picture you can take a different approach, but for basic kitchen cabinets with pre-finished maple interiors I find an applied end panel the simplest method. Its easy to construct in the context of making the doors, just size the corresponding FF parts accordingly.
    I'd echo Peter's suggestions. Applying a panel and mitering the corner of the ff is exactly what I've done in the past.
    Attached Images Attached Images
    [SIGPIC][/SIGPIC]

  6. #6
    Join Date
    Dec 2009
    Location
    Columbus Ohio
    Posts
    192
    Quote Originally Posted by David Thompson 27577 View Post
    although I have no idea what you are talking about when you call this a "mitered folded" face frame. To me it looks like traditional design.
    I would say that he is refering to the mitered corner wrapping around from the front to the side. This way there is no "joint" on the side where an "applied" face frame would show one.

  7. #7
    Join Date
    Feb 2003
    Location
    Eagle River, Alaska
    Posts
    731
    My current project is a blood wood kitchen for my wife. I lock miter the end panel to the fame and then put the whole mess on to the cabinet box.


    Rich
    ALASKANS FOR GLOBAL WARMING

    Eagle River Alaska

  8. #8
    Join Date
    Sep 2009
    Location
    Three Rivers, Central Oregon
    Posts
    2,340
    Richard, how do you do your ff miters? Do you use splines, dowells, or biscuits to align them? How do you clamp it up? Awhile back I made a prototype miter face frame/end panel from poplar in anticipation of using this method on my kitchen cabinets; I ripped the ff's at 45 on the ts, glued & lined them up by hand, shot a few pin nails, then clamped it up. The edge wasn't perfect and I had to sand a slight easing on the edge. I was hoping to get a sharper edge. I probably need to practice a few more times. Any tips you can pass on?

    Thanks
    Scott Vroom

    I started with absolutely nothing. Now, thanks to years of hard work, careful planning, and perseverance, I find I still have most of it left.

  9. #9
    Join Date
    Feb 2003
    Location
    Eagle River, Alaska
    Posts
    731
    Quote Originally Posted by scott vroom View Post
    Richard, how do you do your ff miters? Do you use splines, dowells, or biscuits to align them? How do you clamp it up? Awhile back I made a prototype miter face frame/end panel from poplar in anticipation of using this method on my kitchen cabinets; I ripped the ff's at 45 on the ts, glued & lined them up by hand, shot a few pin nails, then clamped it up. The edge wasn't perfect and I had to sand a slight easing on the edge. I was hoping to get a sharper edge. I probably need to practice a few more times. Any tips you can pass on?

    Thanks
    I use a 45 degree lock miter on my shaper. The photo show how I clamp the corner.

    Rich
    ALASKANS FOR GLOBAL WARMING

    Eagle River Alaska

  10. #10
    Join Date
    Sep 2009
    Location
    Three Rivers, Central Oregon
    Posts
    2,340
    I notice you only clamp one direction...interesting.

    Very nice work...thx for sharing.
    Scott Vroom

    I started with absolutely nothing. Now, thanks to years of hard work, careful planning, and perseverance, I find I still have most of it left.

  11. #11
    Join Date
    Feb 2003
    Location
    Eagle River, Alaska
    Posts
    731
    Scott, I forgot to mention that I's hard to get a perfect edge with the lock miter cutter without some minor tear out at the sharp point of the miter. I always run a 1/4 inch round over on the corner for a couple reason. It's gets rid of any tear out, it looks more finished to me anyway and sharp corner can be damage more easily and a rounded corner will hold finish better. As the finish dries it wants to pull back form the edges.
    Rich
    ALASKANS FOR GLOBAL WARMING

    Eagle River Alaska

  12. #12
    Join Date
    Sep 2009
    Location
    Three Rivers, Central Oregon
    Posts
    2,340
    Richard, do you use a hand held router for the 1/4" roundover?

    How do you like living in Eagle River? My son hitchhiked through there a couple of years ago and said it was incredibly beautiful country.
    Scott Vroom

    I started with absolutely nothing. Now, thanks to years of hard work, careful planning, and perseverance, I find I still have most of it left.

  13. #13
    Join Date
    Feb 2003
    Location
    Eagle River, Alaska
    Posts
    731
    Quote Originally Posted by scott vroom View Post
    Richard, do you use a hand held router for the 1/4" roundover?

    How do you like living in Eagle River? My son hitchhiked through there a couple of years ago and said it was incredibly beautiful country.
    Yes, hand held router. For that and a lot small edge profiles I use a porta cable 310 trim router.

    Yes I like living here. I've been here since 1974. My only regret is we don't have any hardwoods (for cabinet and furniture building) up here. I'd love to live in Amish country were you can go right to a mill and get lumber.
    Rich
    ALASKANS FOR GLOBAL WARMING

    Eagle River Alaska

  14. #14
    Join Date
    Feb 2003
    Location
    Eagle River, Alaska
    Posts
    731
    Scott, one more piece o advice if you use a lock miter. The way the joint is designed it can trap glue in the joint and can be difficult or darn near impossible to get it together if you use to much glue.

    Go easy on the glue, it doesn't take that much.
    Rich
    ALASKANS FOR GLOBAL WARMING

    Eagle River Alaska

  15. #15
    Join Date
    Sep 2009
    Location
    Three Rivers, Central Oregon
    Posts
    2,340
    Richard, thanks for all the good tips
    Scott Vroom

    I started with absolutely nothing. Now, thanks to years of hard work, careful planning, and perseverance, I find I still have most of it left.

Posting Permissions

  • You may not post new threads
  • You may not post replies
  • You may not post attachments
  • You may not edit your posts
  •