
To mitigate the valid issue Michael brings up, use a flexible adhesive, like a thin bead of silicone just around the inner edge of the metal piece (i.e., not slathering the entire back).


To mitigate the valid issue Michael brings up, use a flexible adhesive, like a thin bead of silicone just around the inner edge of the metal piece (i.e., not slathering the entire back).
Hi-Tec Designs, LLC -- Owner (and self-proclaimed LED guru)
Trotec 80W Speedy 300 laser w/everything
CAMaster Stinger CNC (25" x 36" x 5")
USCutter 24" LaserPoint Vinyl Cutter
Jet JWBS-18QT-3 18", 3HP bandsaw
Robust Beauty 25"x52" wood lathe w/everything
Jet BD-920W 9"x20" metal lathe
Delta 18-900L 18" drill press
Flame Polisher (ooooh, FIRE!)
Freeware: InkScape, Paint.NET, DoubleCAD XT
Paidware: Wacom Intuos4 (Large), CorelDRAW X5
 Member
During a Roy Brewer seminar, I saw a demonstration of laserbits laser foil in polished gold. It looked pretty good. Lasered pattern in wood and then placed foil over wood and then vector cut foil. You might then be able to clear cost wood and foil.
Another method might be to engrave wood and fill with gold guilders paint, prior to sealing box.
GDG
 Moderator
I would not be concerned with wood movement in this application. Having done numerous inlays with metal, plastic, abalone, and wood I have never experienced any visible wood movement, even after years. Wood movement is greatly affected by humidity but in this case ambient conditions and the finish of the wood largely negates that.
Foil is not a suitable material for this application as it is not durable enough to be handled. It could be used if it were covered with glass or acrylic. Another option is encasing the logo in acrylic.
Last edited by Mike Null; 01-27-2011 at 9:16 AM.
Mike Null
St. Louis Laser, Inc.
Trotec Speedy 300, 80 watt
Gravograph IS400
Woodworking shop CLTT and Laser Sublimation
Dye Sublimation
CorelDraw X5, X7
 [OP]
Member
[OP]
Member
I want to thanks everyone for all the input. Unfortunately I live up in the boonies and no fab shops nearby. I hope I can convince the customer to use an inlace type material but I told them I would research the metal inlay option (which is their first choice).
Anyone have a photo of a project done with the laser foil? I've seen it in their catalog but have never tried it. I suppose I could order a sheet and give it a try.
BTW -- the boxes will be fabricated locally. I could send the pieces to someone with a CNC router to do the recess. The only issue I have with routing is getting the fine tips on the points using a round router bit. The art I show on my post is quite similar to the styl;e of the customers logo.
Thanks again for all your help.
Jeff in northern Wisconsin
SawmillCreek.org
[SIGPIC][/SIGPIC]
45W Epilog Helix
Corel X4, Photoshop CS3
Sherline 4400 lathe
JET 1221 Lathe
JET 1014 Lathe
Craftman 36" VS lathe
Member
It really depends on the customer's budget - obviously metal inlay will cost much more so it depends on whether the customer wants a high-end box (metal inlay) or inexpensive box (foil decal). Metal inlay will cost 10x-20x as much as foil decal because of increased material cost and much more labor. The budget will help define the method, in my mind.
If you go metal, I would do research on inlays for guitars. This has been done for ages and they know the tricks. I borrowed a book once on inlays for musical instruments and the work is amazing. You might see what they use for adhesives. In the book I had, I believe the author used cyanoacrylate adhesives. Of course, they don't usually use lasers to cut pockets.
Depending on how thick you need the parts to be, I would seriously look at photoetching (Michael called it chemical milling). And yes, that is how brass Christmas tree ornaments are made. If you do an image search on "photo etched parts" you will get the idea. Thinner is cheaper and more practicable - you night need .010" or .020" - I'm not sure. You are probably not near a photo etching facility but that should not stop you. The tooling is basically artwork (film) and costs only a couple hundred dollars and parts are cheap to mail.
If the brass is sanded after installation it will need to be coated with lacquer or something to prevent tarnishing. But since you will be finishing the wood anyway they would be coated together.
I agree it will be challenging and time comsuming, but if you can work out the process details it will have the best appearance.
I don't think casting little parts would be suitable, but if the customer was willing to insert a cast medallion then you could make a simple pocket and not worry about depth. One manufacturer is AT Designs (atdesigns.com). Tooling is not expensive - sometimes there is no die charge.
Member
Michael - not sure if this idea will work for Jeff as he has lots of pockets but I thought I'd throw it out. The musical instrument guys that do inlay cut their outlines with X-acto knives and carve the inside with Dremel-tools on a router base. (The challenge is not to run the router into the edge of the pocket.)Originally Posted by Michael Simpson Virgina

How about this: Raster the pocket as usual with the laser, but leave some high pads in selected areas, away from the edges. (These might be entirely un-lasered areas.) Then use the Dremel-router (or cnc mill) to shave the pads to the right depth relative to the surface. Fill the pocket with adhesive to the height of the pads (difference should be less than .010"). The inlay will sit on the pads in a defined position.
Moderator
NJ Nat'l Guard.JPGjds foil.jpgNW fire foil.jpgHere is a link to a previous thread on inlaying abalone using a laser for rastering the opening and cutting the abalone.
http://www.sawmillcreek.org/showthre...ng-a-fretboard...
And a photo of foil. This foil is not more than .004" thick and is intended for surface application with a vector cut and weeding.
Mike Null
St. Louis Laser, Inc.
Trotec Speedy 300, 80 watt
Gravograph IS400
Woodworking shop CLTT and Laser Sublimation
Dye Sublimation
CorelDraw X5, X7
Guest
Check this out. Very interesting.
http://www.elvesofester.com/coldinlay.html
[OP]
Member
You guys are full of ideas. I'm going to work on some samples (foil & inlace) and other ideas and see that the customer thinks. The end user is a jewelry maker in Europe. I'm only a small link in the whole project.
Thanks again,
Jeff in northern Wisconsin
SawmillCreek.org
[SIGPIC][/SIGPIC]
45W Epilog Helix
Corel X4, Photoshop CS3
Sherline 4400 lathe
JET 1221 Lathe
JET 1014 Lathe
Craftman 36" VS lathe
 Member
another option is to engrave too deep and then seal the inlay area with
cyanoacrylate glue (I'd use thin superglue) and then flood with more CA
while the piece is on a level surface. That will give you a consistent depth
and a level sub-surface on which to apply the inlay.
Someone else mentioned Rub-n-Buff. This will look great UNTIL you apply
a top coat. That stuff turns into a dull muddy wash when you apply any
solvent based coating. It no longer looks metallic and it no longer stays
where you originally put it. (try it on some scrap)
One way around this is to use a water based over-coat to seal the Run-n-Buff
before applying a top coat. I've used Modge Podge with limited success, but
had better luck with 'padding cement' from a printer. That's used to edge bind
paper sheets together into a pad of paper. It will dry clear and give you an even
protective (if somewhat flexible) surface to work with.
I don't think I'd use it in this particular application.. but it's a good tool to have
for other projects where you want to use metallic paints or Rub-n-Buff and
don't want it smeared by your top coat.
I like the cold cast inlay idea (but then, I've been doing lots of cold cast lately)
but it would take a LOT of metallic powder, since it settles. I usually work from
the back of the casting, so the metal settles to the front. (thanks, gravity!) but
to fill from the top and have the metal show would take a LOT of metal in the resin.
Wish I could find a 'how-to' for the chemical milling.. that kicked several ideas in
my mind if I could only find some info on doing small quantities in my shop..
Friend of The Creek
Chuck
The principals of photo-etching/chemical milling are just the same as producing printed circuit boards for electronics projects. There are plenty of places that sell "starter kits" for etching PCBs so the equipment and chemicals are not too hard to get hold of.
You need to mask both sides. The simple way (so long as there is not too much fine detail) is to get two copies of the artwork on clear film (one mirrored) and staple these together to form a pocket that you slide the metal sheet (with photo-resist on) into. That way you get pretty good alignment without too much hassle.
The traditional etching stuff is ferric chloride. Unfortunately this is not the best for chemical milling as it undercuts the edges badly (as well as being horrible stuff generally). There are better etching solutions available - you just need to explain what you are trying to do.
Contributor
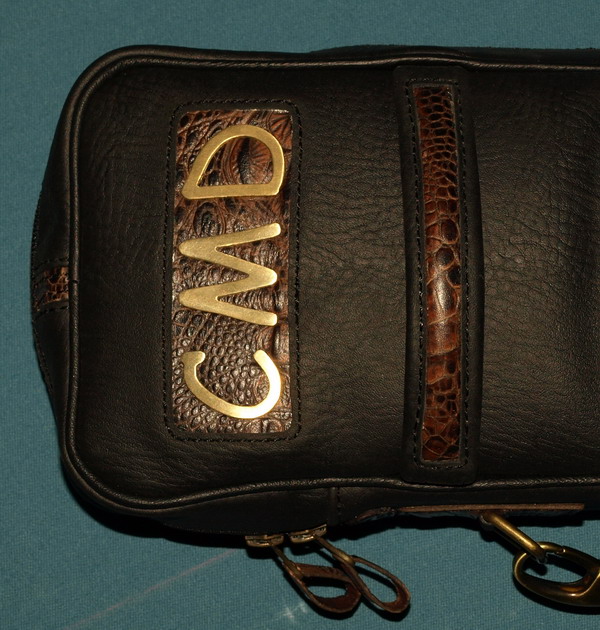
These letters were cut by laser. We have a friend who has a laser the size of a small apartment. He cut the three letters for me and welded tabs on the back. I deburred and cleaned them up with a dremel. Took me about 30 minutes to get all the edges smooth the surface polished to my liking.
Running Chinese 100w - Glass Tube - in China
Also have - Universal 660 - in USA
[OP]
Member
George D Gabert
During a Roy Brewer seminar, I saw a demonstration of laserbits laser foil in polished gold. It looked pretty good. Lasered pattern in wood and then placed foil over wood and then vector cut foil. You might then be able to clear cost wood and foil.
Another method might be to engrave wood and fill with gold guilders paint, prior to sealing box.
I tried some Laserfoil but I just vector cut it. If you raster out a recess, doesn't the foil get the texture off the bottom of the recess when you burnish it? Seems it would. I have a roll of Laserfoil on order so I will have some to play with.
Jeff in northern Wisconsin
SawmillCreek.org
[SIGPIC][/SIGPIC]
45W Epilog Helix
Corel X4, Photoshop CS3
Sherline 4400 lathe
JET 1221 Lathe
JET 1014 Lathe
Craftman 36" VS lathe
Member
Jeff
I only saw a demonstration on cutting the material. It looked pretty nice from a distance. Someone also stated that it was only .004 thick, there for it could be vector cut and when you place the finish on it will look like it was recessed into the wood.
GDG
Member
I was just too stubborn to let it go..
Well .. everything about this was a pain in the butt! Registration was a head scratcher..
especially since I did it on a shoestring. No photo resist, no ferric chloride, but I had
some hydrochloric acid in the shop. I mixed that with hydrogen peroxide and it worked.
I ended up using a polyester adhesive sheet for a mask. Some kind of glossy inkjet
sticker material, I think. I used the glossy because I was pretty sure the acid wouldn't
soak in. That part worked well.
Next time I do this, I won't do 3/8" text with individual letters in a special font.
I'll probably weld the letters together, underline them .. anything to keep them in
one piece! (but this was someone's business logo/lettering, had to do it)
ps .. do you know what it's like to test fit 30 letters into a piece of wood and at the
very end, realize that you're short ONE letter .. and you're standing over a 6" deep
pile of sawdust and wood shavings?CD Boxes.jpg
 Posting Permissions

 Reply With Quote