Page 1 of 2 12 LastLast
Results 1 to 15 of 20

Thread: Shop Layout Opinions

  1. #1

    Shop Layout Opinions

    Well, after a year I've (sort of) settled in to my new house and, of course, workshop. Now I'm embarking on a variety of upgrades and taking another hard look at how the shop is layed out. Like most of you, I've got some constraints to work around such as overall size and a pesky slope in the floor, but it's still a very workable space.

    I've created this scale drawing as a way to help myself plan and visualize. I figured that I'd let the experts here have a crack at it as well. After all, the more eyes and experience the better, right? So how about it? What would you do different? Do you see any big issues?

    Quick Facts
    ---------------
    • The shop is primarily used to build furniture and cabinets, work on home improvement projects, and make other small items.
    • There are plenty of brand new 120V outlets around the walls *except* near the toolboxes.
    • There are four 240V drops. One for the table saw, one for the dust collector, one for the compressor, and one for the welder.
    • There is a substantial beam that supports the second story above the shop. It runs on the ceiling near the gray cabinet to the wall with the window.
    • I usually bust down sheet goods on sawhorses just outside.
    • I don't keep a tremendous amount of lumber on hand, but the lumber rack (a Triton from Rockler) and my cutoff bin are always overflowing it seems.
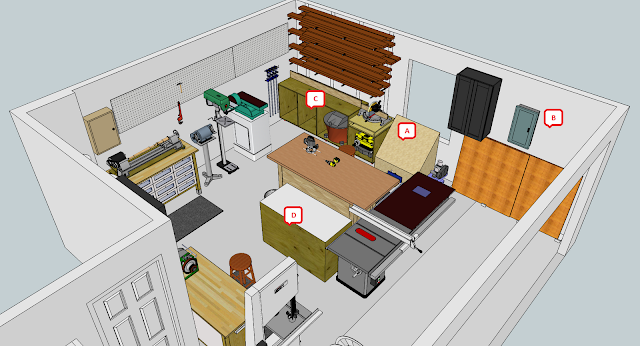


    Picture 01
    ---------------
    A. This is a 9 compartment cutoff bin on wheels.
    B. This is the electrical subpanel.
    C. This shop-built stand will serve the miter saw, planer, and possibly other benchtop tools.
    D. This is a outfeed and assembly table on wheels.


    Picture 02
    ---------------
    A. The floor does have a 5-inch rise over 5 feet. It's a pain.
    B. This is a fridge that my wife and kids access from time-to-time.
    C. This workbench is intended to be used for plans, a place to set a drink, and so forth.
    D. The goal is to fit an 18-inch bandsaw here.
    E. The saw is a Unisaw. The left-hand wing is a Bench Dog cast iron router table. There's also a router table on the right wing.
    F. This lockable metal cabinet holds chemicals and handheld power tools.
    G. This is the primary, shop-built workbench with storage underneath.
    H. The pegboard holds a variety of hand tools and miscellaneous goodies.


    Picture 03
    ---------------
    A. This is a 60 gallon, 5HP compressor that distributes air via hard plumbing around the shop.
    B. There are two tool chests. One holds machinist and layout tools. The other holds mechanic's tools. The shelf above them holds hardware.
    C. The whiteboard is there for taking notes and whatnot.
    D. The dust collector is an Oneida "portable" dual cyclone. It is NOT currently plumbed in.

  2. #2
    Join Date
    Mar 2009
    Location
    Aurora, Colorado (Saddle Rock)
    Posts
    514
    Here are just a few thoughts.

    Try to keep all of your dust-producing tools close to the DC. It gets old FAST if you have to cart that thing all over the place.
    • Duct work is crazy expensive and you'll save many hundreds of dollars if you ever get around to it.
    Oh, and DC's and Lathes laugh at eachother. Moohahahaha!

    Your cyclone is tucked back there... and you'll need to empty it so make it easy to get to.

  3. #3
    Hi Greg, the layout looks pretty good to me

    In a smaller workshop they best way to get the most out of it, I find is to utilize your wall space. Get as much as you can off the floor and onto the walls. Personally I dont like pegboard, I am slowly replacing my pegboard with overhead kitchen style cupboards and it allows me to store a lot more off the workshop floor freeing up some much needed workspace. Dont forget you need space for project assembly etc...


    Joez

  4. #4
    Join Date
    Aug 2007
    Location
    Raleigh, NC
    Posts
    159
    I'd consider rotating the table saw, outfeed table and work bench 180 degrees, so that when making a cut you face the garage door. This makes for a more natural flow, taking the lumber from the rack to the miter saw for rough cutting to length, and then to the table saw for final cutting. It also means you're not standing on the sloped floor all the time. In fact, if you lengthen the legs on the outfeed table & work bench (and cut them at the right angle), you could move them onto the sloped area a couple of feet and gain some space. Any chance you can put the DC in the corner where the electrical panel is? It makes cleaning the filter and emptying the drum a lot simpler.

  5. #5
    @Philip
    I hear what you're saying, but I don't know that I can cluster the dust producing tools much closer to the collector. In fact, this is an area where I really struggle. I'm not sure how I'm going to get that big collector routed effectively to tools like the miter saw and whatnot.

    @Joe
    You're absolutely right. I'm not taking very good advantage of the wall space. I'll probably take down the pegboard and hang cabinets on French cleats when I get the time. Personally, I like using pegboard to fill in spaces that are too awkward for shelves and too small for cabinets.

    @Bas
    I've tried that before in my shops and I just don't care for it. I think the biggest reason is because having them rotated means that I'm carrying sheet goods back through the shop and then feeding them through the saw. I'll play with it in the SketchUp model, though. You make a really good point about the sloped floor. I'll also play with moving the dust collector. My concern there is that is where I currently store sheet goods. I hate moving those heavy suckers any more than I absolutely have to.

    Great suggestions, guys! I really appreciate the feedback!

  6. #6
    Join Date
    May 2006
    Location
    Salem, Oregon
    Posts
    93
    Where's the jointer? <in voce de Clara Peller's famous "Where's the beef?">
    John L. Poole

  7. #7
    Quote Originally Posted by John Poole View Post
    Where's the jointer? <in voce de Clara Peller's famous "Where's the beef?">
    Yeah, funny thing about there. Currently there isn't one. Well, to be 100% accurate, there were two; a Craftsman 6-1/8 and an old Delta 6 incher on a closed base. The Craftsman got sold and the Delta, while still available, has quite a bit of rust pitting in the table.

    I'd love to incorporate a jointer again, but I'm not sure where it'd go.

  8. #8
    Hmmm... actually, if I find an alternate solution for the cutoff bin, I think that i could park at least a 6-inch jointer in front of that window. Time to play some more in SketchUp. Oh, thank goodness for great, free software!

  9. #9
    Good job with the setup, you really have things laid out. I too have a large beam cutting across my garage and had to decide to have the DC and major power tools on one side or the other. I built a plywood chase around the beam and ran my ducting into it with several drops to my major tools. The nice thing about the plywood is it gives you a bunch of space to hang levels, straight edges, and in my case a bunch of Festool rails. If you screw 2x2 cleats into the ceiling on either side and make a 3 sided box with 3/4" ply it is pretty strong.
    It seems like maybe moving your black storage cabinet to where your Cyclone is will shorten your ducting runs. If you have a drop for the bandsaw then a 90 out into the room you can have 1 or 2 drops for the TS/routers and a final drop to the SCMS/planer which will cover your main dust makers. Swapping your table "C" with your belt sander will let the bandsaw and sander share a drop ( take the 6" to a 6-4-4 Y) and give you space to move the bandsaw a bit out of the traffic lane to your door.

    Just a couple ideas, good luck.

  10. #10
    Join Date
    Mar 2009
    Location
    Aurora, Colorado (Saddle Rock)
    Posts
    514
    Greg,

    I have an 3 hp Oneida that has 5 drops. 2 drops to my TS, 1 to the Jointer, and one to the Planer. The other tools are moved over to the 5th. In your shop, I would feed the stationary tools and put in a central drop for the other stuff.

  11. #11
    Join Date
    Feb 2007
    Location
    Denver, CO
    Posts
    175
    It looks like your workbench (G) is higher than the table saw. It would seem that it would limit cutting sheet goods or cross cutting anything wide. If the workbench is the same height, then you have a really cool outfeed table.
    Gary

  12. #12
    Join Date
    Sep 2009
    Location
    Atlanta, GA
    Posts
    6,424
    I assume that the door by the fridge enters into the house, not the outside, and I assume that the only direct exterior access is what must be a garage door [you didn't specifically say this is a garage, but obviously, it must have been in a former life]. And, I am assuming you have overhead tracks/rails for a full-span garage door.

    You might benefit from playing a bit of "what if". As in - what if that sloped floor wasn't there?. 5' deep by what - 18'? 20'? Just eyeballing it, that space would increase the area of the main shop floor by 25% - 30%. Ho.....Lee....Cow.

    If it was me, I'd take some time on the drawings to see what life would look like if I had that space to work with. If nothing else changed in the shop, at the very least there would be a great place for the BS and that jointer that was discussed. Other improvements to material flow or assembly area might become apparent as well.

    I suspect that there are ways - "relatively" inexpensive and straightforward - to frame + shim a wood filler for that slope - one that is more than sturdy enough to support machines. Once you ingore the slope in some layout games, I'd also suspect that it starts looking very worthwhile to pursue.

    The biggest problem I see is if that large overhead door is the only access to the outside. It sure seems to me that there must be another way out, but that isn't apparent from the drawings. It would be annoying to raise that big door to get stuff in and out - but you are dealing with that situation already, so you haven't lost any ground.

    OTOH - the big "what if" would be: What if I left that overhead door in the overhead position, framed in that big hole with a wall and a 36" door............something that could be demolished if need be when the house is sold..........
    When I started woodworking, I didn't know squat. I have progressed in 30 years - now I do know squat.

  13. #13
    First, let me state that as I was setting up shop I changed things many times before I got things right (for me). Likewise, I continue to tweek things.

    I'd focus on where you can position tools so that they work well and you can have efficient dust collection. I like where your table saw is positioned (maybe because mine is in a similar place in my garage). Maybe scrap the outfeed table and just rotate the workbench 90 degrees so it serves as the outfeed table (I also did this for a while and liked it). I would also scrap the "plans" bench as it seems to take up a lot of room and not serve too much of a purpose (you could put plans on the cabinet by the lumber rack and maybe move the DC there to give you more of a tool cluster). Also, not sure how the cut-off bin works but maybe position it in front of the sheet goods as it is on wheels and can be moved or incorporate a flat top that can double as a place to lay your plans or a benchtop tool. I like the alcove with the tool boxes and compressor.

    Play with the plans and keep moving things around - you would be surprised what you might like when you move things to different places.

    Mike

  14. #14
    @Kevin
    Those are some really good ideas for dealing with the beam. Now, the beam itself is 13 inches tall so it's not completely awful, but it sure does make it tricky for dust collection. I'm going to give your ideas some serious consideration.

    @Gary
    Actually, the workbench is about 1/8 inch below the top of the tablesaw by design. In a pinch, it can be used as outfeed.

    @Kent
    All of your assumptions are 100% correct. You make a really excellent point about playing "what if" games. After all, why go through all the trouble of building a scale 3D model if you don't use it right? I've given serious consideration to framing that wall in. In fact, I've thought about that in conjunction with leveling the floor, but I haven't convinced myself just yet. Maybe some more "what if" work will push me over the edge.

    @Mike
    That's my favorite position for the tablesaw. It truly takes center stage and gives me full access to both router wings. The outfeed table doubles as small assembly and there's quite a bit of storage underneath for my sanders, circular saws, and so forth. As for the "plan" bench, it's really just 24^2 in on top for a "desk" of sorts. The other half of the top is a modest sharpening station. Underneath, there's quite a bit of storage for screws, nails, and other hardware. I've scrapped the scrap bin (har-har) and used that floorspace for a jointer instead.

    I've made some tweaks based on my own thoughts and, to a greater extent, the feedback I've received. I'm not quite there yet, but your ideas are really helping. Thanks!


  15. #15
    Weird... my post is showing in the middle of the thread and I was replying to people at the bottom. Ummm...

Posting Permissions

  • You may not post new threads
  • You may not post replies
  • You may not post attachments
  • You may not edit your posts
  •