

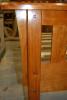

I'm in the process of replacing all of the trim and there are several door locations where the width of the door casing will be wider than the adjacent wall. The overall look resembles the Craftsman style so there will be a plinth block, casing, fillet, frieze, and cap around each door. The door casing is 5 1/4" wide but there are several spots where the wall space on the side of the jamb is only a couple of inches, 2-3.
Is there a standard solution for accommodating a narrower wall than the width of the casing? From what I can think of, there appears to be two options:
1. Rip the casing down and scribe it to the adjacent wall and adjust all other components of the casing, e.g. plinth block, frieze, etc.
2. Wrap the casing to the adjacent wall to match all other casings. I'm not sure if this will look odd but at the same time, doing option 1 may look odd too if everything is considerably thinner.
Additionally, I have an angled wall with a door so the same problem exists at this areas too. I don't know if the solution to this situation differs but option 2 may look better in this instance than option 1.
Any help would be appreciated!
Thanks,
Brett

 Reply With Quote
")


