Page 1 of 2 12 LastLast
Results 1 to 15 of 23

Thread: SawStop Side Table as a Router Table

  1. #1
    Join Date
    Apr 2007
    Location
    Columbus, Ohio, USA
    Posts
    3,441

    SawStop Side Table as a Router Table

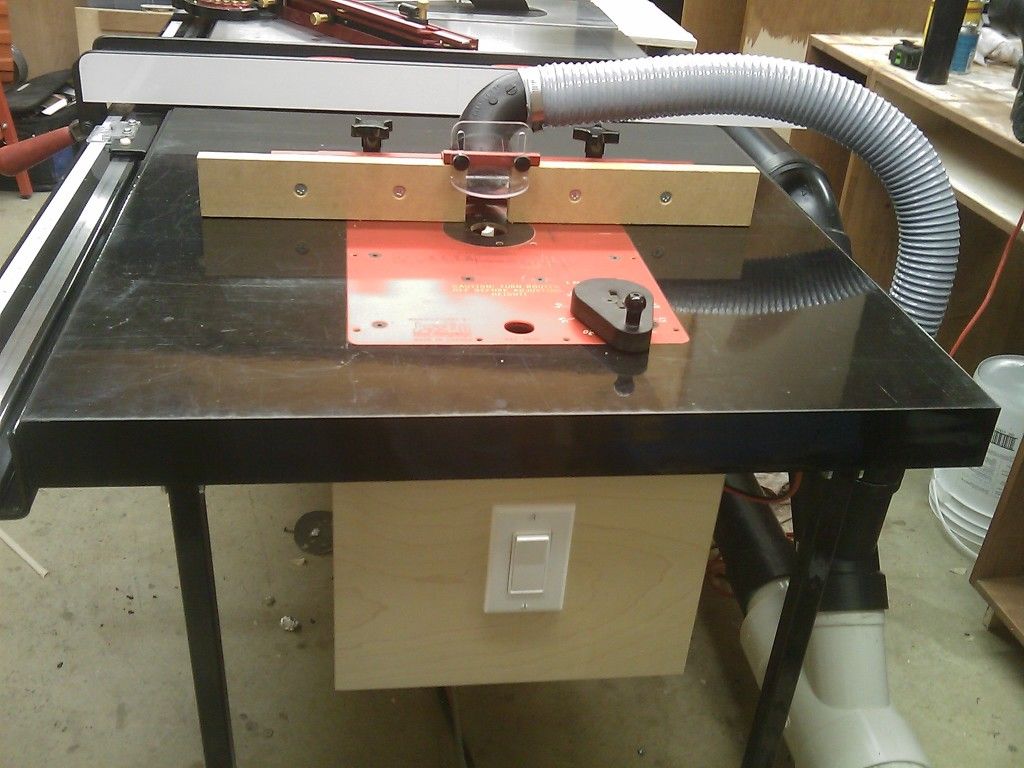
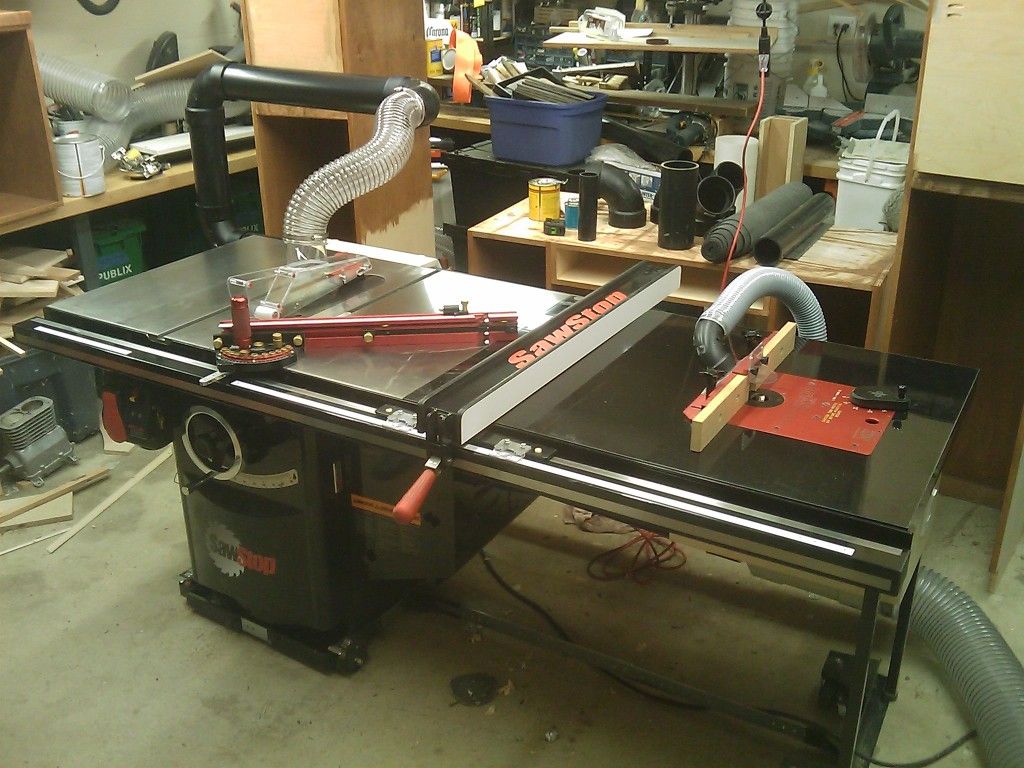
    I built a router table that I installed into my Ridgid table saw, and I really liked it. I am in the process of assembling my new SawStop with a 36" fence. The fence comes with a table top that inserts between the fence rails to the right of the blade. The table is 6" longer my home built router table, so I guess that the SawStop has smaller cast iron wings and/or top than my ridged saw.

    I am considering:


    1. Build a new top. It would fit well, be well built, but take more time than I care to use.
    2. Install the old router top and step between the rails a few inches to use the router.
    3. Modify the side table to be my router table.


    I am considering option 3, but I don't know what is under that shiny black surface and I would need to reinforce the bottom to prevent sagging. I measured things late last night, and I believe that top is probably 3/4" thick material. Will probably enforce the entire center section between the existing support beams, but I might simply add some more support beams so that the supports are directly under the area that would support the router lift. I am a bit concerned as to what the hard shiny material is and how it will route. I hope that the laminate trimmer bits and pattern bits that I have should be able to cut it smoothly, it worked well for laminate on my shop made router table.

    My current router top does NOT have track, which is probably good, because track would not work in the SawStop (because heavy steel angle brackets are used for the fence, and it goes almost to the top of table.... and I don't really want to cut a path like they did for the saw tracks).

    Any thoughts are greatly appreciated.

  2. #2
    Join Date
    Jan 2010
    Location
    Tampa Bay, FL
    Posts
    3,927
    I have a project and blog on another woodworking site that details how I made a router table on the right wing of my 52" SawStop. I used a cast iron router table top and a 3 HP router, so support under the wing was key (it actually lifted the saw into the air and scared the daylights out of me while building it). I don't think I'm able to post the link here, but google is your friend. Just google "Sawstop and Router Cabinet / Infeed Table / Outfeed Table Project" and you'll find it. The blog gives running details of the construction, the project shows completed pictures.
    - After I ask a stranger if I can pet their dog and they say yes, I like to respond, "I'll keep that in mind" and walk off
    - It's above my pay grade. Mongo only pawn in game of life.

  3. #3
    Join Date
    Oct 2008
    Location
    Columbus, OH
    Posts
    3,064
    Andrew,

    I'm not familiar with SS rails, but when I put my Incra rails on my TS I replaced the left wing with a router table. I shifted the rails over to align better with the router table as the rails are the main support for the router table. Can you do #2 and shift the rails to the left? Not sure that if that would help you or create a different issue to deal with.

  4. #4
    Join Date
    Apr 2007
    Location
    Columbus, Ohio, USA
    Posts
    3,441
    Quote Originally Posted by Brian Tymchak View Post
    Andrew,

    I'm not familiar with SS rails, but when I put my Incra rails on my TS I replaced the left wing with a router table. I shifted the rails over to align better with the router table as the rails are the main support for the router table. Can you do #2 and shift the rails to the left? Not sure that if that would help you or create a different issue to deal with.
    Pretty sure that the SS rails will not shift. They screw directly into the center table, and on the left I do not have good access to where the router table would be. Considered scraping everything, however, and building a router / table outfeed table :-)

  5. #5
    Join Date
    Apr 2007
    Location
    Columbus, Ohio, USA
    Posts
    3,441
    Quote Originally Posted by Alan Lightstone View Post
    I have a project and blog on another woodworking site that details how I made a router table on the right wing of my 52" SawStop. I used a cast iron router table top and a 3 HP router, so support under the wing was key (it actually lifted the saw into the air and scared the daylights out of me while building it). I don't think I'm able to post the link here, but google is your friend. Just google "Sawstop and Router Cabinet / Infeed Table / Outfeed Table Project" and you'll find it. The blog gives running details of the construction, the project shows completed pictures.
    Found it, and oh my goodness, now that is very nice. I am totally impressed. I will give that a good read tonight.

  6. #6
    Join Date
    Feb 2009
    Location
    San Francisco, CA
    Posts
    1,408
    Don't worry about the black material - it's just glossy laminate and routs fine. *Underneath is MDF.

  7. #7
    Join Date
    Jan 2010
    Location
    Tampa Bay, FL
    Posts
    3,927
    In particular, read the part of the blog where I used the adjustable feet on the router box to level the table with the table saw table. I thought that method worked out particularly well, and was easy to fine tune to being perfectly level.
    - After I ask a stranger if I can pet their dog and they say yes, I like to respond, "I'll keep that in mind" and walk off
    - It's above my pay grade. Mongo only pawn in game of life.

  8. #8
    Join Date
    Jul 2007
    Location
    Seattle, WA
    Posts
    1,495
    Alan, your tablesaw/router table setup is impressive!

    Does your incra fence come off easily, or do you just not use the wider rip capacity of your tablesaw?

  9. #9
    Join Date
    May 2009
    Location
    Boston
    Posts
    1,740
    Does Sawstop sell the extension table with the router opening already cut? It may be worth trying to get it if its available. Just have to put it together and drip the router in.
    Don

  10. #10
    Join Date
    Apr 2007
    Location
    Seattle suburbs
    Posts
    69
    cutting the hole isn't a big deal - I made a template and routed it out. build a box under the table for dust collection and to hold the switch. I've since made a few mods (changed switches to the nifty push type, made bottom slanted) but you get the idea.


  11. #11
    Join Date
    Nov 2007
    Location
    Buck Lake, Alberta
    Posts
    194
    The black laminate is very easy to use a router on, I never used any special bits and the cuts turned out very smooth.

  12. #12
    Join Date
    Jan 2010
    Location
    Tampa Bay, FL
    Posts
    3,927
    Quote Originally Posted by Peter Aeschliman View Post
    Alan, your tablesaw/router table setup is impressive!

    Does your incra fence come off easily, or do you just not use the wider rip capacity of your tablesaw?
    I have the incra fence attached with 6 screws and captive T-nuts mounted in the bottom of the table. It only takes a few minutes to remove the fence. It is a minor annoyance, but I can use the entire 52" capacity when I need to. You can see the screws on the mounting plate in this photo.
    Incra-Fence.jpg

    Here's a few pictures of the completed system:
    SawStop-Router-Table-Front.jpgRouter-Table-with-Drawers-Open.jpgRouter-Table-Front-with-Gap.jpg

    You can see the intentional gap in the router door to allow air to flow for the dust collection.

    I didn't feel comfortable allowing the router to freely hang in an unsupported box. With the heavy 3-1/4 HP router I have, sagging would have been only a matter of time for the table. Once I chose the cast iron table, there really wasn't another option. I was far happier supporting the box and making the table perfectly level.

    Here's a close up of the adjustable legs. I just dialed in level and locked them down:
    PC7518-in-Router-Table-with-adjustable-legs.jpg
    Last edited by Alan Lightstone; 04-08-2012 at 10:54 AM.
    - After I ask a stranger if I can pet their dog and they say yes, I like to respond, "I'll keep that in mind" and walk off
    - It's above my pay grade. Mongo only pawn in game of life.

  13. #13
    I just completed setup of the SawStop contractor w/36" fence. After seeing the above pics, I had to go check my table. I am planning on replacing the sheetmetal extension & extension with a new router table. My extension table is about 5/8" thick and I didn't think that it would support my Ryobie RE-600 router. Then again, maybe it will since it looks like others have done it.

  14. #14
    Join Date
    Apr 2007
    Location
    Columbus, Ohio, USA
    Posts
    3,441
    Quote Originally Posted by Ken Seiler View Post
    I just completed setup of the SawStop contractor w/36" fence. After seeing the above pics, I had to go check my table. I am planning on replacing the sheetmetal extension & extension with a new router table. My extension table is about 5/8" thick and I didn't think that it would support my Ryobie RE-600 router. Then again, maybe it will since it looks like others have done it.
    I gave my old table to the guy that purchased my previous saw.... It was far more robust (I used 1" MDF and oak for support underneath).

    I went ahead and used the existing table and cut the hole. I still need to adjust the depth, it is a bit high on one end, but, I added a few extra supports that fall almost directly under the rabbits where the router plate sits. I figure that the MDF cannot sag much if it is properly supported.

  15. Quote Originally Posted by Alan Lightstone View Post
    I have a project and blog on another woodworking site that details how I made a router table on the right wing of my 52" SawStop. I used a cast iron router table top and a 3 HP router, so support under the wing was key (it actually lifted the saw into the air and scared the daylights out of me while building it). I don't think I'm able to post the link here, but google is your friend. Just google "Sawstop and Router Cabinet / Infeed Table / Outfeed Table Project" and you'll find it. The blog gives running details of the construction, the project shows completed pictures.
    Alan, I know I am more than a year too late to this thread, but your build (and Ted's) were inspiring. They're the most beautiful projects of their ilk I've ever seen, and ingenious,in so many ways,to boot.

    It's something that would be incredibly useful to me, who is almost certainly even more space challenged than you. I entertained doing something similar until I got honest with myself and admitted I don't have a small fraction of the skill needed. If you sold plans or had measurements I would probably be foolish enough to try.

    Thanks for the inspiration. Maybe one day I'll be good enough.

Posting Permissions

  • You may not post new threads
  • You may not post replies
  • You may not post attachments
  • You may not edit your posts
  •