Would love to seea photo.Originally Posted by Joel Goodman


 Member
Would love to seea photo.
Paul
Member
Russ, can you please describe how you attached handwheels to the screw? I have been trying to figure this out, but could not find any references online. They are not just threaded on, are they? All handwheels I find online seem to have much smaller hole than diameter of the screw.
Member
Yes, sorry I should have mentioned this. One of the things I did not care for on the Benchcrafted design is that the screw is fixed and the wheel travels on the screw leaving the screw in your way. I preferred having the screw travel through a fixed nut let into the rear jaw so that the screw is out of the way of your work and your maximum capacity can be increased without leaving an exposed screw.
The attachment of the wheels to the screw in the wheels I bought is very simple - the screw fits into a recess in the back of the wheel and a hex nut is tightened onto the screw. It is quite solid. I considered drilliing and threading a second hole into the handwheel to provide for offsetting hex screws - one on each side of the screw at 180 degrees but found it to be unnecessary. There are a number of different types of wheels available and the selection is larger if you are williing to use a smaller screw or even a 1" screw with even a slightly higher pitch such as 6-8 TPI.
 Member
I am near finished with a BC moxon build - I bought their hardware and decided to follow their plan. I, too, was very happy to read of Derek's modifications, and intend to incorporate the beam and spacer. I have specifically been avoiding a benchtop bench design for the same reasons that Derek mentions, but hadn't quite figured an easy way to do something similar; his design looks ideal (thanks, Derek!).
Since I haven't finished the vise, I feel I can't really comment on the BC design or hardware other than to say they are nice, hefty, and I have zero regrets about buying them versus going with something cheaper. (Also, note that I am a fan of TFWW and like their design, but I bought my hardware before it was available, so they weren't even a consideration at the time - it wasn't a choice between the two.)
daniel
Not all chemicals are bad. Without hydrogen or oxygen, for example, there would be no way to make water, a vital ingredient in beer.
 Member
I built my first variant after seeing Derek's post.
I used pipe clamps, which proved the concept but were fiddly in application.
After pricing out my own sources for Acme threaded rod, nuts and wheels I just bought from Jameel.
The fit and finish make it a pleasure to use.
The version made by Mario and Alan was not available when I built mine - were I to do this again, I would just pony up the bucks for their version.
There's satisfaction to be had in making tools, and the Moxxon is THE most useful tool in my shop, but $170 for something that's ready is a bargain.
P1030662.jpg
 Member
Russ,
what supply house did you use for your acme rod and hand wheels?
Maurice
Member
Just happened to revisit the TFWW page on their BOB. Looks like you can get the hardware alone for about $60: http://www.toolsforworkingwood.com//...tegory_Code=TL
Might be a nice alternative for those looking at a compromise in a DIW Moxon.
Maurice
 Contributor
The hardware from Joel looks very nice. If I were building another I would give it serious consideration. The wooden threads I made, however, work very well. Another choice.
The TFWW bench-on-bench is a great idea except for the issues with the bench rear being at the same height as the top of the chop (as I detailed earlier in this thread).
The modification I would suggest is to glue a 1/2" high wooden strip to the chop. This can be used with a 1/2" high spacer at the rear of the BOB when transfering dovetail marks. Then flip the cop over to use it as a flat, coplanar BOB. The spacer could be left loose or hinged (as in my example) to fold it of of the way. I guess something similar could be done with the BC version as well.
Regards from Perth
Derek
Member
Derek, I was thinking of copying your set up, using Joel's hardware. Love your flip up spacer feature, well as the I-beam. As I recall, your I-beam can also be used as a support for long material when used lengthwise on the bench top. I'm not a big fan of the B.O.B. concept, as it looks too bulky to store conveniently.
Maurice
Member
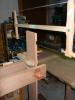
Here's the LV press screw model -- it has the usual piece on the bottom out of view (you can see a tiny bit far left) to allow holdfasts to attach it to the bench like the others. I recessed some square washers on the front face so the screws wouldn't rub on the wood. I ended up having to add a washer as well as the back of the cranks (actually the metal on the back opposite from the knob side) tend to rub intermittently on the wood -- one of these days I'll get out a file and relieve them. The press screws work well. Just discard the piece on the end attached with a screw and reverse the nut with the flange (which goes on the back of the vise). A very quick, inexpensive and useful project.
Last edited by Joel Goodman; 04-25-2012 at 11:10 AM.
Contributor
Adding my .02 cents: I ruminated for awhile about building a Moxon Vise (with or without BenchCrafted parts and with or without wooden screws) or purchasing a Moxon Vise ready made; in the end (never having settle on a style of build), I ordered the TFWW Moxon Vise (mainly due to price and the advantages already listed in this thread). I have had opportunity now, to use the TFWW Moxon Vise quite a bit; its very durable, strong, and yet light (portable). I'm not looking back at this point, it accomplishes what I want a Moxon Vise to do in spades and for less than half the cost of BenchCrafted. Further, I saved some money by not buying taps and dies that would be used for this purpose and probably little else and, in the end, would collect dust in the years ahead, had I opted to build my own using wooden screws (though I confess, I still find some romance in that notion).
Member
It is a far worse move to compromise sawing mechanics instead of fitting the vise to your working habits, so I wouldn't simply dismiss it as a "bad move" for all circumstances.
I've never understood the reasoning in using a paring jig to clean dovetail waste as in my experience it is slower and more complicated, but I won't deny that it is a helpful crutch at certain times and works quite well for others.
Or, it says that your natural sawing position won't allow you to make certain cuts without sawing the chop.
That's assuming that 1.) everyone clears out those small, final bits of waste in this manner, and 2.) beveling the chop removes wood such that a suitable reference surface is lost. In my instance, neither of this is true.
Like always, what works for me won't necessarily work for thee.
YMMV, JMHO, WWYPFI, etc., etc...
 Posting Permissions

 Reply With Quote