Page 1 of 3 123 LastLast
Results 1 to 15 of 31

Thread: Saw teeth filing question

  1. #1
    Join Date
    Mar 2015
    Location
    SE Michigan
    Posts
    3,225

    Saw teeth filing question

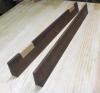
    Here's a 12 ppi crosscut garage sale, nothing special, practice saw. Looking for a little advice on how best to handle the deep gullet/shallow gullet situation that seems to run throughout this saw.

    Would you just joint to the point of even height and probably end up with uneven gullets...or joint it down to - or nearly to - the shallow gullets and reform the teeth...something else?

    I'm not sweating over this...would just like to get a more experienced filer's opinion as I continue to climb up this learning curve.
    Thanks!

    image.jpg

  2. #2
    Join Date
    Jan 2009
    Location
    Williamsburg,Va.
    Posts
    12,402
    The " Long tooth,short tooth" appearance of the saw teeth above is brought forth by holding the file on an UPHILL ANGLE,rather than holding it straight across at 90º to the saw blade as it is filed. Turn the saw around,and the OPPOSITE teeth will be the longer looking.

    The saw needs to be carefully refiled,holding the file straight across. HOWEVER,you already have the 2 different "heights" on your teeth. Filing alone will not solve the problem. It will just file each tooth the same amount deeper,which will retain the long and short look. You'll need to selectively file ONLY the gullets that NEED DEEPENING. Keep examining the work as you go. After you get the teeth all the same height,you can then in the future,continue to hold the file at 90º to the blade.

    To tell the truth,the teeth as shown will cut just fine as the sharp tops of the teeth all SEEM to be at the same height. You could just use it as is till the saw gets dull. Then,attack the problem of getting the teeth the same size.

  3. #3
    Join Date
    Sep 2007
    Location
    Longview WA
    Posts
    27,437
    Blog Entries
    1
    To add a touch of clarification to what George posted... You want the file 90º to the vertical of the saw plate. When filing crosscut teeth the file will be at an angle to the tooth line.

    The bottoms of the gullets look almost too rounded. It may have been sharpened last by a file that was too large for the job.

    Have you visited this site?:

    http://www.vintagesaws.com

    The library linked in the saws at the left has information that is helpful to a new saw sharpening enthusiast.

    jtk
    "A pessimist sees the difficulty in every opportunity; an optimist sees the opportunity in every difficulty."
    - Sir Winston Churchill (1874-1965)

  4. #4
    Join Date
    Aug 2007
    Location
    Dickinson, Texas
    Posts
    7,655
    Blog Entries
    1
    My personal practice is to file teeth away, re-tooth, and then sharpen. I've done that on 5 or 6 saws and never regretted spending the time.

    If you will mark the smooth saw plate with a red marker, tape tooth spacing pattern to the side of the saw plate, and make a file mark at each space. You can refile a saw in an hour or two .

    If you need help getting a pattern, they are available on line or you can send me a personal message and I will help with pattern.

    You can find good mill bastard files online.

  5. #5
    Join Date
    Mar 2015
    Location
    SE Michigan
    Posts
    3,225
    Thanks all.
    Actually George, the shallow gullet is the same on both sides. My guess is that, being a crosscut, the previous filer ran every other tooth too deep and when he/she came back from the other side needed to go shallower to keep the point height even. Who knows. I do believe it will cut fine with a careful filing, but this is a learning thing for me, so would like to bring it to the best consistency I can.

    I've been through Pete's site, Blackburn tools, and Ron Herman's tutorial a number of times. All great resources, plus good advice here. I've made plenty of mistakes and have had reasonably good results on the last few saws. I'm just pretty sure if I file the shallow gullet to be more even with the deep gullets I'm going to end up with teeth on either side badly mishapen.

    I find many resources great for understanding the shaping/sharpening of saws that are in relatively good shape. Not much out there that focuses on what to do when you run into more severe tooth issues like the shallow/deep gullets, or a needle like tooth, or a tooth with a giant flat compared to others (work both sides of that one tooth front and back?).

    Maybe the obvious answer is that if there are only a few whacked out teeth it's best to work around them rather than joint down the whole saw. On the other hand, if it's a lot of whacked out teeth, joint it down.

    Anyway, sorry for the ramble...seems my best course is an agressive jointing to be able to even things up.
    Last edited by Phil Mueller; 11-23-2016 at 8:02 PM.

  6. #6
    Join Date
    Nov 2007
    Location
    Edwardsville, IL.
    Posts
    1,673
    From what I can see in the pic. not all the teeth were deep / shallow gullets. Looks more like an opps on some of them. Hard to tell without seeing the entire tooth line. Maybe they didn't have their glasses on.
    Anyway, Use dykm. 1) joint, 2) file every other tooth, heel to toe, paying attention to the flats filing half the flat. 3) file the other teeth toe to heel. Again pay attention. You may very well not need the same amount of strokes on every tooth. ( common mistake is to file all the teeth the same number of strokes ) If you notice a tooth here or there not playing well, you can apply a little more pressure to the front or back of the tooth. Just not downward into the gullet. Once you have gone up and down the tooth line, apply dykm again, joint again, and repeat. Yep, it takes time. Mark the problem teeth with a black marker so you notice them before you hit them with the file. I have also seen some one draw a straight line down the gullets with a marker and straight edge as a reference. I personally place a straight edge on top of the tooth line when I am finished to make sure all the teeth are the same size and height. Fleam may vary a little, within reason, but a consistent rake and pitch is paramount to a smooth cutting tool. Then again, if you don't mind a rough edge and some chatter, no need to go too crazy. Have fun. Best wishes.

  7. #7
    Join Date
    Jul 2015
    Location
    Broadview Heights, OH
    Posts
    714
    I think what you are seeing is the result of the fact that it is easier to file a tooth that is bent away from you than it is the one on the opposite side bent toward you. Inexperienced filers don't realize that they have to split the top of the flat on the jointed tooth and bias the file toward the tooth that is bent toward you to get consistent tooth shape.

    You DONT need to file the teeth away and start over unless you crave tedious, mundane work. Instead, joint the saw and then file the teeth straight across, even if it's a crosscut. The object it to get the tooth height consistent as well as spacing. This is called tooth shaping. Once that's done, set and lightly joint and file to cut in the fleam. This time you will skip every other tooth and file in the fleam at whatever angle you like.

    When you are done, your saw will be cutting first rate. Just remember to bias the file
    toward the tooth that is leaning toward you and watch the tops of the teeth as a gauge for even filing. You are a good man for taking this on.

    Happy Sawing,

    Pete

  8. #8
    Join Date
    Mar 2015
    Location
    SE Michigan
    Posts
    3,225
    Thanks Ron and Pete. Your tips, like all those offered here, are very helpful. As you both know well, the ability to judge where metal needs to be removed to get the proper shape and gullet depth, and the feel to apply just the right amouth of pressure downward/forward/back is a skill that's going to take me some time. But it's coming along and I'm enjoying it a lot.

    I'm finding the suggestions to lightly joint, take a run at it, joint again, and again if necessary allows me to shape a little at a time and running a piece of tape along the tooth line and marking the odd ones for special attention are helping a lot.

    Pete, I forgot about the point to shape the teeth rip, and put in the fleam after...would make the process easier for me. Thanks for the reminder!

    I will also note, when I did the first light jointing and shaping this evening I discovered the previous filer messed up the spacing in a few places...ran the crosscut filing backwards for an inch or so and then must have somehow "messed up" and corrected. Had to smile...I've certainly done that myself.

    Happy Thanksgiving! Going to trade a file for a fork tomorrow. Continued saw fun will have to wait for the weekend.

  9. #9
    Join Date
    Jan 2009
    Location
    Williamsburg,Va.
    Posts
    12,402
    Without actually seeing the saw blade,it is hard to accurately diagnose the problem. I assumed the problem was the VERY COMMON practice of holding the file at an "uphill" angle when filing the teeth. This is easily seen when examining the actual saw.

    If your saw shows no sign of being filed on an "uphill" angle,it may be,as you say,that the filer filed one set of teeth more than he filed the other. Perhaps he was afraid that,while having achieved very similar tooth HEIGHT,he would mess that up by filing the "short teeth" deeper. Who knows? All kinds of mistakes can be made in the relatively simple,but arcane to some,practice of saw filing.

    In the old days,every common carpenter was expected to be able to file his own saws. Saws in the 18th. C.,I AM PRETTY SURE,were sold with the teeth in place,but unfinished.The saws in the Seaton Chest were never used,but the teeth were still quite dark. Just about black where they were filed(or punched?) I think this might have led the late Jay Gaynor to believe that crosscut saws in the 18th. C. were filed straight across. He told me that,and,not being my job to research the tools(just to make repros),I took his word for it. I was too busy to go examine them myself as Jon and me were making tools for about 80 craftsmen in the museum. Always under a heavy work load. I also was often given the job of making gifts(Like the surveyor's compass,which took over 4 months of my year) for important donors or visiting dignitaries. I even had to spend a few months making a realistic blacksmith's shop ON A HORSE DRAWN PARADE FLOAT,for the 1989 bi centennial parade in Philadelphia,which we took part in. The parade was to celebrate the ratification of the Constitution. The forge was an actual working forge!!

    The saws being supplied without finished and set teeth makes sense to me,though. In the 18th. C.,chisels and gouges were supplied UNHANDLED,and with only partially,rough ground edges. The manufacturers were very frugal in those days. They did not supply tools with sharp edges and with handles as we do these days. You were just expected to do these things yourself as edge tools require re sharpening,saws included.

    Gradually,somehow,woodworkers began to rely upon saw sharpeners. When I was young,small saw sharpening shops were found in just about every town. You could see their signs when driving by. Even in the museum,my saws were getting so messed up by WOULD BE saw sharpeners(except in the Cabinet Shop,where Marcus Hansen(who I had trained while Musical Instrument Maker) was PROPERLY filing the saws,I had to get the director to put out a rule that ALL SAWS had to be taken to my toolmaker's shop to be re sharpened. I thought about holding classes. But,while they can do other tasks,some craftsmen just did not have the eye for properly sharpening their saws,I just decided to do it for them. Either that,or they would just ruin the saws we had made so many of. I'd had to cut the messed up teeth off entirely,and re punch and file and set the teeth again. This narrowed the saw plates,and took years off their life expectancy.
    Last edited by george wilson; 11-24-2016 at 8:45 AM.

  10. #10
    Join Date
    Mar 2015
    Location
    SE Michigan
    Posts
    3,225
    George, always enjoy your historical perspective. You are certainly a man of many skills and your posts are very much appreciated.

    I wouldn't be surprised if you also can make a mean pumpkin pie from scratch

  11. #11
    Join Date
    Aug 2007
    Location
    Dickinson, Texas
    Posts
    7,655
    Blog Entries
    1
    You might want to view the video by Ron Herman

    http://www.popularwoodworking.com/wo...saw-sharpening

  12. #12
    Quote Originally Posted by Phil Mueller View Post
    George, always enjoy your historical perspective. You are certainly a man of many skills and your posts are very much appreciated.

    I wouldn't be surprised if you also can make a mean pumpkin pie from scratch

    Mmm punkin pie

  13. #13
    Join Date
    Oct 2010
    Location
    Australia
    Posts
    2,534
    Phil; imo the look of those teeth exemplify why its a more efficient practice to reshape every tooth from the same side of the saw plate. It looks like who ever was working the file, made a conscious decision to file every 2nd tooth from 1 side of the saw plate, and then work the remaining teeth from the opposite side of the saw plate. The problem being that too many strokes of the file were taken on the 1st run, leaving a lack of remaining tooth flat to match the full depth of gullet on his 2nd run. If indeed an oversize file was used, then that in itself should not impede any attempt to match the gullet depth on every tooth, it will just result in every gullet being slightly shallower in depth than the recommended standard for that saws ppi. All the best of fun with the resharpening exercise Phil.

    regards Stewie;
    Last edited by Stewie Simpson; 11-24-2016 at 7:07 PM.

  14. #14
    Join Date
    Oct 2010
    Location
    Australia
    Posts
    2,534
    Phil; as far as correcting those saw teeth. You going to have to joint those teeth a little harshly to allow you to selectively bring those shallow gullets down to a more desirable and common depth. You want to insure you save a slight flat to each tooth after reshaping so your not impacting the common height of each tooth. Keep an eye on the size of flats during the reshaping stage. If you find the odd tooth is going to end up with more of flat than your targeting, you need to apply some file pressure to the back of those tooth to close up that difference. Try and insure the front rake angle on each tooth is kept at a constant during reshaping. After the reshaping stage has been completed, you might consider a light jointing, before filing each tooth to a point. Being a 12 ppi, you may consider applying side fleam to make the saw more compatible for cross cut work, but there is plenty of info online to guide you on that aspect.

    Good luck and enjoy.

    Stewie;
    Last edited by Stewie Simpson; 11-25-2016 at 6:40 PM.

  15. #15
    Join Date
    Mar 2015
    Location
    SE Michigan
    Posts
    3,225
    Thanks Stewie. Your points are well taken. I ended up doing several light jointings and filings to try to even things up. Probably would have been quicker to do a more agressive jointing, but felt more comfortably shaping a little at a time.

    I appreciate your comment on the odd tooth with more flat. I've been challenged by this. Ofcourse I take a look at the tooth from the side and try to decide if I should file the back or the front or both to bring it down some...depending on the adjoining tooth spacing. But, I have botched this more than once (overly slanted back, skinny tooth, etc).

    And...judging that I have removed "half" the flat, and applying the right direction of file pressure to even the flats of the front of one and the back of the next while not driving the gullet too deep has been an issue as well. But I guess that's pretty much everything there is to shaping...so I keep at it.

    The 12ppi is the smallest toothed saw I've worked on so far. These eyes of mine get pretty tired at times and even with magnifying glasses the tooth line can become a blury line of shining metal. Fortunately, I'm under no deadlines...
    Let's just say none of you would want to pay me by the hour

Posting Permissions

  • You may not post new threads
  • You may not post replies
  • You may not post attachments
  • You may not edit your posts
  •