Page 1 of 2 12 LastLast
Results 1 to 15 of 29

Thread: Bompe Chest Build – Part #1 Ball and Claw Feet

  1. #1
    Join Date
    Feb 2011
    Location
    Carlsbad, CA
    Posts
    2,230
    Blog Entries
    2

    Bompe Chest Build – Part #1 Ball and Claw Feet

    This is part one of a Neander bombe chest build. I’ll include a picture of the overall shape of the chest in subsequent posts, but basically on both the vertical and horizontal dimension, the chest is wider at the bottom than the top with a semicircular curve built into both the carcass sides and front.

    Typically these chests have drawers. I’m building this one out mahogany to hold some audio hi-fi components, so no drawers – the front of the carcass will be open with shelves to support the electronics. There are a pair of amplifiers that each weight ~75 lbs. I love music (but can’t play a lick myself) and am an old school analog guy. That means tube amplifiers (yes they still make those) that generate a ton of heat. The design needs to be appropriately strong to support the weight, but also allow for airflow to keep everything cool.

    The LOML is a big fan of Louis XIV furniture which means lots of curves, veneer and classically some other gaudy decorative elements (I won’t be including), if I have any chance of getting approval to bring a new piece of furniture in the house, timing will be key! The only way I was able to finagle getting the 6’ tall speakers into the house in the first place was on a "temporary, trial basis, just to make sure everything works”. For me, anything from BB King/Eric Clapton, along with good whiskey is pretty much heaven!

    The overall dimensions of the chest are taken from an example in V.C.Salomonsky’s “Masterpieces of Furniture” (which I highly recommend), roughly 40” wide x 24” tall by 21” deep. Described as “Low Chest Of Drawers Dutch 1725 – 1750”.

    The first part is Cabriolet, ball and claw feet. Here’s the template I use for layout taken from Salomonsky’s book. The instructions for carving the B&C came from “Carving 18th-Century American Furniture Elements” by Tony Kubalak. If you’re interested in learning how to add some carving elements to your furniture builds, I could not recommend this book more strongly. It has great step-by-step descriptions with illustrations for classic 18th-century furniture carvings.


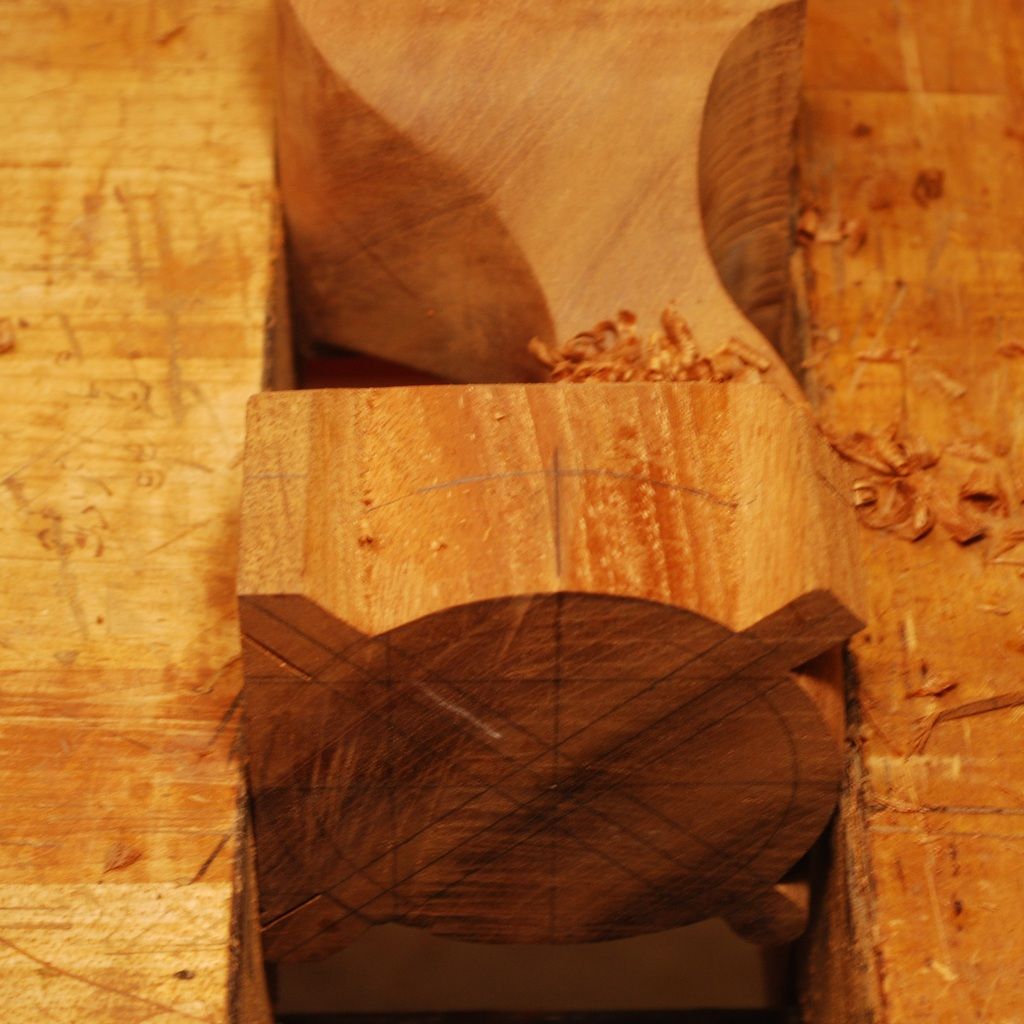
    The stock for the feet are 3 ½ in.² mahogany I had left over from another project. This pic shows the layout on the bottom of the foot.


    I didn’t take any pictures of shaping the Cabriolet legs (my bad). Here they are after being cut out on my cheesy bandsaw and shaped with rasps/files. You can see the layout lines from the bottom of the foot extended up the sides.


    I am absolutely a novice Carver. I did one other set of B&C feed before, the key learning for me was that if you want everything to look symmetrical, you have to work to a ton of defined dimensions for the height, depth of the ball, height of the claws front/sides and back if you want to end up with something that looks reasonable in the end. I’m sure artistic people with the ability to envision objects in 3 dimensions don’t need these dimensional reference points. I’m the least artistic person you're ever gonna meet, my approach is strictly mechanical – measure everything and just try and work each element to the reference point dimensions as best you can and hope it all hangs together in the end.


    After layout, first step is sawing vertical limits of the toes. Here’s a pic of tools – carving gouges and rafts/files.


    First step is separating the toes from the ball, and then using a # 3 gouge to establish the circular vertical dimension.


  2. #2
    Join Date
    Feb 2011
    Location
    Carlsbad, CA
    Posts
    2,230
    Blog Entries
    2
    Next is incising the ark for the top of the ball, and using a flat chisel to establish the height of the ball.


    Here is using a number 5 gouge to establish the curved upper surface of the ball. After each step is important to redraw the maximum horizontal radius of the ball so that when you shape the bottom half of the ball (I used rasps/files), it’s symmetrical.


    Here you can see on the bottom the final radius of the ball.


    Here is a blurry picture of one section completely profile as compared to the layout.


    Once the curvature of the balls established, next step is to saw the upper surface of this toes square.


    Here is one of the toes shape round.


    From the side you can see the objective is to have the back sections of the ball lower than the front section so they appear to flow together into a circle located directly beneath the claw.


  3. #3
    Join Date
    Feb 2011
    Location
    Carlsbad, CA
    Posts
    2,230
    Blog Entries
    2
    Next is carving the toe of the claw. You want the height of all the claws to be equal on all 4 sides – you can see I’m a little bit off here. Throughout the process it'simportant to redraw the reference lines for the height of claws, first knuckle and 2nd knuckle so that as you move forward carving you targets to achieve symmetry.


    My suggestion is to do 1 foot all the way through to get comfortable with all the necessary work holding/tools/techniques. After that, it’s easier to do all the remaining feet together in stages so you have the benefit of repeating the same operations which makes it easier to get consistency.


    Once the knuckles are established, the next step is carving the web on the leg to blend into the toes. Carving with the grain is important here. Given the compound curves it’s easier for me to start by carving horizontally to establish the web and finish with vertical carving down the length of the leg to blend everything in.


    I am a huge fan of card scrapers – curved scrapers are super helpful in smoothing the rough services of the web left by gouges.


  4. #4
    Join Date
    Feb 2011
    Location
    Carlsbad, CA
    Posts
    2,230
    Blog Entries
    2
    Carving the B&C feet is an iterative process. Last step is to try and achieve a clean line between the curve of the ball and the web moving up the feet. My experiences this is never “finished” – at some point you just determine in its good enough and move on.


    I know it’s hard to look at one component of a build (like these B&C feet) and try and envision how they fit into the overall design. Next step will be gluing up 16/4 Pine/Poplar for the carcass sides and shaping the curves. Classically my understanding is 18th-century American woodworkers shaped carcass sides of solid mahogany stock. That’s not viable for me because I can’t afford it and it seems like a crime to waste all that fantastic mahogany. My plan is to shape the carcass sides out of inexpensive stock and then veneer them with mahogany. I have no idea how that will work but that’s the plan.

    Thanks for looking,

    All the best, Mike

  5. #5
    Nice feet so far! You're sure there's enough meat left there to support 150lbs of tubey goodness, right?

    As an aside, one of my hobbies has been designing and building tube amps for guitar and bass. Sadly, no place to do it and no time to do it in, but I still think about it from time to time.
    Last edited by Glen Canaday; 11-21-2016 at 10:18 PM. Reason: speloring was deploratable.

  6. #6
    Join Date
    Aug 2013
    Location
    Princeton, NJ
    Posts
    7,294
    Blog Entries
    7
    Nice work Mike! You are a machine!
    Bumbling forward into the unknown.

  7. #7
    Join Date
    Nov 2007
    Location
    Edwardsville, IL.
    Posts
    1,673
    Hey Mike. Post away. I am supposed to take a class next month on this very thing. So I will watching the step by step. Thank you.

  8. #8
    Join Date
    Feb 2004
    Location
    Perth, Australia
    Posts
    9,491
    Any man who loves tube amps and BB King can be forgiven for a lot! Including ball-and-claw feet! I'll never make them, but I do admire the way you are going about the, Mike. Keep going - I'm watching.

    Regards from Perth

    Derek

  9. #9
    Join Date
    Jun 2005
    Location
    San Diego (North Park)
    Posts
    63
    Your ambitiousness is incredibly infectious, Mike!! I got up & went to the shop after reading this post....cleaned the bench of nearly done's and started a new project!! Never cease to AMAZE! Great stuff...can't wait to see the next posts! THANK YOU

    Don

  10. #10
    Join Date
    Feb 2016
    Location
    Marshall, NC
    Posts
    282
    Thank you for posting this Mike. This really takes me back, my first foot into woodworking was carving ball-head war clubs that looked like that. The next step was carving animals. Haven't made one in going on ten years. Nice work Mike!
    I was once a woodworker, I still am I'm just saying that I once was.

    Chop your own wood, it will warm you twice. -Henry Ford

  11. #11
    Join Date
    Mar 2015
    Location
    SE Michigan
    Posts
    3,225
    I'm convinced you are one of those hyperaccelerated aliens from the Planet Scalos...featured on the Star Trek episode "Wink of an eye".

    Looking forward to this build...if I can keep up.

  12. #12
    Join Date
    Apr 2010
    Location
    Essex, MD
    Posts
    421
    Fantastic work, as usual Mike - you keep saying you're not a wood carver, and yet you carve wood... I think you've arrived.

    It isn't French furniture, but Jeffrey Greene's book "American furniture of the 18th century" is really good for showing how the casework was constructed, plus it has a good techniques section including ball feet (in case you don't have the book).

    The typo in the subject line instantly made me think of the scene in Monty Python's Life of Brian where the 3 kings were describing the gifts they brought and Brian's mother says "Myrrh, what's that then?" "It's a balm" "what d'er want to give a baby a bomb for? "Not a bomb, a balm, an unguent..." if you haven't seen it, you may want to, what with the holidays coming

    looking great, thanks for sharing,
    Karl

  13. #13
    Join Date
    Nov 2007
    Location
    Goleta / Santa Barbara
    Posts
    968
    Mike, I don't know what vitamins you are taking or what energy food diet you are following (other than the occasional IPA bottle we see on the bench) , but I GOTTA GET ME SOME!!! Your output and skill is amazing. Gonna LOVE this thread , as we have all the past ones. You, sir, are becoming an institution!

    Hope the boys are home for TG. Thank you and best wishes to the family for the holiday season, Patrick

  14. #14
    Join Date
    Mar 2006
    Location
    Austin Texas
    Posts
    1,957
    And Buddy Guy and Albert Collins and ,,,,,,,,,,,,. I love the carving and am very interested in seeing the rest of the "bomb". Please don't stop.
    David

  15. #15
    Join Date
    Feb 2011
    Location
    Carlsbad, CA
    Posts
    2,230
    Blog Entries
    2
    Quote Originally Posted by Glen Canaday View Post
    Nice feet so far! You're sure there's enough meat left there to support 150lbs of tubey goodness, right? As an aside, one of my hobbies has been designing and building tube amps for guitar and bass. Sadly, no place to do it and no time to do it in, but I still think about it from time to time.


    Hey Glen,


    Excellent question – given the complex curves/short grain of the Cabriolet ball & claw feet, I'm not exactly sure how strong they will be. Given the weight they will need to support (as you know, the architecture/heat heatsinks etc. associated with tube amplifiers are really heavy), I'm thinking about possibly adding a couple rollerball supports to the middle of the carcass bottom. My experience is hi-fi components get moved at least occasionally to plug in new components etc., and the last thing I want is for the B&C feet to fail when that happens. I'm thinking I will wait on this decision until the carcass is built and I can assess how strong it is. I'm hopeful if I need to add the rolling supporting feet under the center of the carcass to would take the weight off the B&C feet, that they won't be too visible unless you are viewing them from a distance. Not and ideal solution, but one on at least considering.


    I admire your ability to design/build tube amps for guitar/bass. To me that seems like a combination of voodoo and splitting the atom. I hope you have a chance to get back to it at some point.


    All the best, Mike

Posting Permissions

  • You may not post new threads
  • You may not post replies
  • You may not post attachments
  • You may not edit your posts
  •