Once you cut the shape you want. How are you going to join them together? hinge?


 Member
Once you cut the shape you want. How are you going to join them together? hinge?
 Member
Using hand saws to separate the box lid from base there should be no problem keeping all edges at 90deg to face if you wish. Power tools would tend to limit your ability to do so at the front and rear of the box unless you begin and terminate cuts within the alignment of the inner edges of both gables and complete your cuts using hand saws to release the two elements, or plan to square off edges by means of an applied lipping. There's no real need to complicate matters/design by creating ogee curves - unless previously planned as a design feature -in order to carry out such an exercise, as cuts of this nature are fairly standard when crafting chests and tool boxes.
 Member
There is EVERY REASON to "complicate" the issue with an ogee curve. The reason is,it doesn't complicate things. It makes things MUCH simpler,actually,than trying to step the cuts to achieve square front and back surfaces. Actually,I personally don't see why square cuts are needed in the first place.
Actually,I'd like to see someone cut that straight joint accurately,which is exactly why Derek has asked for help. It would be a huge pain!!
Last edited by george wilson; 11-04-2012 at 8:40 AM.
 Member
I agree! Added simplicity aside, it would add a detail that takes a nice box to a great one, and thus in keeping with the beautiful bridle plough Derek has created.Originally Posted by george wilson

Member
Where's Derek? He should nearly be asleep by now. There is a 16 hour time difference,at least,where my Aussie friend Vesper lives(but he's 900 miles from his friend Derek).
Member
Completely tape the box together then cut the front and back on the table saw only going 90% of the the way throught. then disassemble the box and mark between the two kerfs and use a scroll saw to cut the sides and clean up with a plane and chisel
 [OP]
Contributor
[OP]
Contributor
Many thanks all for the advice. It has been very helpful.
The first decision was that the lid had to be cut by hand. No choice really. I have a big bandsaw (Hammer 4400) but it is not big enough (clears a little over 11", however I need about 13"). So handsaw it is.
This also rules out fancy curves.
The second decision was that the parts had to be glued up beforehand to keep the sides lined up.
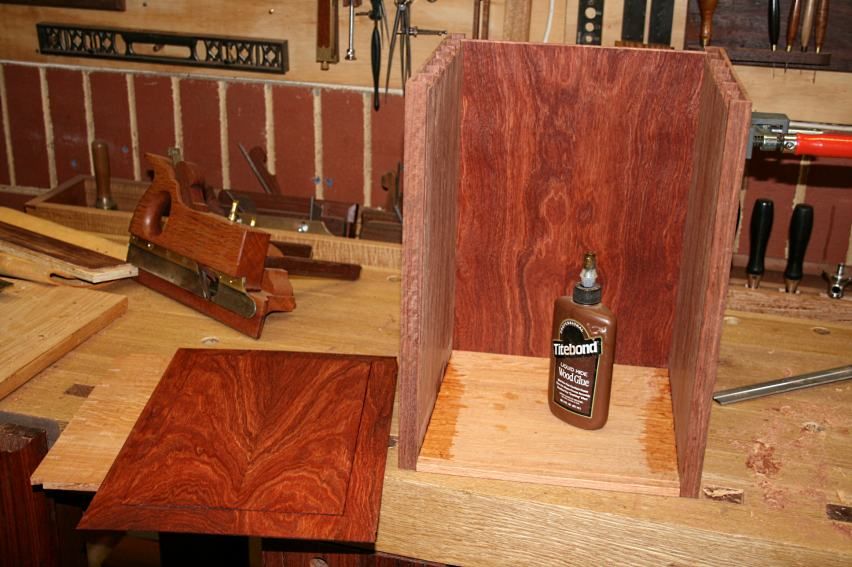
The floating panels were given a finish of Danish Oil, and then the box was glued up ...
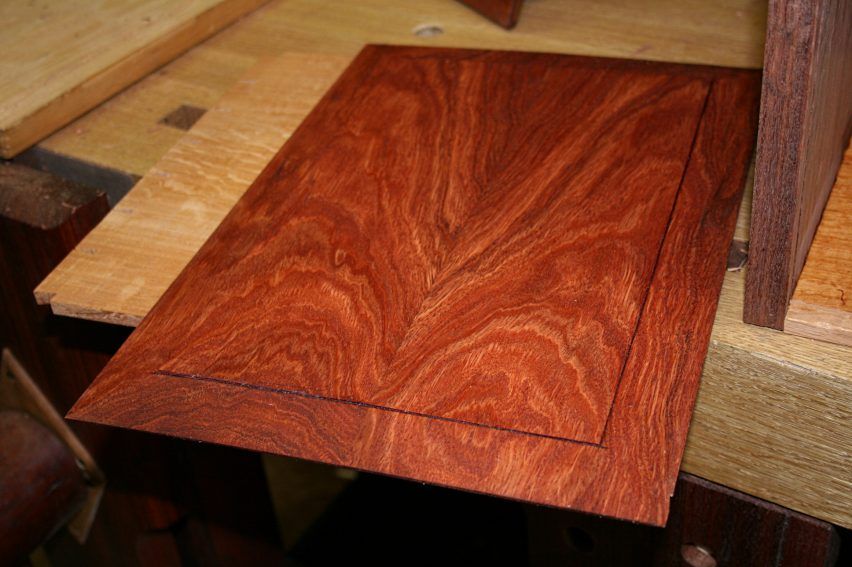
All sides are made up of two boards. The top was bookmatched. I thought it came out nicely.
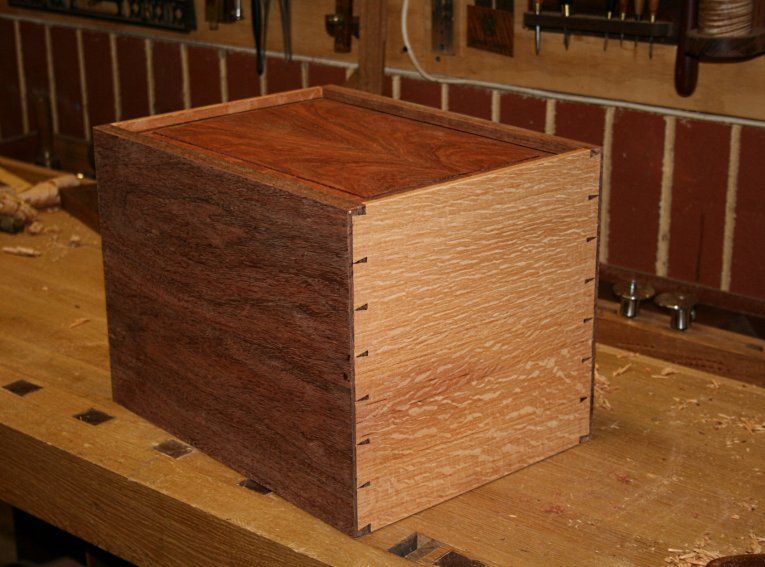
A picture of the glued carcase - no finish yet.
I decided that the key to sawing the box was to saw the sides (She-oak) first. The front and rear (Jarrah) must not be sawn first as it would be difficult to get the angles needed to then saw the sides. The sides first also creates a guide to saw the front and rear.
I planned to saw the box as accurately as possible, then lap the two sides on sandpaper-on-a-flat-surface. I think that this has a better chance of enabling the two sides to go together seamlessly. This is what I have done many times before. Your comments?
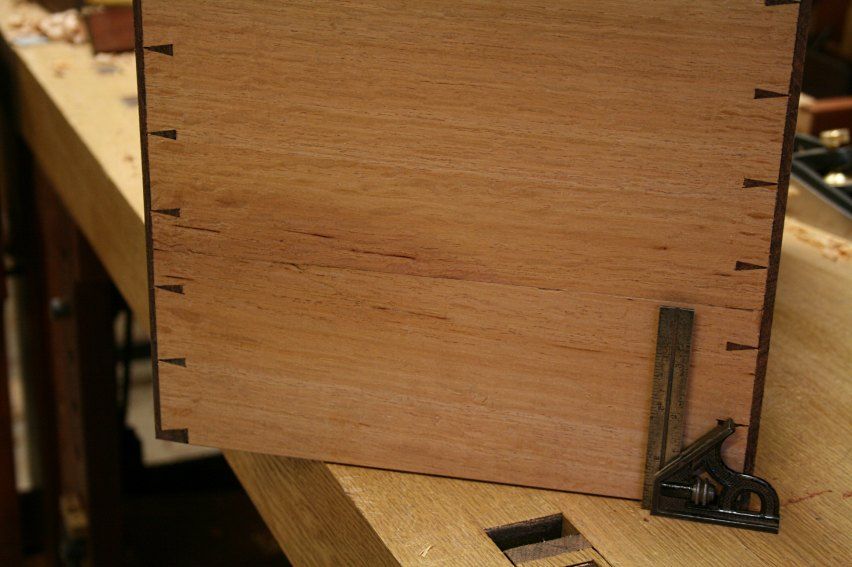
Now there is a problem that may change the whole plan. The Jarrah on the front-and-back is 3/4" thick, while the She-oak is 1/2" (to save weight). While fitting one She-oak side, I could hear that the joined pieces were not solid along the join length. That is, the glue has failed. I used hide glue. The trouble is that the saw cut will start at the join.
The top of the square marks the join ..
Here is a picture of the proposed sawcut (taken before the box was assembled) ...
Ideas? Can the join be strengthened after separation (superglue?)? Do I forget the angled cut and instead saw along the joined line (then I would use a table saw to avoid the blade drifting with the grain)?
Regards from Perth
Derek
Member
There's no need too shout or be "rude" George.
We'll have to agree to disagree in terms of the introduction an ogee curve for the sake of ease. Our perspectives differ, but this type of squared front:side intersection isn't new and whilst an ogee may seem attractive it also introduces points concerning edge dressing (Re spokeshave work) and could well negate the possibility of installing a dust seal (If one had been planned) without moving heavily into ogee territory. Regardless of if it proves to be hand or power tool oriented work.
Stepped cuts aren't necessary if one wishes to craft a square edged box lid with side cheeks canting down from back to front. You simply approach the task from a different angle and pre-cut start and finish points prior to assembly and glue-up. It's then possible to separate the two box halves by sawing straight lines and avoiding complex cutting and finishing.
The only reason I can imagine a square edge being necessary at the front would be if there's a keyed lock involved.
 Member
I don't own a tablesaw, so please forgive my ignorance;
if the desired line is scored deeply, would a circular blade follow the line?
For the purely horizontal incision, should that be straightforward?
On the skewed section, a fenced router would be my choice.
Either by hand or powered. In either case, I would not through cut
but rather finish through with a Japanese saw set to crosscut.
The kerf from the router bit would (I should hope) guide the saw plate.
Perhaps a couple battens applied would ensure squareness.
It's an interesting problem.
Member
I certainly didn't intend to be rude,and don't see where you got that idea,Jim. I capitalize some words all the time to emphasize them,but it isn't " shouting".
If Derek hasn't got a large enough bandsaw,it changes things a bit. Otherwise,my "s" curve would have simplified things for sure. That break in the line is not simple to saw,hand tools or not. If I wanted a dust seal,what is wrong with sawing a pair of S shaped ones to match the curve?
And,maybe you didn't really need to accuse me of "complicating" things??? I'd have put the box on my bandsaw and have the cut made in a short time. Some others thought it was a good idea. My 14" old Delta will cut 12" deep,and I modified my 20" 1950's Delta to cut about 14" deep by simply sawing off a bit of the casting holding the guide bar. It did not hurt the saw at all as the casting is more than ample length. I had to do this on the 20" Delta at work in order to saw some deep curves for the Jones Cup golf trophy I was helping to make at the time.
I had thought that "shouting" was when you did the whole post in capitals. No?
Last edited by george wilson; 11-04-2012 at 4:29 PM.
Guest
Personally, I would take the whole thing apart and build a divider in the box. The top would hold the plow plane, with a sliding lid, and the bottom would have a shallow drawer to hold the irons and other things you'd like to have separate.
if not, I would follow george's advice and find someone with a saw, who could cut an ogee or something similar that would look good without the difficulty of a perfect cut with no bandsaw wander.
Member
With a good blade,I don't get no stink'in blade wander!!But,I know how to make love to the bandsaw.
Guest
That could result in unexpected amputations!
Member
It is true that you have to develop a sense of touch to get the most out of a bandsaw. I do everything with a 6 tpi 1/4" blade. The furniture conservators came over to my shop to resaw some walnut about 5" deep. These guys have Master's degrees in conservation. However,they could not stay within 1/4" of the line!! They were wasting a large amount of their wood. I took a piece and sawed it right on the line. They wanted to know how I could do that. I told them "you have to learn to make love to the bandsaw". Actually,it is perfectly true,though they likely thought I was joking.
Another time,they needed a 1/16" thick veneer cut from a 12" thick chunk of Cuban mahogany I had,and which I valued very much. It was hard as blazes,and I still have it. I made the infill jointer I've posted here with some of it. Takes very crisp detail. Great to work with. It happened to match very closely the missing veneer on the case of an 18th. C. tall case clock that they were restoring.
While they were there,I put a new 1/4" blade on the 20" Delta,and exactly sawed a 1/16" thick slice exactly on the line. They had to do no more than sand the saw cut marks off. They never could figure out how I could cut like that with the bandsaw!! Naturally,I loved prodding them by doing stuff like that. I've warned guys before that I do most things the hard way,but a 1/4" blade can do perfectly good work if it is properly adjusted and the operator knows just how to "feel" the cutting rate of the saw. And,of course,can follow a line!!
Member
George,
have you ever figured out a way to resharpen bandsaw blades, or do you always just use a new one?
 Posting Permissions

 Reply With Quote