
-
As far as those flats on the arches are concerned, the top arch could have a cleat attached to the ends after they are trimmed. This will give you a way to attach the top and if you install it before cutting the flat, it'll prevent the spring back. You could attach a temporary cleat to the bottom arch, cut the flat attach the two arches and then remove the cleat. Everything should be kept under control.

I didn't spend any time on this but hopefully it gets the idea across.
I was thinking on my way to work that maybe it would make sense to add some screws in addition to the dominos. You could bore in from below and add plugs made of matching wood to cover the holes. Something like this:

Last edited by Dave Richards; 01-02-2013 at 7:14 AM.
-
I would use solid wood ,not laminated. Each end of the table would be made of four pcs. There are old ones made that way. If you do laminate it ,spring back will be slight,since so many layers will be needed. That style is a Roman thing,can't think of the name right now.
-
Thanks for the additional input. Dave, some good thoughts on reinforcing with screws, or maybe even some dowels? The cleat idea would simplify things greatly, it kind of takes away from the design of the original a bit, but then again, nobody will ever really see it. I'll have to ponder on that on for a while. It sure feels a lot more secure than just attaching the top at the four corners alone though.
Mel, I started down the solid wood route first, but then read that in these cases a lamination will actually be stronger than a solid piece. It seems like a solid piece would always have the grain in the wrong direction at some point.
-
Chris, how were you planning to attach the top? It seems to me that the cleat would make it easier to do because the cleat can be attached with a couple of screws at each end into the upper arch and then the top attached to that. The cleat won't be visible if you make the edges of the top thicker as I indicated in my sketches. The top os supposed to be shown in section so there'd be the same sort of lip on the end.
As to the solid wood route, I expect Mel is thinking of something laminated from wideer boards. Maybe you'd make it three layers thick. I did that for the keel on the first sailboat I built.
Lousy picture but the best I can come up with. I don't know if you can see it but the pieces overlap at the "corners" so there's no real short grain anywhere and it is very strong.
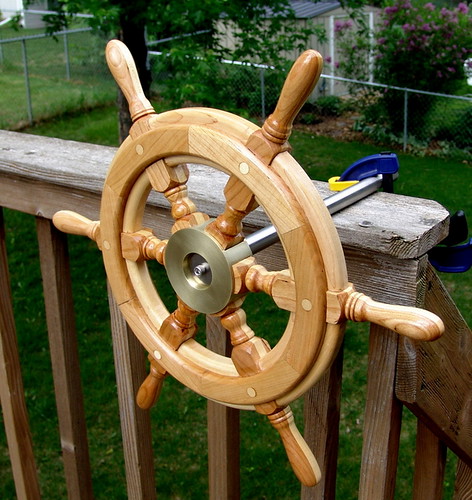
The felloes on my steering wheel are essentially done the same way with the joints staggered.
-
If you attempt to reproduce the original design exactly, you'd need to mill flats on the bent-laminated C's. That might give you trouble. Instead, you could change the design a bit. Bent-laminate the C's, position them back-to-back, and bandsaw a piece from solid lumber to fit between them.
-
As beefy as your design is I don't think that's a problem,most of the old ones are slimmer.Certainly it can be done either way.
-
I was going to make the top out of solid 8/4, planed down to 1.5in or so, so a lip wouldn't work unless I went with a 3/4 top. That's certainly a possibility, I was just trying to get away from 3/4 dimensions on everything, and I want this to have a really solid feel.
This is still a mental work in progress, but I was thinking of attaching the top by putting threaded inserts in each of the four legs, then running a hefty lag bolt down through a counterbored elongated hole in the top and into the insert. At each of the insertion points I was thinking of making a large (2 or 3 inches square) cap to cover the connection, like a greene and green plug, but not so pointy and tall, maybe just rounded over a bit. That would give the top a little bit of decoration. But certainly a cleat would be much easier and secure than doing all that.
As far as solid wood, I understand laminating a wide board to make it thicker, but with a u shape you'd end up with the grain going in the wrong direction along some part of the u. If the grain is horizontal then the base of the U is nice and strong, but the legs are weaker, and vice versa. Or am I over-thinking it?
That is one nice looking steering wheel!
-
Chris, I'm with Mel. Having done bent lam on an oval coffee table that required flats on the ends, I can tell you that it's not very fun. You need some good jigs, and honestly, unless it fits perfectly, you risk some tension at the joints. Mine actually cracked. I went with a solid wood configuration as a fix.
If you lay out your circle like the 'steering wheel' it'll be plenty strong - especially with the dominos. However, here's another option:
'bricklay' the arches. If your legs are say 1.5" thick, use 2 layers of 3/4" 'steering wheel' glue-ups with the joints staggered. This will be the strongest. If you are persnickety, it might require some grain matching of your pieces, but it's totally doable. The nice thing about this kind of configuration is that you'll basically be working with octagons, which will make squaring your ends up for joinery a snap. Only after all joints are mortised should you bandsaw it to shape.
If you like the arched stretcher (I do) I would also bricklay or 'steering wheel' that.
I wouldn't be overly concerned about racking or grain direction. Any of the designs you've posted should (in my experience) be plenty stable.
I think bricklay will give you the most stable and easiest to work with solution.
-
Chris, the thing I was trying to describe is something like this:

There's no real short grain or weak points in a glue up like this. It's is very strong and it would be easier to build than the bent laminations. And there'd be no spring back to worry about.
If you do make the top as I showed, I would make the top thicker anyway. Maybe an inch or inch and a quarter. I would do the Marc Singer trick for hiding the end grain, too. If you make the top full thickness all the way across, you could excavate for the cleats so they don't show.
To me, with the style of the table, having plugs over the bolts would seem distracting. Just my thought.
-
Dave, you are a sketchup wizard, that is very clear now and I was thinking of the completely wrong thing in my head earlier. I think you've also reflected the bricklaying that Prashun recommends. That definitely seems to be the way to go on this. If I make the diagonal parts a bit wider it will also give me room to carve out the foot at the end of each leg rather than milling and attaching it separately.
Then according to Prashun's recommendation I'll do the stretcher the same way, just with a different layout/set of angles.
As far as the top, I was thinking the same thing on embedding the cleat a bit, that might be the best way to go as well. Just need to leave a little room for cleat seasonal movement.
Not familiar with Marc's end grain trick, I'll have to look that one up later today.
Thanks so much for everyone's help on this, I feel a lot better about this design now!
-
You are a Sketchup master. I wish I could sketch like that!!! Hats off, Dave.
-
Thank you, Gentlemen.
Chris,
Here's an example of the "Marc Singer" method I was referring to. Sorry about the disgraceful end grain material. I don't have anything good in the way of end grains on this computer.
So the Marc Singer method involves making the top over length and over width. You then rip the sides off with miters and cut the end the same way. Then you glue the pieces back on as in the lower version and presto! No visible end grain and no issues with seasonal movement. You also get the appearance of a thicker top without the cost of thicker wood.

Hopefully it makes sense from the image that the top is shown upside down.
I tried to find a photo or two showing this where I thought they might be but came up empty handed so I doodled this out. I saw in person a coffee table Marc did this way and it looked amazing.
Last edited by Dave Richards; 01-02-2013 at 12:32 PM.
-
Thanks for the drawing, very helpful. I never would have thought of that, my brain just doesn't work that way. Using Marc's way would also hide the cleat. That might just be the best way to go and I'll forego having a true 1.5in thick top.
I was also toying with the idea of doing a little inlay (my first time at that too), just something simple like a little black epoxy border on the top. Maybe after the miters dry I can just drop the inlay right on top of that glue line to hide any imperfections.
-
That inlay thing could be cool. You could cut a rabbet on the edges and fill them with epoxy. Then, once the epoxy has cured, run a router around with a chamfer bit and put a bevel on it.
-
I do a lot of gluing up of 3/4 stock to make wider things like legs. I will tell you that on a table top, it's a little tricky. You will spend (or should spend) good time flattening and jointing the panels so they glue up well (not to mention the bevel trick below). After a couple years, I find that the effort to do all this is rarely worth the savings of the extra price of the 5/4 or 8/4 stock to begin with. On the top, I'd just go thick to begin with.
 Posting Permissions
- You may not post new threads
- You may not post replies
- You may not post attachments
- You may not edit your posts
-
Forum Rules


 Reply With Quote