Results 1 to 14 of 14

Thread: First Form Bending Results...

  1. #1

    First Form Bending Results...

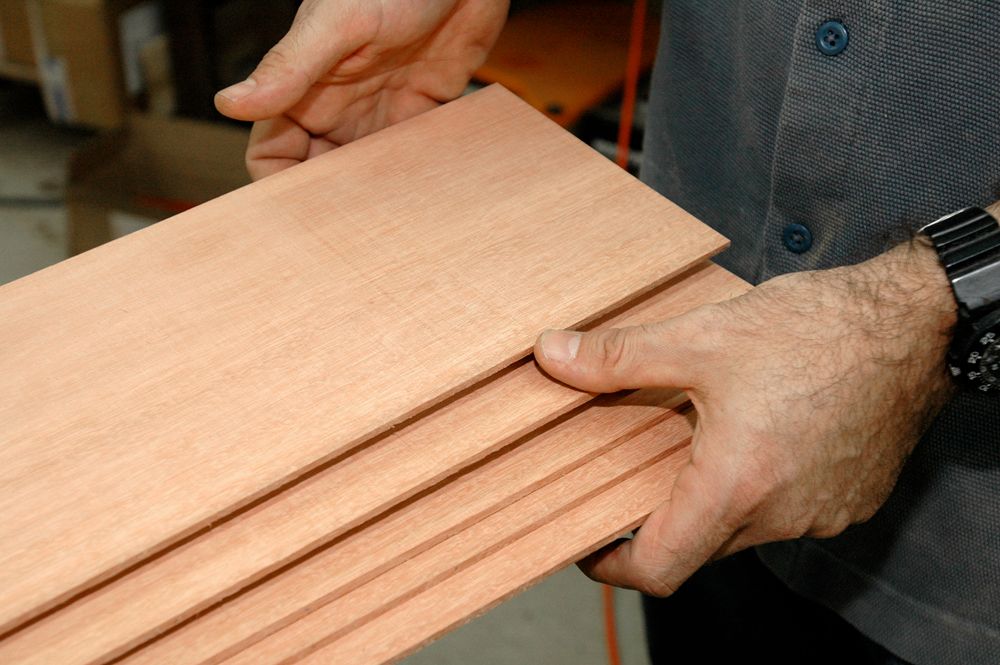
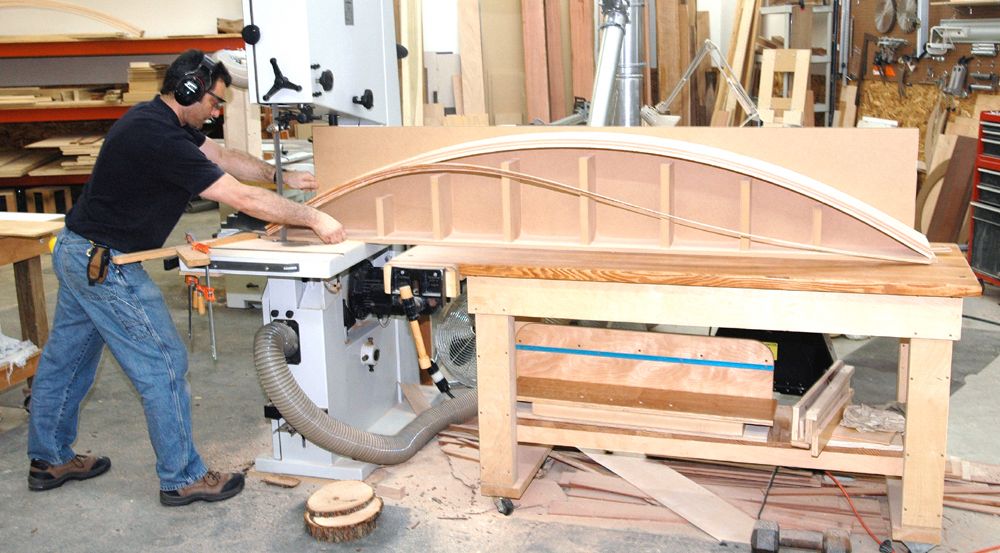
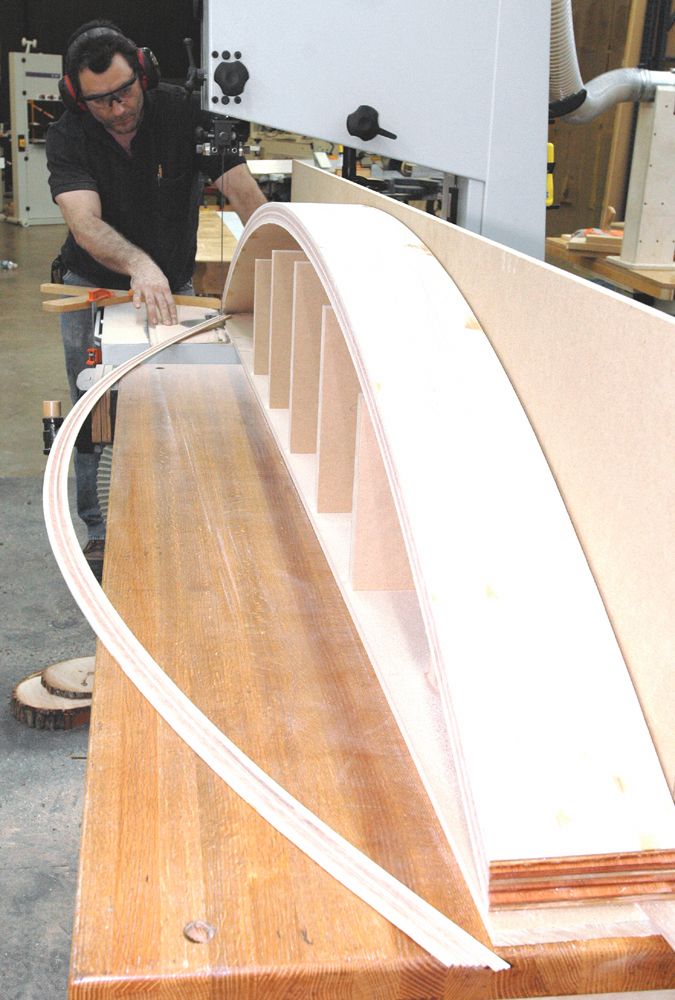
    Well, you be the judge...please. Here's my first time bending wood for a rocker and my first time using epoxy. Both were quite a learning experience. This was a very heavy, two part form. Please let me know what you think and give suggestions for a better glue up. Some spring back, but I have nothing to compare it to, so you tell me.


  2. #2

    Thumbs up

    Impressive!

  3. #3
    Looks real good ,and I don't think there are any two rocking chairs with exactly the same size and radius rockers. For me an easier way to make the forms has been just to make the bottom piece . I use two cheap plywood pieces connected by
    construction 2 x4 pieces with 1 and. 1/2 inches between them .Form is made wide enough to accommodate 1 x 1/2 inch
    cauls predrilled with a hole in each end. They get screwed down over work to act as clamps .

  4. #4
    Join Date
    Aug 2008
    Location
    Southern California
    Posts
    179
    looks good. spring back looks to be very slight. One suggestion would be to align the grain direction. The direction looks to be alternating.

  5. #5
    Caul size should have read 1 x 1 and 1/2 inches or 3/4 x 1 and 1/2 inches

  6. #6
    Quote Originally Posted by Mike Leung View Post
    looks good. spring back looks to be very slight. One suggestion would be to align the grain direction. The direction looks to be alternating.
    Grain direction...I was so keyed up, I forgot all about grain direction. Working with the epoxy took lots of my attention. I'll be more comfortable with it next time, now that I know what to expect. It really was not hard, just new. For instance, when I started to roll it out with a conventional small roller, the roller soaked up all the epoxy and left all the filler on the wood. I had to scrape that off and start again.
    Resawing the layers left some pretty bad saw marks. I tried sanding it out, but lots of the deep ones were left. I'm hoping that the epoxy will fill the voids...fingers crossed. I really need a resaw blade for my MM16.
    The squeeze out was pretty hard within a few hours, but I left it overnight to be safe. I'm wondering if that was truly necessary?

  7. #7
    Join Date
    May 2004
    Location
    Tyler, Texas
    Posts
    2,041
    The thinner the lams, the easier the bend. With only four lams for a rocker, they must be pretty thick and the grain is stressed. That could show up if you rout the edges. I rip mine 1/8" thick and use 9 lams for a rocker. I also have holes drilled in the form to accept clamps. A caul on top and C-clamps about every 4 inches results in very minimal spring-back.
    Cody


    Logmaster LM-1 sawmill, 30 hp Kioti tractor w/ FEL, Stihl 290 chainsaw, 300 bf cap. Solar Kiln

  8. #8
    Join Date
    Mar 2008
    Location
    Beantown
    Posts
    2,831
    I don't use epoxy much as it's too messy for my liking. So if I were doing that glue up I would stack all my pieces in order they came off the saw. Then as I roll glue on to them I flip each one down on top of the next so when done they're still in order. If you do it like that it can look almost like a solid piece when done For really big glue-ups I'll take a crayon or chalk and holding the pieces on edge draw a triangle so as to keep track even if I get out of sync for some reason. As Mel said I don't usually bother with a 2 part form for something like that. Just make the bottom piece and use clamps....or even better a vac press and go! I leave bent glue-ups in the clamps longer than a normal glue-up so I think you made the right choice. Plus epoxy dries even slower, for the initial set anyway, than regular old PVA so I'd leave it at least overnight.

    As far as re-saw marks your always going to have some, I simply run everything through the planer after re-sawing so I have 2 clean faces. I run my stock through a Re-Saw King and while it does leave a great finish, I still don't fully trust it to be perfectly flat and parallel, a necessity for invisible glue lines,....once it's though the planer, I trust it

    All in all I'd say you did just fine for your first bend. Practice will make your jobs go even smoother in the future. Oh and look for contact cement rolls for rolling your adhesive, they don't absorb much and work very well for this application. You may even want to try out your next lamination with PVA, a lot less messy and if you lay everything out right you should have plenty of time to get it glued and in clamps.

    good luck,
    JeffD

  9. #9
    Join Date
    Aug 2008
    Location
    Southern California
    Posts
    179
    Quote Originally Posted by Derek Arita View Post
    Grain direction...I was so keyed up, I forgot all about grain direction. Working with the epoxy took lots of my attention. I'll be more comfortable with it next time, now that I know what to expect. It really was not hard, just new. For instance, when I started to roll it out with a conventional small roller, the roller soaked up all the epoxy and left all the filler on the wood. I had to scrape that off and start again.
    Resawing the layers left some pretty bad saw marks. I tried sanding it out, but lots of the deep ones were left. I'm hoping that the epoxy will fill the voids...fingers crossed. I really need a resaw blade for my MM16.
    The squeeze out was pretty hard within a few hours, but I left it overnight to be safe. I'm wondering if that was truly necessary?
    Haha. I know what you mean about being stressed out when gluing up laminations. Try to orient everything in a pile and simply spread glue and flip over onto glued pile. Great advice from Cody and Jeff. I cut my strips on my resaw king and run them through the planer as well. I use Unibond for my bent parts.

  10. #10
    Join Date
    Dec 2008
    Location
    Northern Michigan
    Posts
    5,007
    The ends on any bent lamination always have a slight change in radius when unclamped. Not important in this application but on something like extension jambs where it needs to meet an existing curve I will make the pieces about six inches longer on each end and cut that off.

    I make the radius a bit tighter so that with springback it is close to the radius that I need. Its just a guess as too how much to change the radius, but it is never much. You have to remember to make your form curve longer for the ends plus the change in radius. Say you want a half circle at a 36"radius. I would make the form at a 34"ish radius depending on species/lams and make the form about 220 degrees.

    I always plane my parts as well. If you have a dip in one part that will make that part turn when it is bent due to more stress on the thicker side. It will turn to the thinner side and make it hard to keep the stack flat. .

    I enjoy round work, makes you think a bit harder. Not much of it lately as Michigan is still in a slump and it is expensive.

    Larry

  11. #11
    Nice work, Derek. These are some pics from a project that my colleague Sam did, very similar. I believe he used epoxy as well but his strips were thinner and as someone else mentioned, the grain was alternated (as well as mixing species in his case, for aesthetics...). I was shooting pics as he made the cuts on MM24 and there was springback that I observed. Strips wwre ripped on his MM as well as the form, straight-edged. I suspect "many layers" and "thin" were the keys to success with the arch not shifting. Blade was a 1.0" Tri-Master...


    Thanks for sharing,

    Erik Loza
    Minimax USA

  12. #12
    Join Date
    Mar 2008
    Location
    Beantown
    Posts
    2,831
    Hmmm, that's an interesting technique.....and a bit safer than the way I cut bent laminations to size I'll have to try and remember than one

    JeffD

  13. #13
    Erik, that obviously works ,I've also seen some joint and rip but I don't like to let jointer contact glue. I like to make one
    layer straight and about 1/2 inch wider than the others . Then rip twice on table saw using the wide piece against ffence for first rip.

  14. #14
    Join Date
    Mar 2008
    Location
    Beantown
    Posts
    2,831
    Quote Originally Posted by Mel Fulks View Post
    I've also seen some joint and rip but I don't like to let jointer contact glue.
    Yup.....that's the way I do them

    JeffD

Posting Permissions

  • You may not post new threads
  • You may not post replies
  • You may not post attachments
  • You may not edit your posts
  •