I like high fudge factors.Originally Posted by John Coloccia

I'll give it a shot.


 [OP]
Member
[OP]
Member
I like high fudge factors.
Contributor
Incidentally, save some old pill bottles, and get in the habit of saving some dust when you're sanding the fingerboard. I have several kicking around for guitars in process. It will come in handy for all sorts of things....minor chips if you need to yank a fret, for example. I also use it to fill in the ends of the fret slots. Sometimes I trim back the tangs, just like on a bound fingerboard, and then fill in with a little dust and a small drop of thin CA. On maple boards, I tend to use a lacquer stick instead.
Anyhow, I'm rambling now.
[OP]
Member
A little over a week ago I wrote Micro Fence asking how the order is going on the Dremel plunge base. They got back to me a couple of days later and said they would be shipping early to mid this week. So far, no more news on shipping from them. I'm hanging my hat on this base being what I need to conquer my inability to see what I'm doing with the inlay routing. It's been a month since I ordered it and I'm getting antsy. I really want to finish this thing.
EDIT: 4 minutes after I posted this I got an email from Micro Fence saying the base was shipped Monday and should be here Friday. If this doesn't work for me, I'm done with intricate inlays.
Last edited by Julie Moriarty; 05-13-2015 at 6:03 PM. Reason: Update
[OP]
Member
I've been to house selling hell and back! I had to gain some sense of normalcy so this evening I went into the shop determined to get the inlay work done, or at least moving forward.
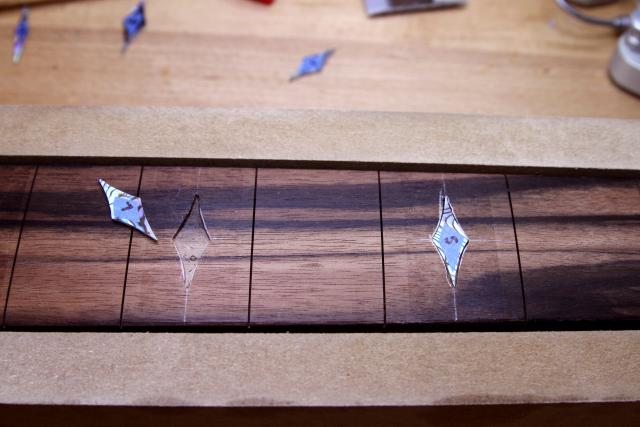
Much of the earlier routing done by my SO was done with a 1/16" bit. That was too large for the points. Tonight I put in a 1/32" bit and positioned the LED lights on the Micro Fence plunge base in a way that provided me the best light with those battery operated lights. It was good but I still want to work on something better.
Anyway, I forged ahead, knowing I'd have to fix the boo-boos with some sawdust. That plunge base is awesome! If I started the inlay work with that base I believe I could get it perfect. All the cuts I made tonight were right on. I especially like being able to plunge down and lock the depth, then release it when done.
I stopped after the 12th fret. It was getting late.
There will be some filling required but I'm really happy knowing I'm going to get this done very soon.
Travel is fatal to prejudice, bigotry, and narrow-mindedness..." - Mark Twain
 Member
Glad to see you getting back to the build. I did some inlay work myself this week...so I feel your pain!
[OP]
Member
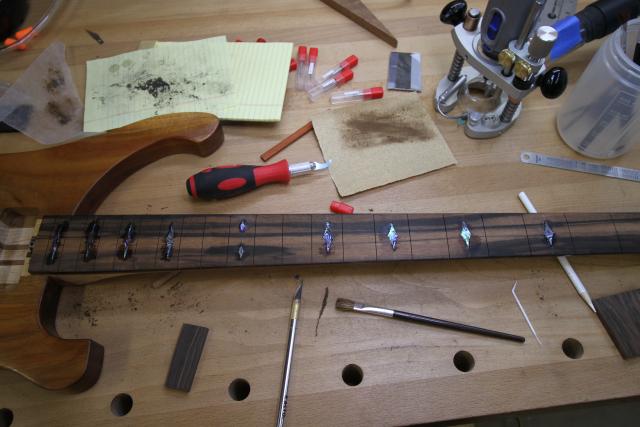
Thanks for the encouragement, Mike. I finished the rest of the inlays last night and spent over an hour filling in the gaps with sawdust. I tried to get the filler to match the color of the grain. It was very time consuming. Once I dripped the CA on it, I realized the results will probably be mediocre at best. I was probably overly ambitious and definitely overconfident when I agreed to take this on. LOTS of lessons learned. But I'll walk away no longer afraid of doing inlay, though I still believe there's some magic involved. It looks so simple in the videos I've seen but it is anything but.
Travel is fatal to prejudice, bigotry, and narrow-mindedness..." - Mark Twain
 Contributor
Julie,
Nice progress! Inlay isn't alchemy, but it is art. The only way to learn the art is with practice. It must be very nervewracking for your first piece to be on an expensive and lage piece. My first inlay (knife handle) was a total disaster. I worked all day on it. Looked at at it the next morning and threw it away. Re-did the whole handle with much beter results in less than two hours the second time.
My advise now that you are comfortable with the routing, is to learn when to stop the routing and go to hand tools to fit the inlay. I bought a box of dental picks (50 for $10) that I sharpen and modify to work odd corners, curves, etc. Need a left hand curve cut? Modify a pick accordingly. I think too many try to use the router for the entirety of the recess. I hog out material with big bit. Creep up on the line with a very small bit. And do final fitting with hand tools.
Shawn
"no trees were harmed in the creation of this message, however some electrons were temporarily inconvenienced."
"I resent having to use my brain to do your thinking"
[OP]
Member
Finishing with hand tools is great advice, Shawn. I was doing that initially but I didn't have anything small enough to get into the points so I used an X-acto knife. That worked so-so.
I know it's inadvisable (insane is probably more like it) to learn on something that already had a lot of time and money invested into it. I can get very impatient at times and then there's the voice in my head that tells me I have magical powers and can do what no one before me has done.But that's me. I've always been that way. Good thing is my SO just wants something I made and something that plays well. That takes a lot of pressure off and I won't be engaging in as much self-flagellation afterward.
Travel is fatal to prejudice, bigotry, and narrow-mindedness..." - Mark Twain
Contributor
Hold off judgement until you get the fingerboard sanded. Again, a bit of dust and CA won't perform magic, but once everything is nicely sanded it's not unusual that it maybe look a little better than you thought it might.
[OP]
Member
I got a chance to sand it down a bit and it does look better. But the still some areas where I was overly generous with the CA and it's darker in those areas. And all the shell is flush with the fingerboard wood. I don't remember that when I did the dots. But the dots were drilled exact. I have no idea how deep that CA went.
Travel is fatal to prejudice, bigotry, and narrow-mindedness..." - Mark Twain
Member
The filler will be less noticeable once you oil the fretboard.
 Contributor
Is CA the glue of choice for this? I messed up quite a few turnings filling cracks with CA and having it bleed and discolor the surrounding wood... which took a lot of sanding to eliminate. What about using thinned epoxy?
Contributor
I've always used CA, but remember that Julie radiused the fingerboard before inlaying...I think I'm remembering that correctly. You normally inlay first, at least a touch deeper than the wood itself, and it's not really a problem after you sand it. Ideally, especially if you use something like abalone, you want to touch the shell as little as possible as that preserves the best figure. A side benefit I'd never even thought of, though, is that it means any glue staining will simply disappear when you sand it.
I typically get a rough radius after I cut the pockets, but before gluing them. Then i glue in the MOP. Then sometime later, after the neck is fully shaped, I do a final radius/flattening just before fretting. Maybe Mike will weigh in with his process. I hate inlay, and do as little as I can possibly get away with!
I think in the end, this will turn out a lot better than Julie's self-critical eye is giving herself credit for. You're always your own worse critic.
Now, one trick that I have used on repairs/refrets is putting a touch of wax on the wood right near where you're gluing. After the CA sets, it will peel right off more fingerboard materials. I have a dulled micro chisel I use specifically for peeling that glue out from the corner of a fret.
Last edited by John Coloccia; 06-09-2015 at 2:45 PM.
 Contributor
On ebony fingerboards I've always used a relatively slow setting epoxy with carbon black mixed in to set inlays. That gives me time to get all the inlays in place and then press them into place by clamping with a caul (waxed paper keeps the caul from sticking). A banjo might have 50+ pieces to get into place, using CA I'd surely have glued all my fingers together, and probably my finger to my nose before I was done ;-) Haven't done a pre-radiused fingerboard, CA and working piece by piece would probably be better for that. Carbon black is extremely fine and when sanded gives a final sheen and color that is near invisible on ebony. It's easier to come by than quantities of extremely fine, uniform sawdust.
[OP]
Member
With all the house selling PITA out of the way, I got the chance to do some work on the bass. I did some more sanding on the fingerboard and then applied some FB oil. It looks much better but I can still see the flaws. Oh, well. It probably won't be sold until I'm long gone.
I worked on the nut slot and got the nut nice and snug. It's a Ric nut and is 3/8" thick. It looks like it's some sort of phenolic material. It seems everything this company does is weird. Anyway, I inserted it in the slot and it stands up like a violin bridge. The slot is a bit deeper than what I've done with my guitars. I guess they figure you need filing down experience.
Before I do, does anyone know where I can find action numbers for a bass? I've done a Google search and I can't find any numbers for a Ric. I did find something at Stew Mac:
Bass Bass E Treble G Action at the 1st fret .022" .020" Action at the 17th fret .105" .094" Relief: .014" at the 7th fret
Would this work OK?
Travel is fatal to prejudice, bigotry, and narrow-mindedness..." - Mark Twain
 Posting Permissions

 Reply With Quote