Page 14 of 18 FirstFirst ... 4101112131415161718 LastLast
Results 196 to 210 of 260

Thread: Electric Bass Guitar Build

  1. #196
    Join Date
    Jul 2012
    Location
    Punta Gorda, FL
    Posts
    3,028
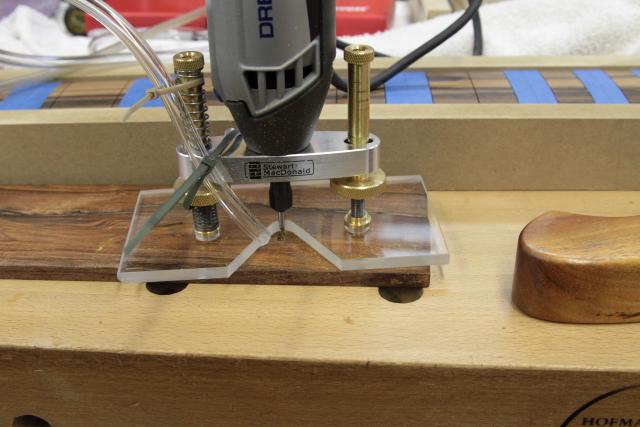
    The Nextflo looks pretty high tech but I can't justify the cost. What I ended up doing is removing the hose from the air inlet on the base and attached it so it's blowing straight down into the cut. That worked. I can see the lines when I'm routing now.


  2. #197
    Join Date
    Jul 2012
    Location
    Punta Gorda, FL
    Posts
    3,028
    A miracle happened tonight. We're in the midst of finishing up some bathroom renos and I was waiting for finishes to dry. I've had nightmares about the abandoned bass (kinda) and I knew I had to get back to it but the microscopic surgery of inlay work overly challenged my far-sightedness. But I set everything up again and started routing. Problem was I just couldn't see the fine lines, even with 500+ magnification. My SO came down and saw I was frustrated. "Do you want to try?" I asked. My SO has electron microscope up-close vision and after a couple of minutes was routing away like a pro. No magnification at all and far better than anything I have ever done. I was ecstatic!

    Now the bass has a new lease on life!

  3. #198
    Keep on chuggin', Julie! It's hard when you let something sit for a while.

  4. #199
    Join Date
    Jul 2012
    Location
    Punta Gorda, FL
    Posts
    3,028
    Quote Originally Posted by John Coloccia View Post
    Keep on chuggin', Julie! It's hard when you let something sit for a while.
    You're telling me!

  5. #200
    Join Date
    Jul 2012
    Location
    Punta Gorda, FL
    Posts
    3,028
    I'm posting this probably more as motivation to get back on the horse than anything else.

    Awaiting final surgery...

  6. #201
    It LIVES! Looks like the fun part is next.

  7. #202
    Looking good, Julie!

  8. #203
    Join Date
    Jul 2012
    Location
    Punta Gorda, FL
    Posts
    3,028
    Quote Originally Posted by John Coloccia View Post
    It LIVES! Looks like the fun part is next.
    Ooh boy... I was working on the fine cutting for those arrow point inlays (they can impale your) and I discovered my SO's electron microscope eyes may have not be properly connected to the hands. I had to take an X-acto knife to get the points cut in but the robot I hired to do the Dremel work must have been working during an earthquake. 
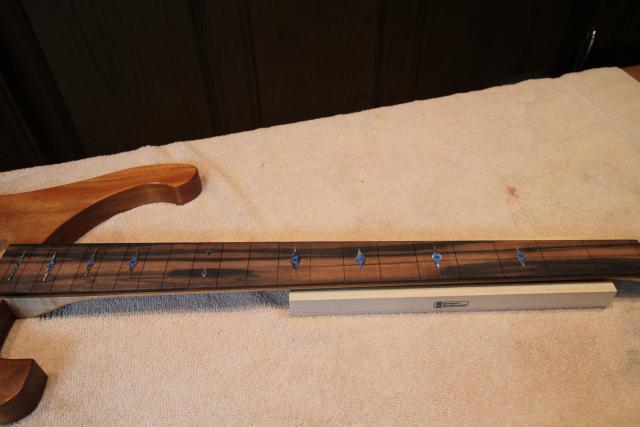
It's not pretty. I have no idea what to do. The grain colors on the fretboard won't allow an easy sand-CA-sand-CA-sand process without being obvious. I'm thinking I need to sprinkle in sawdust the same color as the adjoining grain then drop in the CA.

    Today has brought all sorts of challenges. That's why I'm still up.

  9. #204
    My suggestion would be to cut around the outside of the inlay with an X-acto or a graving tool, pick out the wood and use black epoxy to create a black border around the inlays.
    Time consuming, but IMO it will make those inlays pop better against the fret board color.
    Last edited by Mike Sherman; 04-21-2015 at 12:25 PM.

  10. #205
    Join Date
    Jul 2012
    Location
    Punta Gorda, FL
    Posts
    3,028
    Quote Originally Posted by Mike Sherman View Post
    My suggestion would be to cut around the outside of the inlay with an X-acto or a graving tool, pick out the wood and use black epoxy to create a black border around the inlays.
    Time consuming, but IMO it will make those inlays pop better against the fret board color.
    So, enlarge the rout out creating a small margin around the abalone, then setting the shell in black epoxy, leaving a black epoxy border around it? Any advice on where to start finding, coloring then using epoxy? I'm a total newbie to this.

  11. #206
    Correct. Certain inlay designs require a black witness lines to help offset the colors of shell and accent the overall design. An example would be white MOP next to gold MOP, it looks kind of washed out when used next to each other without a witness line. Having a black witness line helps with color separation. Stew-Mac and most hobby shops sell black epoxy. I prefer the slow-setting epoxy as it has a lower shrink rate. You can also add wood dust (or colored plastic dust)to epoxy for color matching.

  12. #207
    I haven't tried it personally but I understand that India Ink mixed in with the epoxy works great. YMMV...test on scrap!

  13. #208
    Join Date
    Apr 2009
    Location
    Mandalay Shores, CA
    Posts
    2,690
    Blog Entries
    26
    I've used black dye or ebony dust in epoxy. Works great.
    Shawn

    "no trees were harmed in the creation of this message, however some electrons were temporarily inconvenienced."

    "I resent having to use my brain to do your thinking"

  14. #209
    Join Date
    Jul 2012
    Location
    Punta Gorda, FL
    Posts
    3,028
    Looks like I have some more experimenting to do. Thank you for the assistance. I just hope paralysis doesn't set in again. But I'm going to wait until the Micro Plunge arrives. It's already 10 days into the 3-4 week delivery time frame. I have plenty to do in the meantime...

  15. #210
    I'll just mention that unless it's really bad, you'd be surprised how much CA, or CA and dust, will hide. Do a test inlay in a piece of scrap, do a bad job, glue it in, and you'll get an idea of what you can get away with and what you can't.

Posting Permissions

  • You may not post new threads
  • You may not post replies
  • You may not post attachments
  • You may not edit your posts
  •