Page 12 of 18 FirstFirst ... 28910111213141516 ... LastLast
Results 166 to 180 of 260

Thread: Electric Bass Guitar Build

  1. #166
    Join Date
    Jan 2009
    Location
    Williamsburg,Va.
    Posts
    12,402
    I wonder if Nicholson files are STILL as soft as butter-those are made in Mexico now,you know. I'd call Stew Mac and ask if their files are old stock still made in USA. You will probably have to speak to a tech. Those are cut off,so the brand is eliminated,so you can't tell where the file came from.

    I just looked at the files in your link,John. Those are actually LATHE FILES. They have been cut down to length to make them fit the wooden blocks. A horse file would do just as well,and they are very sharp,more so than lathe files.

    I make files screwed to a wooden block for leveling FRETS by drilling a hole in each end of the file with a cheap carbide tip masonry bit. I use a 3/16" for the through hole. Run the masonry bits as fast as your drill press will go. The chips will be orange hot. Don't worry about it. The carbide takes the temper out of the steel,and scoops it out. Let off every several seconds with the drill. The brazed tip can melt loose and the tip comes off. Buy more than 1 masonry drill while you are at the hardware store.

    I countersink the holes to receive the flat head screw with a larger masonry bit. You can run it slower since you already have made a pilot hole. Probably would screech loudly if run fast anyway.

    Don't try to do this drilling with a hand held drill. It won't run fast enough,and probably the drill will skitter all over the file and ruin it.

    For my FRET files,I just used an ordinary 8" mill file with the tang ground off. I carefully check the file by sighting down it to make sure it doesn't have an "S" curve in it. All files are curved a bit,it seems,except special files like pillar files. Drill your countersink holes so that you are screwing the hollow side to the wood. The wood will pull the file straight,or you can add some paper shims under the center of the file to make it straight,or slightly convex. I make mine slightly convex to prevent the ends of the file from whacking into frets as it is used.

    For leveling the actual WOOD,I'd recommend getting a farrier's horse rasp. One side is a very coarse rasp,but the other is a real sharp extremely coarse cut regular file. You'll have to clamp the file TANG UP in a vise,cover the end sticking up with a HEAVY rag,like an old towel,to prevent shards from flying all over the place. They are very sharp where broken. Use a HEAVY hammer. I made myself one about 4" long. It is great for finish filing a guitar neck,eliminating any dips in the surface and making the back of the neck quite straight. I use both sides of my neck file,rasp first,then the file,to finish contouring necks. I really love my horse file. The FILE side teeth are very sharply cut. Great for wood.

    If you are afraid to break the file,send it to me and I'll break it and grind the ends true for you. PM me for my address.

    These horse rasps are not made by Nicholson,so are still made in USA as far as I know. And,it probably would be easy to pick out an old stock one that still says USA on it as they are not fast moving items.

    P.S. Those horse files are thick enough I do not find attaching them to a wood block necessary. You may if your fingers are tender. But,I like using BOTH sides of mine. I'd just epoxy the file to the wood block if you decide it is necessary. Glue the RASP side to the block.
    Last edited by george wilson; 01-09-2015 at 9:49 AM.

  2. #167
    Lathe file, eh? That explains why I couldn't really identify it. I don't know about current Nicholsons. I've simply stopped buying them.

    It's amazing how that file takes shell right off, but mostly just leaves the wood alone unless you're really trying to do damage. I have to try the farrier's rasp. You've mentioned that before and I've never had a chance to try one. I'm surrounded by farms and stables, so I'm sure there's a local farrier supply place around here somewhere. No worries on breaking the file...it wouldn't be my first! Having been in the R&D biz for a long time, working with lots of robots and things over the years, I always seem to need to sneak a file into somewhere it doesn't fit. Noooooooo problem.
    I guess you have no ideas on that inlay either, huh? The only thing I can think of is that the inlay itself just simply needs to be at least .010" thicker, or more, than the worst case dip due to the radius (worst case being at the body side). I guess if you want to cheat you can route it as deep as you need to not sand away the inlay, and then fill it in with a clear epoxy. I've seen some inlays done like that when they've had engraving on them, and it doesn't look too terrible.

  3. #168
    Join Date
    Jul 2012
    Location
    Punta Gorda, FL
    Posts
    3,028
    Thanks guys! I was pretty concerned facing what I was yesterday and would have been even more so after you confirmed my fears. But later on yesterday my SO looked at the pictures I dug up on the Internet with shark fin inlays and came to the conclusion they were too angular, or sharp or something like that. Then came literally hours on the Internet, searching for the right ones.

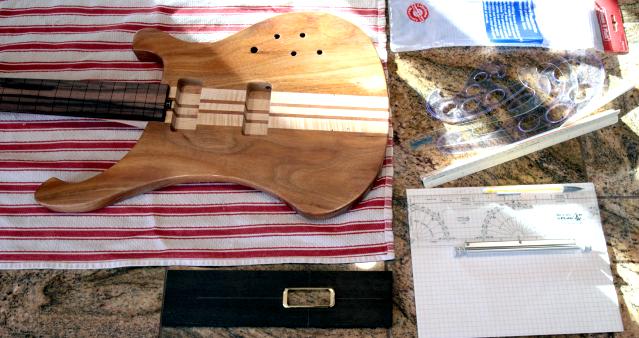
    During that time I put second coats of finish on the new bathroom cabinet doors and drawer fronts, wiped a second coat of Tru-Oil on the bass, made a routing template for the pickup rings, milled a new piece of ebony and routed it out for the pickup ring. I had drawn a shape on another piece of ebony that incorporated curves from the headstock. My SO liked it and wanted to pursue using that as a cover for the bridge pickup. The images I have in my head are a mix of acoustic bridges and curves taken from the bass.

    Here's what I'm giving my SO to work on this morning:

    Graph paper, pencil, rulers and curves. I feel like a grade school teacher.

    But back to the inlays... After hours and hours searching and not finding "the one", the concession winner so far is the "inverted diamond"

    This may be less of an issue across the width. At the 3rd fret location the FB width is 1-3/4". The last inlay will lie across a neck width of 2-1/4". The FB radius is 10". I'll have to do the calcs and get the actual thickness of the inlays before I'll know for sure.

    The best inlay selection we've found so far is from Luthier Supply. They have many wide FB inlays so you'd think they would take into consideration the fact that the outer ends will be sanded down quite a bit. I can't find the thickness of the shell on their website except where they are offering pieces by the ounce. There they say it's 1.5mm thick. We'll call today and try to get some answers.

  4. #169
    Since the inlay is only 1 5/8, if I calculate it correctly a 1.5mm inlay will give you about .020" to spare at the edges (there, that should get the metric/imperial/fraction/decimal crowd really going!). DO DO DO double check me, though. I would inlay it as low as I possibly could...maybe even SLIGHTLY, just ever so slightly, lower than the fingerboard. Just enough that you're sure it's not proud of the fingerboard at the highest part. Then level the inlays, and then come back and do a final flushing up of everything. You probably want to do a final levelling on the fingerboard before fretting anyway, since it's surely squirmed around a bit after carving the neck.

    Incidentally, it wouldn't be unusual to inlay shell just shy of the surface, and then bring the wood down to match the shell. It doesn't matter in this case where you're removing so much shell at the ends anyway, but doing it like that on flat surfaces (soundhole rings, binding, etc) preserves as much of the figure as possible. Something to consider for the future.

  5. #170
    Join Date
    Jul 2012
    Location
    Punta Gorda, FL
    Posts
    3,028
    I don't know how much this will matter, but I'll only be using 9 of the 10 inlays so I may get a smidge off the 1-5/8" on the lowest fret inlay.

    Now that you've done the calculations, you've sparked my interest. I'll have to try my hand at that.

  6. #171
    Join Date
    Jul 2012
    Location
    Punta Gorda, FL
    Posts
    3,028
    I took out my Sagitta skills and put them to the test (Senior Motolla helped) and came up with sagitta of .033. The shell is .063 thick so that leaves .030 on the ends of the bottom inlay, if I'm doing any of this right. At the top I'll only lose .007 off the shell thickness. The owner said the shell is good enough quality that sanding to the radius won't be a problem. "It's not like you find on ebay."

    My SO placed the order! Hip! Hip! Hooray!

  7. #172
    Join Date
    Jan 2009
    Location
    Williamsburg,Va.
    Posts
    12,402
    Julie,I have my doubts about using Tru Oil on an instrument. You need to listen to this: I finished a violin with Tru Oil years ago. It is a beautiful finish. This was back when I was Master Musical Instrument Maker. I was experimenting with different finishes back then. The violin hung 3 or 4 months in the shop(things moved along slowly due to dealing with the public every day). Finally,I had got the finish rubbed and some time later,strung the violin up. Some months(or weeks) later,I noticed goo around the feet of the bridge. Investigating,I found that the feet of the bridge had sunk clear down to the BARE WOOD!! Tru Oil never really hardens fully,though it seems hard to the hand. I had to strip the violin and apply another varnish. I think any instrument might become glued to the lining of the case it is kept in. The case lining might be ruined as well as the finish on the instrument trying to pry it loose. BE WARNED. This is real experience I had. A solid body bass is not a light weight instrument. It will not rest lightly in the case. I hope you don't have a tragic outcome using Tru Oil.
    Last edited by george wilson; 01-11-2015 at 9:56 AM.

  8. #173
    Join Date
    Jul 2012
    Location
    Punta Gorda, FL
    Posts
    3,028
    Thanks George. I've been on Talk Bass and there's a lot of builders there who have used Tru-Oil. I haven't read anything about problems with it but I'll go back there and look deeper. I chose Tru-Oil because it seemed it was used more often than lacquer on bass guitars, and also, I didn't want to set up the spray tent again.

    We got the inlays Monday. I measured the thickness of the bottom inlay. It's 0.0565" thick but only 1.454" wide. Using that link you provided, John, I come up with a sag of .026. If I understand this right, that should leave 0.0305 of shell on the outer edges. Now I have to dig out the mini Dremel bits I got from SM. I still haven't found those. I need to get some practice in.

  9. #174
    Tru-Oil is generally OK. I have a body finished in TruOil here. It's an electric, and I checked under the screwed down bridge. It's held up fine. I generally use it on my necks and they hold up fine also, even after being in the case for years at a time. I'm not sure what happened with the violin. Perhaps it's something to do with the truoil on spruce? THAT I've never tried. I've also never actually followed the Truoil instructions for application. They insist you should flood the area and then wipe off the excess. I, on the other hand, put a tiny drop on a little square of paper towel or cloth, and I apply many coats very sparingly, at least a 1/2 day apart. It takes me over a week or two to apply the finish, but it's only about 1 minute per day of work. I've done it in as little as a few days, but it takes longer to fully cure like that and it won't feel right until it is.

    Every time George mentions the violin, I always wonder exactly what happened because it's usually much better behaved than that! I'll say also that those violin feet were probably exerting a lot of pressure in a small area. I should do a test here one of these days just to see exactly what's going on and at least understand it so that I don't run into the same problems that George had. It would be easy to dismiss if it were anyone but George, but I'm sure he did it right so there's some kernel of truth in there that needs to be understood.

  10. #175
    Join Date
    Jan 2009
    Location
    Williamsburg,Va.
    Posts
    12,402
    It could be that the 29 # down bearing on the 2 small feet of the bridge was too much for the never-truly-hard Tru Oil.

    I used it on 2 flintlock pistols and had no problem,but I didn't put a lot of coats on them.

    But,if you put your bass for a long time in a case with thick plush lining,and it sticks to it,you have been warned. I certainly would wait some months before putting it in a case. Once bitten!!

  11. #176
    Join Date
    Jul 2012
    Location
    Punta Gorda, FL
    Posts
    3,028
    Oh, I'm not ignoring George's advice at all. I just wanted him to know how I arrived at using Tru-Oil. It seemed like the "bass" thing to do.

    I got the inlays in place, trying to figure out how I will mark them precisely and so I can see the line.


    Yes, the gave me one for the 1st fret too...

    I read in Robinson's book to lay a drop of CA down to make the edges. He suggests using a 0.2mm lead pencil (or was it 0.3mm?). I don't think I've ever seen lead that thin. I have 0.5mm pencils I use all the time and somewhere I have an old mechanical drafting pencil.

    What I did was try to hold the piece in place and, using a white lead pencil sharpened with sandpaper, I traced the outline but it still wasn't close enough for me. Then I took an X-Acto knife and tried the same thing. This was all done with the 3rd fret inlay, one of the largest. I'm trying to be as precise as possible. I don't have the advantage of working on all black Gagon ebony

    I'm a bit apprehensive about using the CA. These things are pretty fragile and I don't have any raw stock to make another if I break one. I placed a piece of blue tape on each to number them. Even working with that was tedious. I'd like to find that shrinking machine so I could shrink myself and make this easier.

  12. #177
    Join Date
    Apr 2009
    Location
    Mandalay Shores, CA
    Posts
    2,690
    Blog Entries
    26
    I apply blue tape over the area that will receive the inlay (okay so maybe not all the time). Then I use spray 77 to temporarally hold the inlay down. I transfer the outline by using a sharp Exacto or scapel to trace around the inlay. If taped, I lift out the inlay tape leaving the outline around. I then go to the Dremel or Foredom Router to hog out the bulk of the inlay. I creep up on the outline with a sharp chisel and dental picks. Don't force the inlay down; it will break.

    Sorry, I should have noted that you can break the CA bond by heating with a heat gun. I don't like that technique, but it can work.
    Last edited by Shawn Pixley; 01-14-2015 at 1:35 AM.
    Shawn

    "no trees were harmed in the creation of this message, however some electrons were temporarily inconvenienced."

    "I resent having to use my brain to do your thinking"

  13. #178
    Join Date
    Jan 2009
    Location
    Williamsburg,Va.
    Posts
    12,402
    I just put a LITTLE drop of ca in the center of inlays,such that when it is SQUEEZED FLAT,it gets no bigger than a B.B.. That means a much smaller spot to begin with. A little bigger than the head of a pin. Then,I trace with a sharp knife.

    You have chosen a REAL DELICATE type of inlay,so you'll obviously have to be exceedingly careful about everything. That includes popping the inlay loose,delicately tracing and inletting the tips with NO pressure at all to make it go into the wood.

    I use an old,antique bacon turner to get under inlays. They were tapered down VERY thin at the end to very nearly a knife edge not thicker than a beer can. New ones are crap,and way too thick. Easily found in flea markets. You might spend a day honing down a new made one with a big India stone,or against the SIDE of a Tormek wet grinder wheel(running,of course). Wonderful tools for removing tops from violins or any other task where you want to spread the wood as little as possible. They were made of good spring steel.

    If you can pull this off,BRAVO BRAVISSIMO!!!
    Last edited by george wilson; 01-14-2015 at 9:41 AM.

  14. #179
    One "trick", Julie, is to use a mechanical pencil and to then make a sharp bevel on a piece of sandpaper. You'll be able to mark with that really sharp edge and get right up to the inlay. I use this a lot when I'm making nuts. I can mark the edges, take it to the disc sand, and kind of just hold the nut and go right to the line. I very very rarely have to touch up. It's usually a perfect fit the first time. I have a nice drafting pencil and sharpener too that I use for layout, but when it has to be perfect I use the beveled edge of a mechanical pencil if I can.

    You're biggest problem is that the fingerboard is already radiused. It's all so much easier when everything is flat

    If you send me your address again, and don't mind waiting a couple of days for me to mail it, I'll lend you my StewMac dremel base if you want to try it.
    Last edited by John Coloccia; 01-14-2015 at 10:01 AM.

  15. #180
    Join Date
    Jul 2012
    Location
    Punta Gorda, FL
    Posts
    3,028
    Thank you guys! Some nice tips here that never crossed my mind. The SMC braintrust comes through again!

    John, thank you for that offer. Very generous of you! If you're talking this...

    I have one. I just hope there won't be an issue with setting the depth. I still haven't found the box with the inlay bits and collets in it and I have looked EVERYWHERE! But when I tried to do some practicing with a standard Dremel bit, it was way too long. I had the base set to the highest it would go and there was still close to an inch of the bit protruding past the bottom of the base.

    Right now I have the inlays marked in white pencil lines. I know it's not perfect but it's as close as I could get it. I used sandpaper to put a fine point on the pencil and turner's tape to hold the inlay in place. If I applied too much pressure with the pencil, the inlay would twist a little at the ends. The blue tape idea seems worth a try. What I found using a blade on the wood was it tended to hop at the hard grain lines. The tape shouldn't do this.

    My biggest problem is finding the bits and collets. I'm also missing that purple shell laminate piece and I'm thinking the missing items are in the same box somewhere. I have unpacked and unwrapped everything. In frustration, I gave up looking for the bits and ordered new ones from SM. But I forgot about the collets. Maybe Home Depot will have them. Once I have everything I need, I'll practice.

    Just curious - have any of you used the stitching method for outlining the inlay? Robinson says he's switched to that exclusively. He uses a fine bit and plunges it all around the the inlay outline then hogs out the interior. It seems very time consuming but this guy does inlay for a living and pros usually find the fastest way to do pretty much everything so maybe it is faster.

    If you look around 8:50 in this video, he uses a mechanical pencil to make the outlined and holds the pieces down with a nail while marking. And yes, he's a pro and the pieces are smaller. He didn't stitch like I understand Robinson does but he certainly did this fast. I think I'll need some practice.


Posting Permissions

  • You may not post new threads
  • You may not post replies
  • You may not post attachments
  • You may not edit your posts
  •