Page 4 of 18 FirstFirst 1234567814 ... LastLast
Results 46 to 60 of 260

Thread: Electric Bass Guitar Build

  1. #46
    Join Date
    Jul 2012
    Location
    Punta Gorda, FL
    Posts
    3,028
    George, unless you've been blessed with great vision beyond 40 (I haven't) you know it's the eyes that will give you the most problems staying outside the lines. When cutting that close to the line, I cut VERY slowly!

    Pat, that's a very nice bass you built! It looks like it was one piece, not always easy to find. Thank you for the information and links you provided. It is all very helpful!

    I bought JBE 4000 pickups from John. My SO and I heard a lot of different sounds produced by different pickups and it was a toss up between Fralin and Joe Barden. After discussions with John, we settled on the latter. We're going with Hipshot tailpiece and tuning machines in gold. It's tough to find gold hardware for the Ric bass. I ordered a wiring harness, mono jack, knobs and nut from Rickenbacker. The only thing I can't find is gold pickup covers. Pick of The Ricks shows them on their website but when you click on them to load into the cart, nothing happens. Rickenbacker is out of stock. If I can't find them, I'm thinking of making covers out of ebony.

    The more I think about it, the more convinced I am that I'll put access to the controls from the back. I have slices of the body I cut off in taking the 8/4 stock to 6/4 so I can pretty closely match the grain. The only way I wouldn't go that route is if I made a cover out of ebony, which is tempting me a lot lately. I'm just not sure what thickness I'd have to make it for it to work. Maybe I'd have to back it with sheet metal to keep it from splitting?

    On another note - Woodcraft is having a 15% off everything you can fit in the bag sale today and I filled the bag, mostly with finishing products. One of the things I picked up is Behlen sanding sealer. I'm guessing I'll need it for the koa. I already tried mahogany-toned Behlen pore filler but it's pink and dries pink. If the sanding sealer alone doesn't fill the pores, I'll have to mix something up.

  2. #47
    Join Date
    Jan 2009
    Location
    Williamsburg,Va.
    Posts
    12,402
    Julie,I always have had good eyes,though over the years I developed cataracts. Not as bad as I thought,though. When I had the lenses in my eyes replaced a few years ago,white walls were stark white instead of having a bit of golden color about them.

    I could see 20-15 after the surgery,at distance. I still need glasses for closeup,but do see just fine. My closeups are 2.75,I think,or 2.5.. That is fine for the bandsaw. For hand sharpening #80 drills,I put on 4X drugstore glasses. I'm not quite as sharp as I used to be. Started needing glasses about age 45,I think.


    You need to tint that sanding sealer. Don't put it in if it isn't the right color!!! I made that mistake when I was a teenager. I bought some filler that was designated "transparent". I fell for it. It might have been transparent on PINE,but not on rosewood!! It just dried cream colored. All we used to have(that I was aware of) was the old oil based gunk. Not easy to sand off. The new water based stuff is easier to deal with.

    In the old days,they just used plaster mixed with water based stains. In the 18th. C.,they actually used ground up red brick dust to fill mahogany,and make it redder. After centuries of relatively dark and bland oak and walnut woods,the English really got excited about the new tropical Cuban mahogany. In the Anthony Hay cabinet shop in Williamsburg,they used brick dust on a piece. It certainly was lively!! But,in the old days,seeing colors was a real treat compared to today. And,their colors were too often vegetable based and fugitive. When aniline dyes were invented in the early 19th. C.,people soon went nuts over them,especially when Queen Victoria appeared dressed in a mauve dyed dress.

    Woods from the New World first made their way back to England as ballast material,thrown up on the docks. After a ship unloaded in Cuba,they had to re ballast the ship,and often used logs. When cabinet makers discovered these mahogany logs,it was soon realized that they were a great cash cargo to bring back.

    At first,they cut down the trees and only took the stumps back,as they had the most figure. 50 years later,when the trees were getting scarcer,they went in and got the logs they left behind. Talk about rot resistant!!

    Getting this wood was terribly difficult work as they went farther into jungles. Many men and oxen were lost to diseases like malaria. But,men were willing to risk it for the pay they got. In many trades,workers refused safety measures when they were invented. They got hazardous work pay,even though they knew they'd die at about 35.

    Needle grinders breathed steel dust,and got "pointer's rot". Someone invented putting lodestone magnets near the wheels,but the men refused to use them. Lots of trades were like that in England.
    Last edited by george wilson; 05-27-2014 at 9:44 AM.

  3. #48
    Join Date
    Jul 2012
    Location
    Punta Gorda, FL
    Posts
    3,028
    George, you are a never ending wealth of information. They need to dedicate a library to you!

    Can you help me with this? Pickup location and harmonics?

    If I understand what I've read correctly, there are certain places you SHOULDN'T place a pickup and those places are where the string harmonics are at their zero node. (Forgive me if I don't have the terminology correct but I'm talking about is a dead spot in the string vibration.) I realize once you fret a string, you change the zero node. But is there some guideline for placing the pickups or is it just seat-of-the-pants?

    Right now I'm looking at placing the neck pickup on this guitar at the 24th fret and the bridge at the 36th fret. Both are pretty close to where Rickenbacker places theirs. To keep the SO happy, I'm doing my best to get a Ric look for this bass while creating the best sound I can.

    Should I make a mockup and move the pickups around to see what sounds best? Or are there some guidelines I should follow?

  4. #49
    Join Date
    Jan 2009
    Location
    Williamsburg,Va.
    Posts
    12,402
    Julie,I am really not an electric guitar maker,though I have made a number of them,I'm more an acoustic builder. John can better advise you on pickup placement. I WOULD get his advice before placing them.

  5. #50
    It's seat of the pants. Generally, the closer to the bridge you get, the brighter and less loud it is. Closer to the neck is darker and louder. That's the basic difference when you see the same pickup in a neck model and a bridge model. The neck model is weaker or you'd never get them balanced. It's because the string moves less at the bridge...it's stiffer there...so you get less signal. Also, because of the stiffness it can't support the lower order harmonics very well there...moves even less. So it's brighter at the bridge and weaker.

    There's no magic formula. There's a lot of talk about lining it up under harmonics, but talk is all it is. The pickups are where they are because that's where they fit. If you move them around, they're still close enough to the harmonics at that point that people will say they're lined up under nodes. Look at 24 fret guitars...quite popular. The position of the harmonic where the Fender neck pickup is located is actually located over the 24th fret on the fingerboard now! Run your finger lightly over the string between the end of the fingerboard to the bridge, and pluck. You'll find so many nodes that it would be practically impossible NOT to have a pickup generally aligned under SOMETHING.

    I would probably just copy what Ric did, especially since you have pickups that are designed for Rics. I've done a LOT of experimenting with pickup locations. In the end, it's a matter of taste, but if you start moving things around you'll start getting away from the sound of that Ric.

  6. #51
    Join Date
    Jan 2009
    Location
    Williamsburg,Va.
    Posts
    12,402
    Well,blast it,I knew that much,John!! I thought you'd have some kind of formula. A magic one especially!!!

  7. #52
    Join Date
    Jul 2012
    Location
    Punta Gorda, FL
    Posts
    3,028
    Thanks John. I'll just position them where I had planned. And George, thanks for whipping John into shape and dragging him here to reply.

    The tuners and tailpiece arrived today. I think we're on the right track with the gold and Hipshot brand. The pickup covers are still alluding me though. About the only other thing up in the air is possibly using some ebony for binding. I still can't quite picture it and I've never done anything like that before.

    I've been working on templates to make router jigs for angling the headstock and taking down the back of the neck so I won't have so much hand work to do. It should save a lot of time. If it works, I'll post pics. If it doesn't, forget you ever read this.

  8. #53
    Join Date
    Jan 2009
    Location
    Williamsburg,Va.
    Posts
    12,402
    Ebony for binding what,Julie? If it's the body,be prepared to learn how to bend it.

  9. #54
    Join Date
    Jul 2012
    Location
    Punta Gorda, FL
    Posts
    3,028
    Quote Originally Posted by george wilson View Post
    Ebony for binding what,Julie? If it's the body,be prepared to learn how to bend it.
    The ebony would outline the body. Rickenbacker also runs binding along the neck but if I did that I'd have to use koa or maple on the neck as the fretboard is ebony.

    For the body, I know I'd have to steam the wood, form it and then glue it in place. I've been thinking 1/4" x 1/4" strips of Macassar ebony. Then when it's glued in place, I'd come back and do a roundover on it. Still just a thought.

    Here's the progress on the jigs I'm making for basic shaping of the neck:

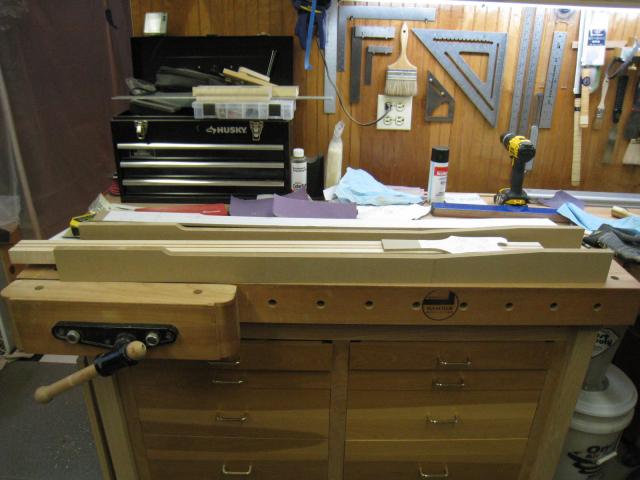
    This one is for the back side. It will create the 4 degree angle at the headstock and also cut the waste away from the back. The final shaping will be done the old fashioned way.


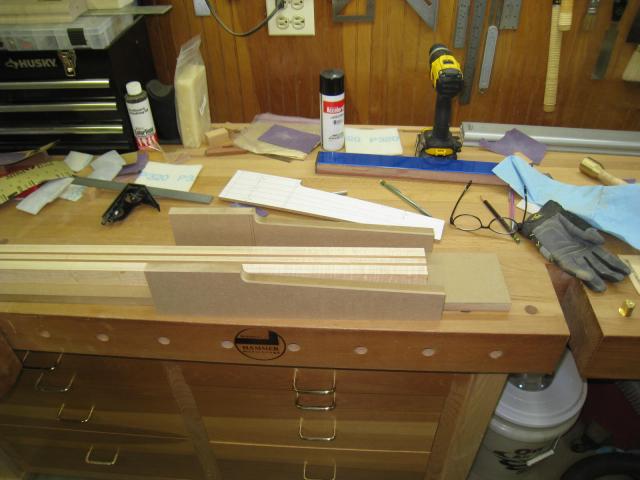
    This will cut the front side of the headstock. Both headstock cuts will be made after the "wings" are glued on.
    The final Ric shape will be done last.

    I also made a template to shape the neck - before the "wings" are glued on. To make sure the neck blends with the different length sides, I used a straight edge to form a line from the nut to where the body joins the thru-neck. On the jig for the front side of the headstock, there will be a platform on top of the left side of the jig. My plans are the router can move off the MDF base and onto the top to shape the transition just above the nut. I'll use a 1/2" round bit at that point. I drew this all up in 3D CAD and "tested" it there. I hope it works as well in the real world.

  10. #55
    Join Date
    Jan 2009
    Location
    Williamsburg,Va.
    Posts
    12,402
    It is traditional to bend bindings and the sides of acoustic bodies around a hot pipe rather than by steaming them. I don't know how you intend to bend ebony around the sharp curves of the cutaways. Especially 1/4 X 1/4" strips. Maybe 1/4 x 1/16" strips,but ebony,at least some ebonies,are very brittle woods. Have you thought about using built up black dyed veneer strips? I'd glue them up with black dyed glue.
    Last edited by george wilson; 05-30-2014 at 10:36 AM.

  11. #56
    Join Date
    Jul 2012
    Location
    Punta Gorda, FL
    Posts
    3,028
    You know George, I've never done any steam bending, but that's what makes this so appealing. Look at where I was 6 months ago. I was clueless about building guitars. Now I'm making the Moriatavarius. I realize bending 1/4"x1/4" ebony is very different than typical binding but the look I'm going for will have a roundover on the perimeter of the body. I don't want a sharp edge there.

    Yesterday something hit me (one reason why taking this slowly has its advantages), with the thru-neck the same depth as the body, none of the neck will stick up above the body of the guitar. On the guitars I've built, the neck material sticks up 1/8" above the body and the fretboard adds another 1/4" - so 3/8" overall. I've been trying to find a clear picture of the side of Rickenbacker basses to see how they do it but haven't found one yet. I'm thinking I'll have to add a 1/8" spacer on top of the fretboard from where the top of the body is to just past the nut.

  12. #57
    Quote Originally Posted by george wilson View Post
    It is traditional to bend bindings and the sides of acoustic bodies around a hot pipe rather than by steaming them. I don't know how you intend to bend ebony around the sharp curves of the cutaways. Especially 1/4 X 1/4" strips. Maybe 1/4 x 1/16" strips,but ebony,at least some ebonies,are very brittle woods. Have you thought about using built up black dyed veneer strips? I'd glue them up with black dyed glue.
    Looking at the horns, I think it's right at the limit of what I could do with something like Ebony or Bloodwood. 1/4" is way way way too thick. Biinding on electrics and archtops is typically under .100" total thickness. Acoustics are sometimes more, with fancy abalone even sometimes, but that's always multiple layers. Aim to get that ebony down around .8". If you want thicker binding, use some THIN maple and ebony veneers to do white/black/white purfling.

    The secret to binding, if there is one, is to make the channel SLIGHTLY too deep. A few thousandths is fine. You always want to scrape the sides down to meet the binding, not the other way around. If you bring the binding down to the sides, any slight deviation in the binding ledge will show up as differing thickness binding. Sometimes you get away with it...and sometimes you don't. Better to be safe and leave the binding untouched.

    The really tight bends on the horns are actually mitered, George, like a Venetian cutaway. Still, as you say it will be a test of skill to bend the wood around there. One trick I picked up from somewhere is to use the tape from a mini tape measure to backup the binding as you're bending it. It helps keep the outside of the bend from tearing. It's definitely not a silver bullet, but it does help a little.

  13. #58
    Join Date
    Apr 2009
    Location
    Mandalay Shores, CA
    Posts
    2,690
    Blog Entries
    26
    Quote Originally Posted by John Coloccia View Post
    The really tight bends on the horns are actually mitered, George, like a Venetian cutaway. Still, as you say it will be a test of skill to bend the wood around there. One trick I picked up from somewhere is to use the tape from a mini tape measure to backup the binding as you're bending it. It helps keep the outside of the bend from tearing. It's definitely not a silver bullet, but it does help a little.
    Once again John beat me to the game. The tape measure trick helps a lot. You may want to build up the ebony thickness from multiple thin layers (all black if you don't want the banding effect).

    For the fingerboard on the through neck, I'll look at mine when Connor gets up. He had a show last night and I'll let him sleep in. The things we do for our kids, eh?
    Shawn

    "no trees were harmed in the creation of this message, however some electrons were temporarily inconvenienced."

    "I resent having to use my brain to do your thinking"

  14. #59
    Join Date
    Jan 2009
    Location
    Williamsburg,Va.
    Posts
    12,402
    If you had a strip of saw blade spring steel it would really help,backing up the strips while you bend them,Julie. I definitely agree with John that your 1/4" ebony is way too thick to bend. Better to make up a multi layer strip of black and white,as he said. My suggestion to build up all black layers was if you really wanted a solid black edge. But,sometimes it is just better to make something look obvious,and let the layers show with different colors.

    I think Grizzly sells black fiber binding. You could use that with no bending at all. It just bends.

  15. #60
    Join Date
    Jul 2012
    Location
    Punta Gorda, FL
    Posts
    3,028
    I saw StewMac sells natural wood binding. The dimensions are .080" thick, .250" tall and 33-1/2" long. I could take that and laminate it around the curves. What I don't want is a sharp edge, not with wood. Sanding between coats of lacquer is tough enough on roundovers and I can't see a sharp corner being very conducive to comfortable playing.

    I've been researching the pickup installation. JBE figures you're replacing old pickups in an existing RIC and provides nothing in the way of mounting them in a new build. And from what I've seen, RIC's design for mounting is kinda crazy. It's like someone just decided, "This looks okay" rather than being engineered and tested. The neck pickup has nothing for mounting it to anything.


    From what I've seen, that plastic plate is used to keep the pickup inside the cover and there's a foam ring to keep it in there snug. There's no way I can see to adjust the height outside of raising the entire cover up off the pickguard or body. I saw one picture where they inserted grommets under the cover and it looked terrible. And trying to find parts for the bridge pickup is a lesson in futility. After hours looking, my SO said it would be easier finding a RPG to buy than the mounting hardware and covers for the bridge. If we knew then what we know now, the RIC-based bass build would have been replaced by something else. Either Rickenbacker keeps their stock low because they can't afford to have it in stock or they do so to intentionally keep demand and prices high.

Posting Permissions

  • You may not post new threads
  • You may not post replies
  • You may not post attachments
  • You may not edit your posts
  •