Page 1 of 2 12 LastLast
Results 1 to 15 of 28

Thread: Having a Little Trouble With Topcoat !st Time Using a Brush

  1. #1

    Having a Little Trouble With Topcoat !st Time Using a Brush

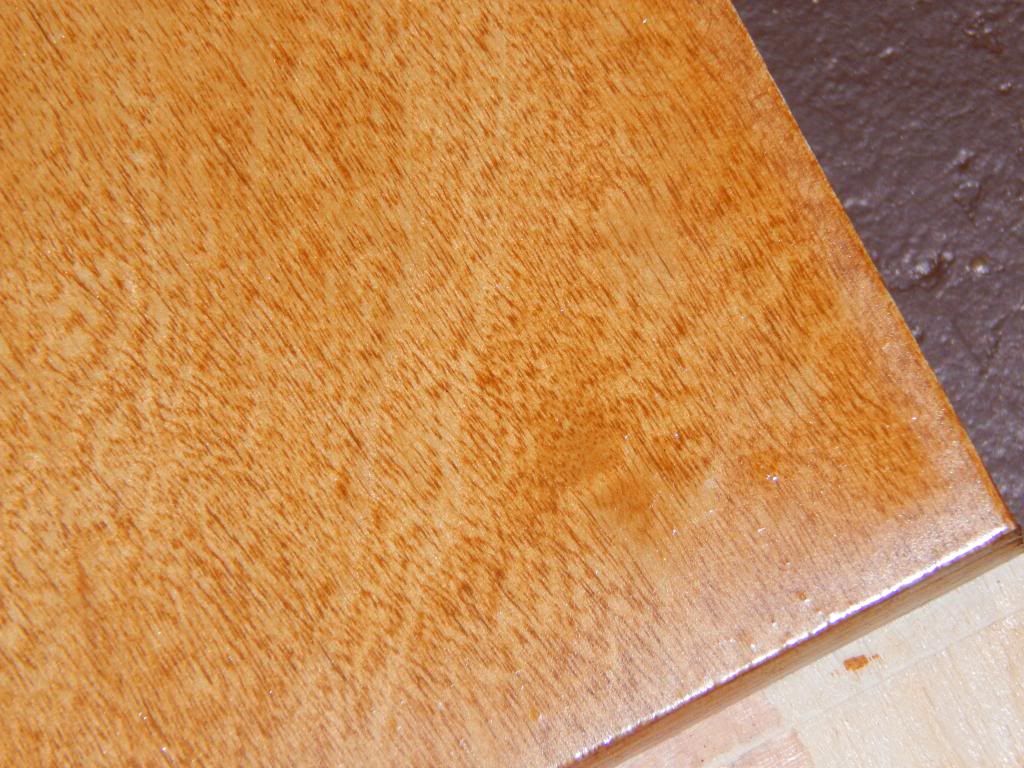
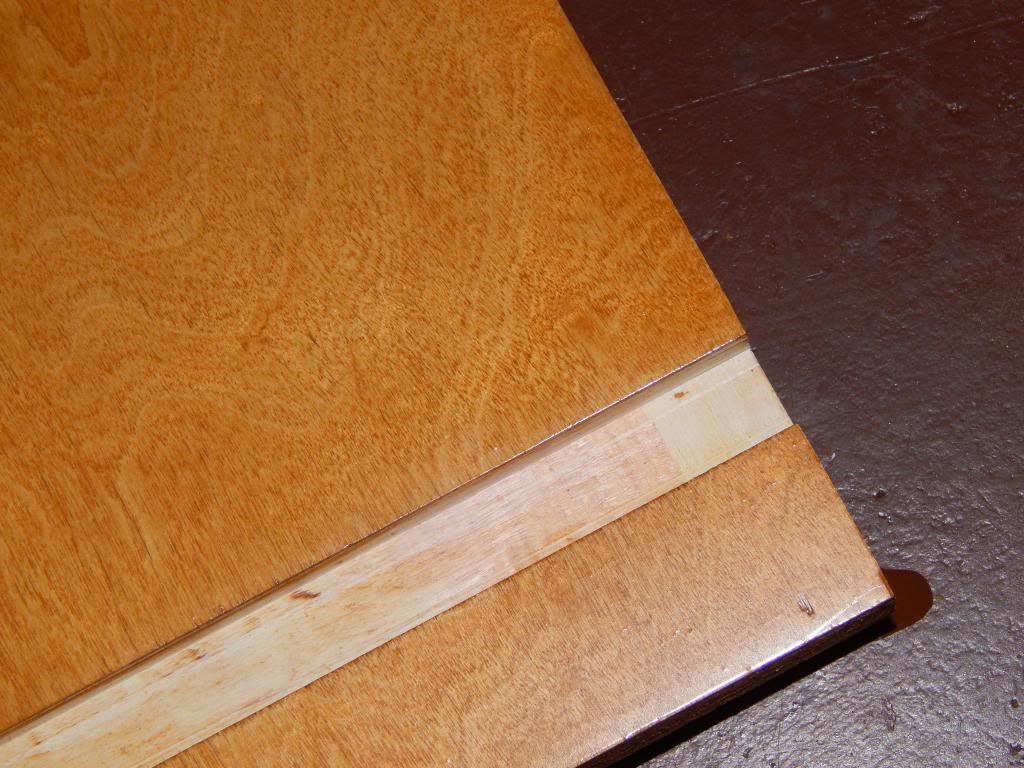
    Got to the Topcoat on one of my Pantry Cabinets. Using GF Arm-R-Seal Satin, I applied the 1st coat at full ratio. I am at the 5th coat and have been using a 25% MS cut, every coat after the 1st has quite a few air bubbles.

    I sanded to 120. Started each coat by soaking the brush up to the ferrule in 100% MS and squeezed the excess out then dipped the Brush a little over 1/2 way out of a glass jar and gently pressed the bristles against the side of the jar. Starting a couple inches from an end using full strokes until the surface is completely covered with a lite even coat and then dragged the brush with the grain the full length with the brush strait up.

    It seems I have done everything correctly but still getting excessive bubbles. I am using a grey sanding pad between each coat but still see the pot holes. I took a Razor blade and using the touch of a heart surgeon sliced most all the areas flush, went back over with the sanding pad.

    I think it will end up looking good but feel I am working to hard at it. Any advice?

  2. #2
    Join Date
    Sep 2009
    Location
    Atlanta, GA
    Posts
    6,423
    Quote Originally Posted by Alan Gan View Post
    ........ I applied the 1st coat at full ratio. I am at the 5th coat and have been using a 25% MS cut, every coat after the 1st has quite a few air bubbles.
    What does this mean? Not thinned?

    I haven't used Arm-R-Seal, but I use oil varnishes all the time. Brushed.

    My game - first coat is 50/50. 2d is mebbe 60/40 varnish/thinner. Then the rest are 75/25 or 80/20 - I don't measure, I get it to the "right" consistency coming off the brush. Very subjective, of course - Like Potter Stewart, I know it when I see it.

    If your first coat let you with zero bubbles, then that might be the correct ratio...............

    All those air bubbles you are seeing suggest to me one, or more, of 3 things:
    1. Too rich in varnish - it is setting up before it can release the bubbles.
    2. Too warm in your shop - so the varnish is kicking over too fast
    3. What kind of brush[es] are you using?

    Alos - missed this in my first read of your post: Don't press the brush against the container - maybe a couple gentle taps - that is all. You just loaded the brush with varnish - pressing on the container unloads it. You might be getting the coat so thin it is "flashing" too quickly, before the bubbles can escape.

    Start a few inches from one end - brush to that end, then reverse direction, land in the middle of that varnish patch, and take it all the way to the far end, and off the end, in one smooth, continuous stroke.
    Last edited by Kent A Bathurst; 04-07-2014 at 5:50 PM.
    When I started woodworking, I didn't know squat. I have progressed in 30 years - now I do know squat.

  3. #3
    Quote Originally Posted by Kent A Bathurst View Post
    What does this mean? Not thinned? Sorry, yes I applied it full strength out if the can.

    If your first coat let you with zero bubbles, then that might be the correct ratio...............

    I just assumed because it was the 1st coat that most of the Finish was just sucked into the wood.

    All those air bubbles you are seeing suggest to me one, or more, of 3 things:
    1. Too rich in varnish - it is setting up before it can release the bubbles. Are you saying maybe adding more MS could help?
    2. Too warm in your shop - so the varnish is kicking over too fast My shop is running about 78* with the Humidity hanging around 10%
    3. What kind of brush[es] are you using? I picked up a 2" Badger RedTree

    Alos - missed this in my first read of your post: Don't press the brush against the container - maybe a couple gentle taps - that is all. Thanks! I have been doing that wrong for sure then, I will try it. Still have the larger Cabinet to finish in the next couple days.

    Start a few inches from one end - brush to that end, then reverse direction, land in the middle of that varnish patch, and take it all the way to the far end, and off the end, in one smooth, continuous stroke. OK Thanks again for the great help, that is not how I have been doing it.
    Thanks Kent

    I do not know how many articles I have read and still forget what I read.

    I should have also added that the Plywood is 3/4 Birch.

    Living in the Desert, before long it will be 110* with 2-3% Humidity so it is going to be a real challenge when I do my finish work. Currently my shop has no climate control so it gets pretty hot, may need to get a Window AC before long.

  4. #4
    Join Date
    May 2005
    Location
    Highland MI
    Posts
    4,521
    Blog Entries
    11
    This is why I don't brush varnish much anymore, I use a wipe-on varnish or dilute regular varnish with 50% MS. No bubbles and no runs or sags. And no brush cleaning. And I can do 2 or 3 coats in a day as it dries much faster so you get much less dust nibs and bugs in the finish.
    Last edited by Ole Anderson; 04-08-2014 at 12:17 AM.
    NOW you tell me...

  5. #5
    Join Date
    Jul 2008
    Location
    Tomball, TX (30 miles NNW Houston)
    Posts
    2,747
    The RedTree 2" badger is a pretty good brush; I've used one for many years. Watch the video at the top of this section it's got sticky note. I don't use GF poly's but you my need to cut it a bit more; many of the manufacturers are adding less and less thinner to meet VOC regs.
    Scott

    Finishing is an 'Art & a Science'. Actually, it is a process. You must understand the properties and tendencies of the finish you are using. You must know the proper steps and techniques, then you must execute them properly.

  6. #6
    Join Date
    Sep 2009
    Location
    Atlanta, GA
    Posts
    6,423
    Alan -

    What Scott says. In fact, in my years here, I do whatever Scott says.

    Your green notes:

    1. No - the out-of-the can mix is too viscous to be readily sucked into the pores - as Scott notes. Pretty funny, actually - to meet the revised VOC requirements, many/most manufacturers reduced the amount of solvent in the mix, and added a "Do Not Thin" warning. If they said "Be Sure to Thin to a Useable Consistency", they would be in trouble with the Feds. The "Do Not Thin" is there for the Feds, not for the user. Ignore it - at least, on the oil-based varnishes I use.

    2. So - I mix out of the can to thinner in equal proportions for the 1st coat - THAT will get soaked up. But, you are not leaving much solids behind, so the film thickness won't build very fast that way. So, I increase the proportion of varnish as I move through the subsequent coats. This is not a decimal-precision game, by the way. Final is, as noted, 75% - 80% varnish - I never measure - I can tell by the way it drips off the brush.

    3. Yes - more thinner would help, because it takes longer for the coat to move through the drying process. Easier for the bubbles to escape water than maple syrup - especially when the maple syrup is cooking.

    110* and 2% RH? Holy Sahara, Batman!!! That is going to be a challenge. You might be better off with wipe-on, but I have ZERO experience in your environment, so I'm leery of sounding too knowledgable. Remember - oil varnish cures by exothermic reaction - it cooks, literally - higher ambient temps mean it cooks just that much faster. Lower RH means the thinner flashes off that much quicker.

    Wipe-on approach was the only way I was comfortable for a long time -- because the results of my pathetic attempt at brushing were terrible, at best, until Scott convinced me I could brush it on, simply by improving my technique and getting good brushes. Now I only wipe it on where it is a relatively small item - not worth fooling around cleaning the brush.
    When I started woodworking, I didn't know squat. I have progressed in 30 years - now I do know squat.

  7. #7
    I use Arm-R-Seal.

    What is the temp of your shop right now? If too high, it is possible a thick coat of varnish is skinning up before bubbles have a chance to pop.

    Also, how are you mixing in the MS? I'm sure you're not 'shaking' right?

    If thinning the product did not help, then consider wiping your final coats. 5-6 brushed on coats - even thinned, should have given you reasonable thickness. You could level it off, then wipe on two or three final, thin coats. Caveat emptor: wiping satin varnish can cause other probs like streaking if not mixed thoroughly.

  8. #8
    Join Date
    Dec 2010
    Location
    WNY
    Posts
    9,712
    Arm-R-Seal is a solvent based alkyd wiping varnish. It is formulated to be wiped on straight from the can, no thinning required or desired. I've used gallons of the stuff, though never at 10% humidity, but plenty at 30%. I've seen people get good results with a foam brush but I've never been able to. I use blue shop paper towels and get great results, never a bubble, never a run. Change your approach, use a paper towel or microfiber cloth, and I think you will be pleased. You do have to work quickly on a large surface. Put it on as smoothly as you can and resist the urge to go back over it - that will lead to nothing but grief. It will self level in a few minutes on it's own. Gentle sand with 320 or 400 grit between coats, just enough to remove any nibs, vacuum, wipe with a microfiber cloth, then apply your next coat. After 4 coats it should look great.

    John

  9. #9
    It may have some alkyd in there, but its largely poly. When built up thick, the poly component is definitely noticeable.

  10. #10
    Join Date
    Dec 2010
    Location
    WNY
    Posts
    9,712
    You aren't supposed to apply a thick layer. The can says 3 or 4 wiped on coats. That seems to work well for me, although I've applied 6 w/o any plastic look. If you apply it with a brush it gets ugly in as little as 3 coats. So - don't apply it with a brush.

    John

    IMG_5726.JPG

  11. #11
    Quote Originally Posted by Prashun Patel View Post

    What is the temp of your shop right now? Today it was about 95* outside, shop a little cooler with door closed, about 5% Humidity

    Also, how are you mixing in the MS? I'm sure you're not 'shaking' right? I mix gently with a stick, no shaking
    Quote Originally Posted by John TenEyck View Post
    Arm-R-Seal is a solvent based alkyd wiping varnish. It is formulated to be wiped on straight from the can, no thinning required or desired. I've used gallons of the stuff, though never at 10% humidity, but plenty at 30%. I've seen people get good results with a foam brush but I've never been able to. I use blue shop paper towels and get great results, never a bubble, never a run. Change your approach, use a paper towel or microfiber cloth, and I think you will be pleased. You do have to work quickly on a large surface. Put it on as smoothly as you can and resist the urge to go back over it - that will lead to nothing but grief. It will self level in a few minutes on it's own. Gentle sand with 320 or 400 grit between coats, just enough to remove any nibs, vacuum, wipe with a microfiber cloth, then apply your next coat. After 4 coats it should look great.

    I agree my application needs to be adjusted, I will start trying different methods. One thing I do not understand is, I just refinished refinishing my kitchen cabinets and had much less issues than these. The temps and humidity was a little better so I know the weather here is going to be an problem for me.
    Quote Originally Posted by John TenEyck View Post
    If you apply it with a brush it gets ugly in as little as 3 coats. So - don't apply it with a brush.

    This is my 1st attempt at using a brush.
    This project is really frustrating me, the nubs are very hard (as in "rock hard") smoothing out is challenge and I am getting some streaking. Today makes the 5th and final coat, I tried doing it as careful as I could, I see some bubbles that I expect to be there in the morning.

    I am thinking that after it cures out I will rub it out and see.

    Also, I will be starting the larger 2 door cabinet in the next couple days. I am going to do the glue up before Stain, not seeing leaving it separated has helped me much.

    Thanks for everyone's help, I will get some pictures up soon.

  12. #12
    Join Date
    Dec 2010
    Location
    WNY
    Posts
    9,712
    If you are getting nubs on a surface that is smooth before you apply the finish, then either the nubs are in the can of finish or your shop has a lot of sawdust or other dust floating around, or they are coming out of your brush. Streaks could mean the finish wasn't stirred adequately (not likely - it takes hours for the flatters to settle), or that the wood is still sucking up finish (unlikely if you are using a brush and on the 5th coat), or more likely that you are not applying the finish uniformly or you are going back over it trying to make it perfect.

    Sand it smooth, clean up really well, wipe it with a microfiber cloth, apply a coat with a paper towel in a dust free room, wipe it on quickly striving to use one continuous sweep from one end to the other, and don't go back over it. Your paper towel should be pretty wet but not dripping after you dip it in the finish. If you can't get from one end to the other before the paper towel stops delivering a continuous film of finish, then use a microfiber cloth instead as they hold more finish.

    John

  13. #13
    Quote Originally Posted by John TenEyck View Post
    If you are getting nubs on a surface that is smooth before you apply the finish, then either the nubs are in the can of finish or your shop has a lot of sawdust or other dust floating around, or they are coming out of your brush.

    I am pretty sure the can is clean, the brush is brand new and has been soaked in MS before and after use, it has been washed out with warm soapy water 1 time during this project. As far as the shop, I run my Air Filtration system for about an hour before finishing and really very little sanding done prior. I think on high for a hour this system will turn my shop air over around 8-10 times based on shop size.


    Streaks could mean the finish wasn't stirred adequately (not likely - it takes hours for the flatters to settle), or that the wood is still sucking up finish (unlikely if you are using a brush and on the 5th coat), or more likely that you are not applying the finish uniformly or you are going back over it trying to make it perfect.

    The streaks this morning look more like places I missed, I could see them yesterday when using reflective lighting. I will try stirring longer just to be safe. As you mention I try to not go back over looking for perfection as shown with the streaking but I know I do find myself going back over more than I should.

    Sand it smooth, clean up really well, wipe it with a microfiber cloth, apply a coat with a paper towel in a dust free room, wipe it on quickly striving to use one continuous sweep from one end to the other, and don't go back over it. Your paper towel should be pretty wet but not dripping after you dip it in the finish. If you can't get from one end to the other before the paper towel stops delivering a continuous film of finish, then use a microfiber cloth instead as they hold more finish.

    I will try different applicators and see if I can find the one that works, I have a Micro rag to try.
    Most of the time I am smarter than a 5th grader but just when I think I got it I am wrong...

    This is an example of the nubs, there are areas that are worse than these,


    Thanks again for your help, I am really trying to figure this out, I do enjoy Woodworking.

  14. #14
    Join Date
    Sep 2009
    Location
    Atlanta, GA
    Posts
    6,423
    OK - Keep up the positive attitude - there is a way out of all of this. It is called experience and problem solving.

    From the cheap seats, it doesn't look like bubbles to me.

    You have to manage the dust that is floating in the air. You think you are, but I don't - and I have been in your position, with exactly the same results. Welcome to the club, Alan. You are not a charter member, if that makes you feel any better.

    Here is my protocol for preparing to varnish:

    Yesterday:
    > Complete all sanding. ALL sanding.
    > Vacuum the table and floor within an inch of its life.
    > Get all the finishing stuff out and positioned. Don't pour the varnish, or anything like that - just get everything in position on the table.
    > Alert SWMBO that the basement - all of it - shop, wine closet, laundry room, deep freeze, her garden tools - everything - is going to be off limits shortly, until about noon tomorrow. IF you need something - git it now, please.
    > Turn off the ventilation fans.
    > Turn on my JDS unit with the 1-hour timer.
    > Go away.
    > Yesterday has ended.

    Today:
    > Put on clean clothes. They are shop/varnishing clothes to be sure, but they have not been worn since the last laundry. You cannot imagine how much dust is clinging to your clothes when you leave the shop.
    > Walk into the shop gently - just don't scuff your feet around.
    > No ventilation fans, No JDS dust cleaner, nothing.
    > Go directly to the varnishing location.
    > Wipe the surface with an anti-thinner. This means do not use that varnish's thinner - I always use DNA, never MS, because it flashes off instantly, with no residue. Not so with MS. I learned this the hard way.
    > I am not tromping around. I stand right freaking there.
    > Varnish
    > With as little movement as possible, I suspend the brush in MS, and I walk out of the shop.


    If I am doing wipe-on, I wait an hour, come back in gently, wipe with DNA, and do another coat. Then a third. That's it for the day. Shop is open again.

    If I am brushing, I wait a couple hours, and shop is open again.

    Between each brush-on coat, or every 3d wipe-on coat, I scuff sand with 400g or 600g 3M gold after 8 - 12 hours. I vac the dust right away. NO FANS, NO JDS. Generally, I varnish first thing in the morning, and then that evening becomes Yesterday, and tomorrow becomes Today for the next round.

    If I had my dream shop - there would be a separate finishing room of course. Short of that, I would have a floor drain, and before varnishing I would follow all the above steps PLUS I would flood the floor with water. I have done that a couple time, actually - a couple quarts of water poured around the varnishing table.

    This, correctly, sounds pretty anal on my part. I guarantee you that it took me a while to learn this lesson, and it has paid off wonderfully. I did not realize how much unseen stuff can get suspended in the air, or how long it took to settle out, or how easy it was to stir it all up again.
    When I started woodworking, I didn't know squat. I have progressed in 30 years - now I do know squat.

  15. #15
    Thanks Kent for the words of encouragement, it has not beat me yet. I am with you on having a separate finishing room. My shop is about 30 years old and has been used for a lot of things over the years. If I had the money I would have a larger shop that would be built for Woodworking. Been busy on other things today and did not do anything with the cabinet other than look at it. The nubs are still there but overall it looks pretty good so I will be working on that later tonight.

Posting Permissions

  • You may not post new threads
  • You may not post replies
  • You may not post attachments
  • You may not edit your posts
  •