Has anyone built a corner desktop? The pic below is an example....corner desktop with cabs extending down each leg of the "L". I'm stuck on how to turn the corner with hardwood. Any ideas on layout and joinery method?


 [OP]
Contributor
[OP]
Contributor
Has anyone built a corner desktop? The pic below is an example....corner desktop with cabs extending down each leg of the "L". I'm stuck on how to turn the corner with hardwood. Any ideas on layout and joinery method?
Scott Vroom
I started with absolutely nothing. Now, thanks to years of hard work, careful planning, and perseverance, I find I still have most of it left.
 Contributor
I would do it by edge gluing boards. Probably 3 sections. If you wanted a contiguous top then you could run the boards parallel with the monitor section front but you would be left with diagonal end grain on both the left and right sections. This is something that might look veyr nice with the right wood selection.
[OP]
Contributor
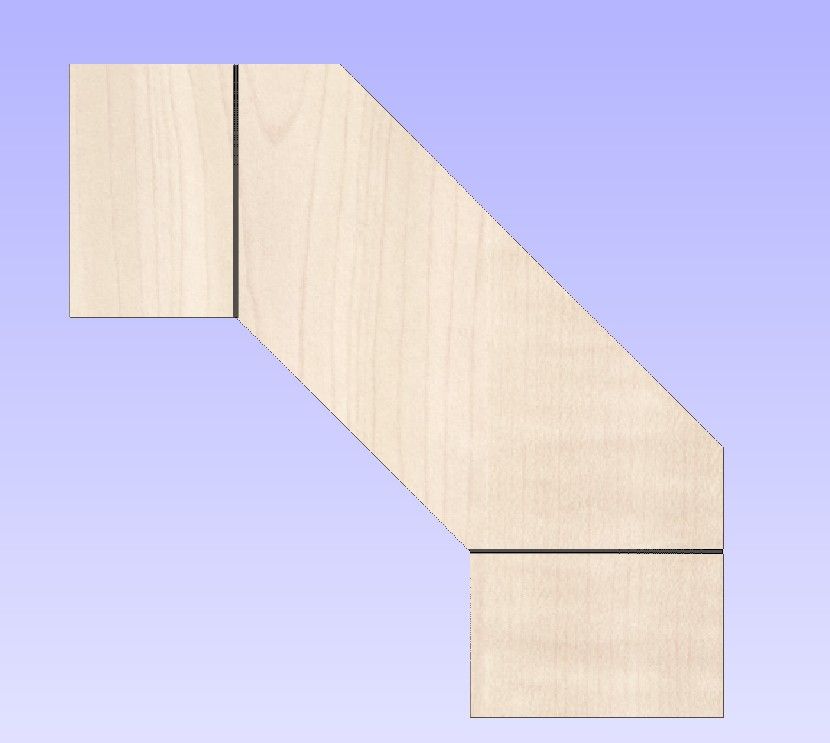
Pat, I found this pic that you posted on a similar thread. I like the grain direction on the corner piece, but how would you clamp it up? Would you first glue up a large rectangle then cut it to shape? Seems like a lot of scrap but that might be the easiest way.
Scott Vroom
I started with absolutely nothing. Now, thanks to years of hard work, careful planning, and perseverance, I find I still have most of it left.
Member
You could figure out how long the pieces need to be so that you can create a sort of stepped arrangement. That'll give you clamping areas and reduce the amount of waste.

Contributor
This is how I've built corner desks in the past. Never used solid for the tops, just ply or laminate. IMO, the continuous grain look, looks like a hack laminate job.
ForumRunner_20140430_202608.jpg
Member
Nice drawing Dave and Pat.
Also consider just having a straight front and rear rather than mess with the curve. Kind of 1/4 a Octogon. Make it in three pieces and it will be modular and work in many room positions.
Glad its my shop I am responsible for - I only have to make me happy.
Contributor
One thing to be cautious about corner desks -- making sure you can open the drawers without moving your chair. If you make the desk compact, the drawers pull open into the airspace occupied by the chair of the person sitting at the desk. Then you have to move your chair every time you open a drawer -- not great. If you make the desk wide enough so that the drawers pass by the chair, the desk gets to be really big. Make a plan-view drawing, and see how the drawers and the chair interfere with each other.
[OP]
Contributor
Not clear on how plywood solves the problem of wrapping the corner. You still have to deal with a change in grain direction. And laminate? Do you mean laminate veneer glued to a plywood base and trimmed to fit? Don't see how that is possible without seams.Originally Posted by johnny means

Also not clear on what your last sentence means ("continuous grain look, looks like a hack laminate job"). Huh?
Scott Vroom
I started with absolutely nothing. Now, thanks to years of hard work, careful planning, and perseverance, I find I still have most of it left.
 Member
Before making any kind of top, I would consider how you plan on breaking it down to move it. You will have to move it sometime. I've been burned by this too many times to not make it a must have in any design.
Johnny's and others examples show three separate sections. Much easier to move if you have to then one large top.
When Johnny mentioned laminate, I think he was meaning that continuous grain across the entire top looks like laminate, not real wood. (And is therefore a hack...)
(Just my $0.02)
Member
Feng Shui says that having your back to the door is a bad idea. You automatically give up your privacy and cannot see when someone is entering. May sound goofy but there is merit to it. I was told this by a woman who was an expert at it.
[OP]
Contributor
Good points raised. I've begun thinking that a modular approach might be best (corner piece independent of "wings"). So if I build modules, what is the best way to pull the tops of the adjacent wings tight with the corner desktop? I'm thinking dowels for alignment, and then some sort of latch on the underside that would bridge the gaps and pull them together tightly. I guess table lock hardware is suited for this, any suggestions on type (there are dozens of different types of table locks)? Something like this:
Last edited by scott vroom; 05-01-2014 at 11:48 AM.
Scott Vroom
I started with absolutely nothing. Now, thanks to years of hard work, careful planning, and perseverance, I find I still have most of it left.
Woodsmith had a set of plans that my son and I used to build a corner desk. I'll check tonite for the plan #
Life's journey is not to arrive at the grave safely in a well preserved body, but rather to skid in sideways, totally worn out, shouting "...Holy Cow....what a ride!"
Contributor
I wasn't intending to imply that plywood solvee any issues, just stating that I had not built a desk top like this from solid lumber.
A skilled laminate tech would seam a top like this so that the grain would follow the front edge. A hack would lay a single piece over the entire top, thus creating a single continuous grain direction over the entire surface. Of course, this is a matter of personal preference. IMO, it looks cheap, like something you'd see on a Wal-Mart desk.
Contributor
I have built a corner unit like you describe and built it in three sections, pretty much in the same fashion as a corner kitchen cabinet base unit. I ran my three top underneath frame pieces out to just-shy of the edge of the outer edge of the top piece, the individual adjacent joining top frame pieces parallel to each other (with a slight gap between the long faces) and then joined (sucked together) the adjacent pieces together with those drilled insert connectors that allow you to screw the pieces together after moving the pieces into place. One side of the insert has a screw and the other has the female threads - all usually metric and use an Allen wrench to tighten. I use those same connectors when connecting a long run of bookcases together as well. I include the slight gap so that there is no way the underlying frame (stretchers?) bottom out against each other before the top is sucked in snugly without any gap at all. The unit I built was out of plywood, and yes, you need to plan allowance for the drawers to be pulled out while seated at the cutout. My cutout design was angled as opposed to a curved cutout and allowed 24" for the chair/person clearance. I believe I have some "industry standard" measurements that say you need a minimum of 20" per chair when designing a table, but I went a little wider. This may be the type project to layout a full-sized sketch (on newspaper, etc) or a dummy mockup with scrap before starting the final build as there are a few things to consider. As stated above, the thing does grow into a sizeable unit.
David
[OP]
Contributor
Thanks Dave.
Scott Vroom
I started with absolutely nothing. Now, thanks to years of hard work, careful planning, and perseverance, I find I still have most of it left.
 Posting Permissions

 Reply With Quote