Page 2 of 8 FirstFirst 123456 ... LastLast
Results 16 to 30 of 108

Thread: Cocobolo Smoother Build - #2

  1. #16
    Join Date
    Mar 2007
    Location
    PA
    Posts
    13,076
    Quote Originally Posted by Steve Voigt View Post
    Looking good Dave. The mistakes don't look bad, and surely won't compromise the plane's function.
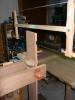
    Just wanted to add one thought on cutting abutments. I don't like using a japanese saw. Too much flex. All the references I've seen suggest that 19th c. planemakers used fairly thick blades on abutment saws. So far, my favorite tool for this is a flush-cutting saw made from an old drywall saw. The blade is about .060, twice as thick as the japanese saws. I recently picked up a box of 10 vintage compass saw blades, also .060 thick, and am planning to make a nicer saw.
    Anyway, it's coming along nicely; looking forward to seeing the rest!
    Steve, you're right about the flex. This is the first plane I've cut with a spacer on it - the flex requires care and some side pressure from fingers until the cut gets started. Every old abutment saw I've seen looks like a thicker plate like you're saying. with the japanese saw against the spacer, it's sort of one of those three hands needed and room for one. On the other planes, I just drew a line on the cheeks and cut it freehand because I knew I'd need to widen it to fit the wedge. That was suboptimal as floating and chiseling the abutments in cocobolo makes me sweat.

    The saw pictured wouldn't fit in a small plane, but it does have one virtue when it's new - if you lay it on a line and pull straight back, it literally cuts straight down into it.

    A stiff keyhole saw would also be good for cutting the mouth. I used a float from LN, the modern day white collar more-money-than-sense way to go about it.

    When it comes down to it, I'm still a hack with this and my desires (to match the try plane I showed a while ago) are a dozen planes off. Building a couple of dozen of these would get me a lot further ahead (and I'd build them twice as fast).

  2. #17
    Join Date
    Mar 2007
    Location
    PA
    Posts
    13,076
    Quote Originally Posted by Mark Almeidus View Post
    Those parts reguire a lot of patience.
    A good dose of finding a plane that works well, some repetition and then blatant copying of elements works well 
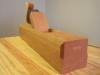
All the way down to looking at where the abutment terminates, how wide the gap is at the top of the abutment beyond the thickness of the iron and cap iron, etc, wear angle, wear length....all of it. And much attention toward how a good working plane's wedge and abutment fit is tight, the wedge goes the full width of the mortise (so that the prongs on the wedge never intrude past the abutments, etc, and terminate smoothly into the side/cheeks of the plane.

    It was a long time before I found a couple of properly made double-iron planes, though - that also had decent wedges to match their abutments. The whole abutment/wear/wedge, etc isn't very fully discussed anywhere for planes with a chipbreaker, and it's a little more difficult to get right on them (where right means a good performing plane regardless of what direction it's going and how thick the shaving.

    A couple of years ago, Larry Williams got on one of the forums and called double irons a hoax or something similar and described all sorts of compromises in plane making that occur because of them, but I once I got a good plane in good shape, I didn't see any compromises. Good double iron planes can take a full width shaving with no chatter, as heavy as you'd want to go, and they can dominate a single iron plane in every way other than speed of disassembly and assembly in sharpening.

    All of that is what triggered this discussion.

  3. #18
    Join Date
    Jun 2013
    Location
    Neither here nor there
    Posts
    3,841
    Blog Entries
    6
    Looking great. I really want to make some planes. I got a LN gift certificate for Father's Day, and plan to get some floats. I have some cocobolo laying around that would make nice small planes, and I happen to need some small specialty planes. I also have some pieces of maple that have been drying almost 2 years now, and are perfect size for a smoother. You are inspiring me.

  4. #19
    Quote Originally Posted by David Weaver View Post
    . The wear is somewhere around 85 degrees, and at the outset, I was aiming more for 80, [...]
    85 degrees is in fact quite normal for a double iron plane. The planes from the Seaton chest are almost 90 degrees! A single iron plane has a wear closer to 70 degrees or even a bit less.

    The tight mouth in a wooden plane is a bit of hoax. If you want to use a tight mouth to control tearout, it needs to be very tight indeed. There is a very small margin of error. Tighter then 0.1 mm and it is quite impossible to make without issues of a clogging mouth. Any wider then 0.2 mm and it doesn't work anymore to control tearout. And the front edge of mouth needs to press down on the wood firmly. Any wear on this edge and it doesn't work anymore to controll tearout.

    What does this mean for the wear angle and flattening of the sole of the plane? Say you manage to make a wooden plane with a 0.1 mm mouth, evenly across the width of the mouth. After using it for a while, you need to flatten the sole, because of wear and seasonal wood movement issues. How much can be removed from the sole before the mouth gets beyond 0.2 mm? In a single iron plane with a 70 degree wear? A little bit of trigonometrics shows that you can only remove 0.16 mm from the sole to reach the limit of a 0.2 mm wide mouth. That is abouth 6 or 7 fine smoother shavings. And this is not even taking into account the traditionally tapered blades, which agravate the situation. Or the normal wear of the front of the mouth, where the shavings are squeezing through that gap.

    So, why do we want a tight mouth? It is not really realistic to use a tight mouth to control tearout in a wooden smoothing plane. A tight mouth looks neater of course. I think it helps to take a fine shaving, Japanes planes take advantage of this. The wood is pressured down just before the mouth, which should help to make it easier to cut.

    The mouth size, the wear and the cutting blade also play a role in feeding the shaving. When you start taking a shaving, the shaving itself curls up in a tight roll. But the wear helps to stop this curling and directs it upwards out of the plane. In a wide mouth plane, this curling could lead to a clogging situation. This was actually tested in a Japanese laboratory, where they found the best feeding characteristics were with a relatively tight mouth. But it didn't need to be super tight, up to 1 or 2 mm was fine. But their planing machine isn't directly comparable with handplanes of course.

  5. #20
    Join Date
    Dec 2010
    Location
    South Coastal Massachusetts
    Posts
    6,824
    Is this following your article?

    I find that a tight mouth on the traditional coffin smoother leads to
    a jammed shaving in each corner, where the wedge is closest to the opening.

    I'm aiming for a shaving under 4 thousandths of an inch, but thick enough that it
    won't jam up under the tip of the wedge.

    I believe that the smooth sides of cast iron planes are one of their chief advantages.
    Less time is spent disassembling and clearing those.

    I have no such jams with the Gordon planes that use clever brass abutment
    wedges on pivots - they're quite "high" up the mouth, holding a beefy
    "Krenov" style wedge.

  6. #21
    Well yes, but is also just conjecture of course.

    I also have troubles with my wooden planes at the tips of the wedge. It helps when they are really pressing outwards to the sides of the abutments, but still...
    I usually just grind of the corners of the blade to avoid any such issues.

  7. #22
    Join Date
    Mar 2007
    Location
    PA
    Posts
    13,076
    Right, kees, I know all of those things about the wear and the mouth (and feeding, etc). But, this is about vanity and cosmetics. The other plane that I made has the wear around 78 degrees. It makes the junction of the wear and the taper of the abutments look much nicer if the wear terminates in a sharp line.

    The mouth of this plane won't be especially tight by metal plane standards. I've made a tight mouthed (metal) plane before, and would much rather have a double iron, of course.

    It's difficult to better a stanley #4, anyway, if the user knows how to use it. When all is said and don't, i'll probably go back to a stock stanley 4, which is to me, the most ideal smoother that I've used. Quick to sharpen, nimble, even likes the washita. Thin or thick shaving, no problem, no tearout, no feeding issues. Hopefully this plane will perform almost as well, as jim pointed toward, I hate to take a plane apart to clear shavings before the plane is dull, but on a common pitch plane, a wear just below 80 degrees won't clog if the plane is made properly.

  8. #23
    Vanity, that's as good an excuse as everything else.

    I am looking forward for more plane making secrets. I am not in any kind of a hurry to build my own planes, but it is very helpfull understanding old ones too.

  9. #24
    Join Date
    Mar 2007
    Location
    PA
    Posts
    13,076
    I'll see if I can measure the english try plane that I have, it's where I got the vanity idea. It's probably 80 degrees or so at the wear (and common pitch). Having it and a decent coffin smoother that I found is what triggered this idea of making a couple of coffin smoothers, as the ones that are wide open and have less "vanity factor" don't make me want to build a plane.

    The wedge being full width so that the prongs of the wedge (whatever they're called) are snug against the side of the plane is definitely one of the key factors in the plane feeding well, though, especially if it's used on the skew. If the wedge and fingers aren't full width, it's awfully difficult for the wedge to end up in the same placement against the abutments. I've noticed in the planes made with a lot of care, the wedge is oriented in a way such that it seems to shrink the same amount as the wood in the body of the plane (i.e., it's rift of flatsawn or something similar).

  10. #25
    Join Date
    Dec 2010
    Location
    South Coastal Massachusetts
    Posts
    6,824
    Quote Originally Posted by David Weaver View Post
    I've noticed in the planes made with a lot of care, the wedge is oriented in a way such that it seems to shrink the same amount as the wood in the body of the plane (i.e., it's rift of flatsawn or something similar).
    That's an interesting notion.

    If the wedge is quartersawn, it can always be driven in tight enough
    to hold the blade still, but the "fingers" will be closer to the mouth.

    I'm rehabbing a solid coffin smoother, using a Berg double iron from Kim Malmberg.
    The blade cuts beautifully, but the replacement wedge is still jamming in the corners.

    I saw a variant of the Krenov style wedge, with a semicircular profile that I hope to emulate.


    I'm suspicious that most of my woodies suffer from a poor fit, for the reasons ascribed to Seasonal
    movement, above.

    Now that I've got my standard to judge performance by, I can make some progress
    toward getting finer shavings out of these old girls.

    I'm drawn to these because of the size and shape; it's a comfortable fit for me.

  11. #26
    Join Date
    Feb 2011
    Location
    Carlsbad, CA
    Posts
    2,230
    Blog Entries
    2
    David, thank you for a great thread!

    I've always wanted to build a non_laminated plane but have never have always been intimidated by the details of chopping the mortise and cutting the abutment. Yours is the most helpful tutorial of the process I've seen. It is typically generous and self deprecating of you to show your build, complete with the real world challenges. I eagerly look forward to seeing the rest of your build.

    Thanks for sharing!

    All the best, Mike

  12. #27
    Quote Originally Posted by Mike Allen1010 View Post
    I've always wanted to build a non_laminated plane but have always been intimidated by the details of chopping the mortise and cutting the abutment
    Mike, I'll just repeat something Dave has said before: chopping the mortise the mortise for a bench plane is child's play compared to some of the furniture pieces you've posted on here. Once you try it, you'll wonder what was the big deal about digging a mortise the size of a Roma tomato.

  13. #28
    Join Date
    Mar 2007
    Location
    PA
    Posts
    13,076
    Quote Originally Posted by Steve Voigt View Post
    Mike, I'll just repeat something Dave has said before: chopping the mortise the mortise for a bench plane is child's play compared to some of the furniture pieces you've posted on here. Once you try it, you'll wonder what was the big deal about digging a mortise the size of a Roma tomato.
    That's definitely true. It's more about finding out what allows a plane to work full width, etc, than it is difficulty. Maybe that stuff was written somewhere (wear meeting the abutments and taper of the abutments starting into the side of the plane there, etc) but I haven't found it and it really was the thing about building a coffin smoother that makes a plane vs. making a piece of wood that may have problems that keep it from even being practical to use, let alone pleasing to use. Everything else is pretty much cosmetics and preference.

  14. #29
    Join Date
    Mar 2007
    Location
    PA
    Posts
    13,076
    Quote Originally Posted by Jim Matthews View Post
    That's an interesting notion.

    If the wedge is quartersawn, it can always be driven in tight enough
    to hold the blade still, but the "fingers" will be closer to the mouth.
    Yes, and if they move in closer to the mouth and get away from the cheeks of the plane, every cut askew or every cut of light shavings that is on the edges will get hung up on the tips. Before we started discussing all of this stuff a few months, the couple of coffin smoothers I ever bought, I spent a lot of time on the wear and cleaning up bits and pieces of the plane, not wanting to make a new wedge and clean up the inside of the cheeks, but that was probably the problem with most.

  15. #30
    Join Date
    Mar 2007
    Location
    PA
    Posts
    13,076
    Quote Originally Posted by Jim Matthews View Post
    Now that I've got my standard to judge performance by, I can make some progress
    toward getting finer shavings out of these old girls.
    That marples smoother is not perfect, I guess (you might be able to get a jam running it on a skewed cut) but of all of the old coffin smoothers I've ever run into, but it's as close to perfect as I've seen on an older plane (and was certainly useful to help learn what we've learned about what makes them feed full width, askew, etc, without clogging. The rest that I've gotten, I've essentially had to sell away for less than the irons were worth.

    It's too bad all of them in the wild aren't as well made.

Posting Permissions

  • You may not post new threads
  • You may not post replies
  • You may not post attachments
  • You may not edit your posts
  •