Page 1 of 3 123 LastLast
Results 1 to 15 of 39

Thread: Banding on solid black fills.

  1. #1

    Banding on solid black fills.

    I am having issues with vertical banding when engraving anodised aluminium. Initially I noticed this when trying to engrave a photograph but have now discovered it to be an issue on black vector fills, which rules out artwork as the cause of the problem.

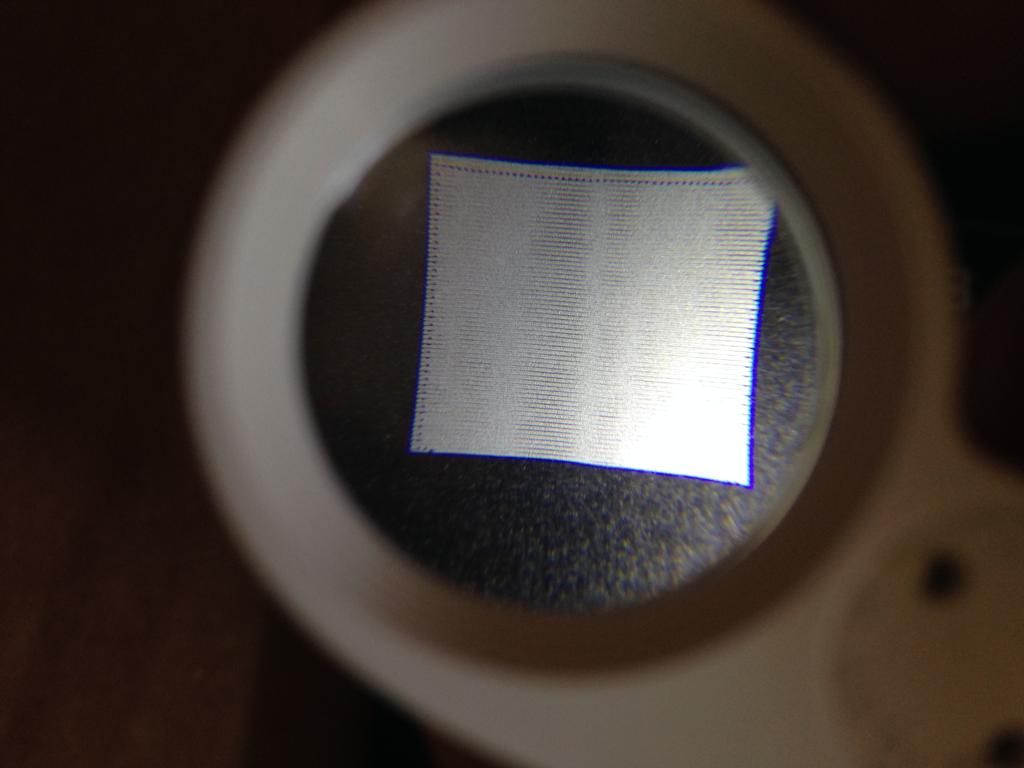
    Here is the banding under the loupe


    I engraved the same black filled square twice, one above the other but slightly displaced in the X axis. The banding appeared in the same location on the X axis, which again rules out the artwork and points to an issue with the laser, at certain points on high power settings the dot size appears to be fluctuating.

    I know from searching this forum that these issues are rarely solved but I was hoping that having ruled out the artwork, there might be a narrower band of possible causes for the issue?

    Cheers

    Dan

  2. #2
    Join Date
    Jul 2007
    Location
    Michelmersh, ROMSEY, Hampshire UK
    Posts
    1,020
    Unless the bearings and belts on your machine are supernaturally perfect, there is likely to be some oscillation of the lens holder following each change in direction.
    You might be able to prove whether this is happening to you by doing a wide engraving, rather than the tiny square.

    Fixes are :
    Use a higher resolution.
    If already at the highest resolution, slightly de-focus so that the beam is a bit wider.
    Epilog Legend 32EX 60W

    Precision Prototypes, Romsey, UK

  3. #3
    It will do it on wide engravings too. The photo I was doing was A3 size and the banding was noticeable in the lighter areas.

    I will give a higher resolution a go, hopefully that will fix it.

  4. #4
    Dan, can you report your settings? DPI sent over as, speed/power/ppi, all the settings in your "advanced" settings.
    Lasers : Trotec Speedy 300 75W, Trotec Speedy 300 80W, Galvo Fiber Laser 20W
    Printers : Mimaki UJF-6042 UV Flatbed Printer , HP Designjet L26500 61" Wide Format Latex Printer, Summa S140-T 48" Vinyl Plotter
    Router : ShopBot 48" x 96" CNC Router Rotary Engravers : (2) Xenetech XOT 16 x 25 Rotary Engravers

    Real name Steve but that name was taken on the forum. Used Middle name. Call me Steve or Scott, doesn't matter.

  5. #5
    Join Date
    Nov 2007
    Location
    Glenelg, MD
    Posts
    12,256
    Blog Entries
    1
    Looks like the dot size is fluctuating on initial entry into a line (getting the tube to start lasing is not fast enough), so you may need to turn up the tickle a tad... you can see that every other line is leaving an entry mark, which says the end of the line is still at the same power as the middle, but the beginning isn't up to full power.

    Second, it looks like you're getting full coverage (so dpi is good), but that also looks like bare aluminum... until you post your power, I'm going to guess you have your power way too high and you're completely blowing away the oxide layer down to bare metal.
    Hi-Tec Designs, LLC -- Owner (and self-proclaimed LED guru )

    Trotec 80W Speedy 300 laser w/everything
    CAMaster Stinger CNC (25" x 36" x 5")
    USCutter 24" LaserPoint Vinyl Cutter
    Jet JWBS-18QT-3 18", 3HP bandsaw
    Robust Beauty 25"x52" wood lathe w/everything
    Jet BD-920W 9"x20" metal lathe
    Delta 18-900L 18" drill press

    Flame Polisher (ooooh, FIRE!)
    Freeware: InkScape, Paint.NET, DoubleCAD XT
    Paidware: Wacom Intuos4 (Large), CorelDRAW X5

  6. #6
    Hi Dan

    I know you're an advocate of using low power on anodised aluminium, but I did a test ramping down the power from 100% and 70-100% produced much the same response, 40-70% produced varying (darkening) shades of silver and anything below 40% produced absolutely no mark whatsoever. This material needs quite a lot of power to produce a decent mark I have found, your recommended settings of 20P/100S did not work at all. Perhaps you're basing that on a much more powerful laser?

    I also tried 100% and decreasing the speed, which again didn't produce much difference!

    Good analysis though, I hadn't noticed the entry points. How do I adjust tickle settings in JC 10.3?
    Last edited by Dan Kozakewycz; 07-18-2014 at 9:09 AM.

  7. #7
    Scott, settings were 333dpi, 100P/100S, DPI 1000, correction 20.

  8. #8
    Increase to 500 DPI. Speed up the laser 5%.

  9. #9
    How do you mean, it's already at 100%?

  10. #10
    Quote Originally Posted by Dan Kozakewycz View Post
    How do you mean, it's already at 100%?
    It's a rule of thumb. If you can't speed up, then you use less power. Same idea.
    Equipment: IS400, IS6000, VLS 6.60, LS100, HP4550, Ricoh GX e3300n, Hotronix STX20
    Software: Adobe Suite & Gravostyle 5
    Business: Trophy, Awards and Engraving

  11. #11
    Join Date
    Nov 2007
    Location
    Glenelg, MD
    Posts
    12,256
    Blog Entries
    1
    Quote Originally Posted by Dan Kozakewycz View Post
    Hi Dan

    I know you're an advocate of using low power on anodised aluminium, but I did a test ramping down the power from 100% and 70-100% produced much the same response, 40-70% produced varying (darkening) shades of silver and anything below 40% produced absolutely no mark whatsoever. This material needs quite a lot of power to produce a decent mark I have found, your recommended settings of 20P/100S did not work at all. Perhaps you're basing that on a much more powerful laser?

    I also tried 100% and decreasing the speed, which again didn't produce much difference!

    Good analysis though, I hadn't noticed the entry points. How do I adjust tickle settings in JC 10.3?
    I never provided you with any initial settings, so I'm not sure where you got the 20P/100S settings from (it's what I used on my ULS with a cartridge measuring 70W+)... if you pulled those from another thread, then I based those settings upon the power of the system used in that thread (probably mine). We don't know what machine you have (and therefore the max raster speed) or what power cartridge you're working with, so we can't suggest appropriate power/speed settings. If you're working with a 140ips Trotec Speedy with a 60W cartridge, I'd suggest something in the area of 40P/100S.

    You're at 333dpi, which has significant overlap on a 2" lens and should be okay for simple shapes like the square, but for high-definition images I'll typically use 500 dpi (or thereabouts).
    Hi-Tec Designs, LLC -- Owner (and self-proclaimed LED guru )

    Trotec 80W Speedy 300 laser w/everything
    CAMaster Stinger CNC (25" x 36" x 5")
    USCutter 24" LaserPoint Vinyl Cutter
    Jet JWBS-18QT-3 18", 3HP bandsaw
    Robust Beauty 25"x52" wood lathe w/everything
    Jet BD-920W 9"x20" metal lathe
    Delta 18-900L 18" drill press

    Flame Polisher (ooooh, FIRE!)
    Freeware: InkScape, Paint.NET, DoubleCAD XT
    Paidware: Wacom Intuos4 (Large), CorelDRAW X5

  12. #12
    Quote Originally Posted by Dan Kozakewycz View Post
    Scott, settings were 333dpi, 100P/100S, DPI 1000, correction 20.
    Correct should be at zero for rastering. I'd also do the 500 dpi. Your wattage is a little less than ours, so I'd guess that you'd be at 500dpi, 70% power, 100% speed, and 1000 PPI.

    Correction used to be for vector only, so there was a default value in that field. In 10.2, they made it have an impact on rastering, and it's generally a value you want at 0, unless you are having specific issues where you need to bump it up, but I'd start at 0.

    Don't worry about the tickle for now. Let's get you engraving with the right settings before you start messing with anything else.
    Lasers : Trotec Speedy 300 75W, Trotec Speedy 300 80W, Galvo Fiber Laser 20W
    Printers : Mimaki UJF-6042 UV Flatbed Printer , HP Designjet L26500 61" Wide Format Latex Printer, Summa S140-T 48" Vinyl Plotter
    Router : ShopBot 48" x 96" CNC Router Rotary Engravers : (2) Xenetech XOT 16 x 25 Rotary Engravers

    Real name Steve but that name was taken on the forum. Used Middle name. Call me Steve or Scott, doesn't matter.

  13. #13
    The correction factor was actually set by the Trotec engineer when he was here setting it up. In honesty, I don't know what it does, but as he recommended it, I have left it as is!

  14. #14
    Sorry, I picked up 20P/100S from another thread, yes. Mine is a 40w Speedy 100 (180cm/s maximum speed I think).

  15. #15
    Quote Originally Posted by Dan Kozakewycz View Post
    The correction factor was actually set by the Trotec engineer when he was here setting it up. In honesty, I don't know what it does, but as he recommended it, I have left it as is!
    Dan, the correction factor had a change come to it, so what used to be right is now wrong. Please change it and start there. You should NOT be starting with any value in the correction for rastering. Vectoring? Yes. Rastering? No. It WILL cause engraving quality issues if you have it set too high (or anything at all in some cases).

    Please try it at 0 and if you believe it makes something worse, then simply change it back. Or, better yet, copy that material, name it something else like "experimenting" and then change it to zero in that one so you can always go back to what he set it at.

    This change causes me headaches. With a value in there, it can mess up how text (or anything else) engraves and since it defaulted with a value in it (which it did nothing in the past), now it's default is set to a value, so it messes things up by DEFAULT. They need to change that default value to zero since they changed it's function. It's a bug, in my opinion, that needs to be corrected.
    Lasers : Trotec Speedy 300 75W, Trotec Speedy 300 80W, Galvo Fiber Laser 20W
    Printers : Mimaki UJF-6042 UV Flatbed Printer , HP Designjet L26500 61" Wide Format Latex Printer, Summa S140-T 48" Vinyl Plotter
    Router : ShopBot 48" x 96" CNC Router Rotary Engravers : (2) Xenetech XOT 16 x 25 Rotary Engravers

    Real name Steve but that name was taken on the forum. Used Middle name. Call me Steve or Scott, doesn't matter.

Posting Permissions

  • You may not post new threads
  • You may not post replies
  • You may not post attachments
  • You may not edit your posts
  •