Page 2 of 2 FirstFirst 12
Results 16 to 30 of 30

Thread: Roubo Bench glue-up...

  1. #16
    Join Date
    Dec 2010
    Location
    South Coastal Massachusetts
    Posts
    6,824
    Quote Originally Posted by Harold Burrell View Post
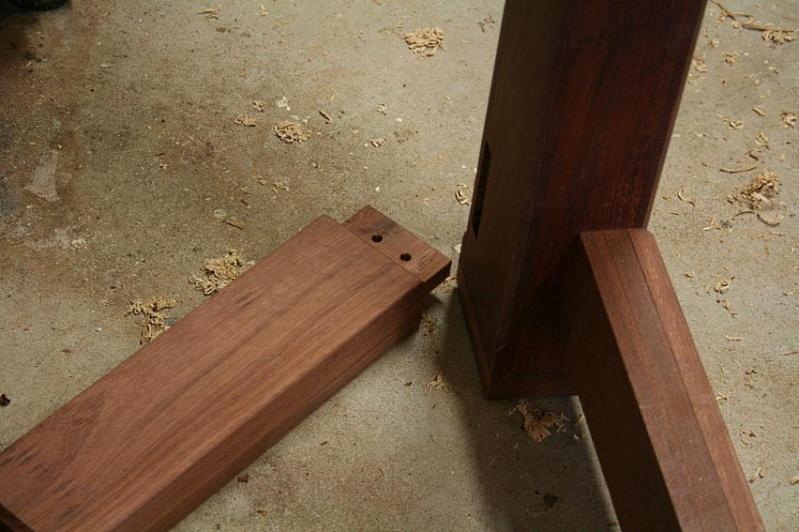
    My bench is, for the most part, built. I have the top and the legs and the stretchers made. I have the mortises and the tenons cut. All I have yet to do is drill the peg holes. Basically, I am ready for assembly.
    Gotcha. Missed that part.

    Build it upside down.
    Put it face down on a stickers, so you can get a grip underneath
    once all the glue dries...

    First one set of legs, then the other.

    That way, you can drive the legs home with a mallet
    instead of persuading the top.

    Use framing squares to make sure you're properly aligned.

    Join the stretchers last.
    (There will be some flex in the leg assembly.)

    Get some help to roll the beast upright, when you're done.

    A couple of milkcrates should get it high enough that you
    can rock it upright on one set of legs.

    If you've got exposed floor joists in your shop,
    you could rig something overhead to move it yourself
    (the method I use for heavy things in my shop).

    Using two ratcheting straps, you can lift almost anything.
    (Tighten one strap, then the other - and so on.)

    I've wrestled with a fully assembled top onto an already built leg assembly.
    It's more than I can handle, on my own - more than once.

    Following this suggested sequence means you've got plenty of time,
    and needn't struggle against gravity, until the very end.

  2. #17
    Join Date
    Aug 2008
    Location
    Portland, OR
    Posts
    528
    Quote Originally Posted by Prashun Patel View Post
    There are two products I've used for extended open time:

    Titebond Extend has an opentime of more than 15 minutes.

    System 3 T88 Epoxy. This has an open time of about 45 minutes. (the small size ~$20 should be enough for your bench)

    You can get both from Woodcraft or Amzn.

    Personally, I hate glueups of more than a couple joints at a time. Can you do it in stages just to save yourself the sweat?
    I used both of these on my bench, and the open time worked out fine for me. Unfortunately a check of Harold's location shows the nearest Woodcraft and Rockler stores are roughly two hours away. I don't think Home Depot and Lowes carry the Extend, or the T88 epoxy. They probably have some other brand of epoxy that would work.

    I bought a gallon of Titebond Extend to do the entire project, including laminating boards for the top, legs, everything. Way more than I needed; there's still half a gallon sitting on a shelf years beyond the expiration date.

    I used the epoxy for the mortise and tenon joints, to fill gaps where I gnawed them out with my teeth. I bought the small set as Prashun recommends and I still have some left; so it doesn't take very much. I also drawbored them just to make sure.

    I started by gluing the short stretchers to the front and back legs and letting that set up before moving on. I think as several people have suggested, you could do the glue-up in stages, even though the joinery is massive. I also agree that you could drawbore the joints without glue, giving you all the time in the world.

  3. #18
    I think you could easily glue the tenons if you organized everything ahead, but I would not glue the bench. My own bench was draw bored and pinned without glue 35 years ago, and is fairly easy to disassemble. Roubo's design has the stretchers a bit narrower than the legs. Since the pins are close to the shoulder, they can be accessed from the back of the joint for easy removal. This will not work if the stretchers are thick enough to cover up the ends of the pins. Here is Andre Roubo's bench.
    Roubo bench.jpegRoubo bench full.jpeg

  4. #19
    Join Date
    Apr 2014
    Location
    Davis, CA
    Posts
    249
    Quote Originally Posted by Warren Mickley View Post
    I think you could easily glue the tenons if you organized everything ahead, but I would not glue the bench. My own bench was draw bored and pinned without glue 35 years ago, and is fairly easy to disassemble. Roubo's design has the stretchers a bit narrower than the legs. Since the pins are close to the shoulder, they can be accessed from the back of the joint for easy removal. This will not work if the stretchers are thick enough to cover up the ends of the pins. Here is Andre Roubo's bench.
    Roubo bench.jpegRoubo bench full.jpeg
    Again, could I ask what the difference is between drawboring and pinning? Is pinning just straight doweling, without the offset used for drawboring?

  5. #20
    I guess I was using drawbore to mean boring offset holes and pinning to mean driving in pins. On some work you could clamp the joint together and bore through cheek and tenon at once, and just pin, but I don't think that is practical here. If you don't clamp you have to drawbore or risk a problem joint.

  6. #21
    Join Date
    Apr 2014
    Location
    Davis, CA
    Posts
    249
    Quote Originally Posted by Warren Mickley View Post
    I guess I was using drawbore to mean boring offset holes and pinning to mean driving in pins. On some work you could clamp the joint together and bore through cheek and tenon at once, and just pin, but I don't think that is practical here. If you don't clamp you have to drawbore or risk a problem joint.
    OK, but earlier in the thread Derek made a distinction between drawboring and pinning:

    Quote Originally Posted by Derek Cohen View Post
    I pinned rather than drawbored the mortice and tenons for the top. The reason was that I can removed the pins if I need to take off the top, while it will be a tough job with a drawbore. I doubt that you will get extra rigidity with drawboring if your joints are a good fit to start with.
    I'm curious if "pinning" in this context just means doweling without an offset. (Sorry if I'm semi-hijacking the OP's thread, but it relates to various methods of securing a Roubo top).

  7. #22
    Roubo made rather careful drawings and apparently pinned the stretchers but not the top. I would do likewise. Any pin that is placed in such a way as to preclude pushing it back out from behind is going to be trouble to remove.

    We generally use tapered pins and not dowels to secure tenons, whether it be a cabinet door or a barn frame. I use the term pinning whether the holes are offset, or the cheeks and tenons are bored together under clamping pressure, or the joint is glued together, then bored and pinned.

  8. #23
    Join Date
    Feb 2004
    Location
    Perth, Australia
    Posts
    9,494
    Quote Originally Posted by Phil Stone View Post
    OK, but earlier in the thread Derek made a distinction between drawboring and pinning:


    I'm curious if "pinning" in this context just means doweling without an offset. (Sorry if I'm semi-hijacking the OP's thread, but it relates to various methods of securing a Roubo top).
    Just to clarify.

    My recommendation follows the example I set for my own bench. The base is Jarrah and all the joints here were drawbored. That is, the pins went through holes that were off set. The joints were not glued. The drawbored mortice-and-tenon joint is very strong and has nil movement.


    The top is held to the legs with a blind M&T joint. Frankly, the European Oak top is heavy enough that it would not move if all it did was sit on the tenons. I wanted a joint that could be easily undone should I need to move the bench to a new home. The solution I used was to pin non-offset holes - simply drilled them with the top in place. That would allow for drilling out, if needed, which cannot be done with offset holes.


    Regards from Perth

    Derek

  9. #24
    Join Date
    Aug 2010
    Location
    USA
    Posts
    5,582
    My bench is rather small, 5 ft long, 2 ft wide, 2 1/4" thick Ash top on construction lumber leg and stretcher assembly. Tenon on top of each leg that fit into blind mortises in the top that, frankly, are probably a bit sloppy due to my lack of skill chopping mortises and the ash wasn't real cooperative. None the less, the weight of the top is perfectly fine to hold it in place. I have never noticed a problem with it moving at all and I really had to do a lot of planing of the top to planarize it after completing the assembly. My backup plan was to pn it if need be and I'm happy I didn't need to. I do not go around lifting my bench though. I liked the idea of the easy to remove top if I ever needed to move it somewhere.

  10. #25
    Join Date
    Jan 2010
    Location
    Lafayette, Indiana
    Posts
    1,378
    I'm with Joshua - you can do it in stages. The only thing I would add to his instructions - first dry fit everything - start with the short stretchers - assemble the pairs of legs; then add the long stretchers to one end, and then the other. I'd probably throw a pipe clamp or two across the long stretchers, and a f-clamp or two across the short stretchers and then make sure you can attach the top and everything is square. Once you are done with the dry fit, pull everything apart and label your mortise and tennons so you reassemble everything in the same orientation/mating as the dry fit. Then proceed as Joshua suggests. Since you are using pine, I would go with Tightbond II - squeeze out matches pine fairly well . I would not glue the top to the legs.

  11. #26
    Quote Originally Posted by Phil Stone View Post
    I have the same goal, but don't want the top to lift off accidentally if I try to move the bench a little. I originally planned to use long bolts through the top and the leg tenons, but now I'm thinking of maybe using Miller dowels, two driven in from the outside, and one driven through the middle of the tenon from the inside. I think that will hold pretty well, and still be knockdown-able.
    I can lift the full weight on one end using the top and it doesn't move at all. I think I would need to beat on it to remove. I will take some pictures at the weekend and post.

    Matt
    Last edited by Matt Knights; 07-31-2014 at 1:51 AM. Reason: Spelling

  12. #27
    Quote Originally Posted by Derek Cohen View Post
    Just to clarify.

    My recommendation follows the example I set for my own bench. The base is Jarrah and all the joints here were drawbored. That is, the pins went through holes that were off set. The joints were not glued. The drawbored mortice-and-tenon joint is very strong and has nil movement.


    The top is held to the legs with a blind M&T joint. Frankly, the European Oak top is heavy enough that it would not move if all it did was sit on the tenons. I wanted a joint that could be easily undone should I need to move the bench to a new home. The solution I used was to pin non-offset holes - simply drilled them with the top in place. That would allow for drilling out, if needed, which cannot be done with offset holes.


    Regards from Perth

    Derek
    Derek,

    Thanks, a good explanation and statement of reasoning.

    My last two benches were done the same way, draw bore the base with out glue and pin the slab. Both are solid and will remain that way. Most of my furniture is built the same except for top attachment. A bench build with the size, weight, and cost of materials, to glue the joints would take my stress level to DefCon 10. With good shoulders and well marked and drilled tenon bores, assembly is a leisurely process of putting together tinker toys and it is as strong or stronger than any glue joint.

    ken

  13. #28
    Join Date
    Aug 2013
    Location
    Princeton, NJ
    Posts
    7,296
    Blog Entries
    7
    Harold,

    Is the bench you are building is exactly that in your first photo?

    Draw-bored is offset then worked together with a dowel that has a tapered start. 'Pinned' generally means that the piece was clamped tight, glued up, then dowelled.

    Draw-Boring relies on the dowels, specifically, to hold the joint together.

    Generally speaking, When something is 'pinned' the pins are usually the back-up plan, meaning they are there incase the glue fails. Though, as some have mentioned, they use pinned joints in situations where they want to be able to take apart the joint with ease.
    Last edited by Brian Holcombe; 07-31-2014 at 8:09 AM.
    Bumbling forward into the unknown.

  14. #29
    Join Date
    Apr 2014
    Location
    Davis, CA
    Posts
    249
    I appreciate the clarification re: drawboring vs. pinning. It is what I thought, and I will be doing the same with my bench, i.e. drawboring the stretchers to the legs and then pinning the blind M&T joint between the legs and the top. Actually, I'll be using Benchcrafted barrel nuts and bolts for the long stretchers, for an easier knock-down. I figure I can leave the legs and end stretcher assemblies intact and still move them easily if I have to, so I'll drawbore those joints.

    OP, it must be maddening that nobody has an answer for you about the "construction epoxy", but perhaps we've all talked you out of gluing the top on in the first place?
    Last edited by Phil Stone; 07-31-2014 at 11:26 AM.

  15. #30
    Join Date
    Jul 2007
    Location
    Houston TX
    Posts
    548
    Harold, it sounds like you just have to decide: draw-bore vs pinned. Draw-boring eliminates the need for clamps, but once glued, they're the same. Either way, assemble inverted with the legs partially inserted into the top. This will assure alignment when you seat the top. If you EVER want to remove the top, dry-pin the M/T joints as Derek suggested.
    I am designing a new base for an existing top. It will be "Roubo lite" with stretchers and rails pinned & glued (M/T joints) to the legs and the top attached with bolts thru the upper end rails into existing threaded inserts in the top.
    Good luck on your glue-up.

Posting Permissions

  • You may not post new threads
  • You may not post replies
  • You may not post attachments
  • You may not edit your posts
  •