Does anyone have a good resource for building a good woodie jointer? I'd like something large and light, and have been unable to find dimensions or proper plans for this.
I'd like to make one with a tote.


 [OP]
Moderator
[OP]
Moderator
Does anyone have a good resource for building a good woodie jointer? I'd like something large and light, and have been unable to find dimensions or proper plans for this.
I'd like to make one with a tote.
Guest
Prashun, as big of a pain as it is, you almost need to have a good plane already in hand to copy proportions and find out where things are oriented, how big they are, etc.
As far as I could tell when I was fiddling with the coffin smoothers, there isn't a great resource out there for double iron planes, though there are some summarized layout tutorials. I think Caleb james has provided a diagram of the mouth and mortise area on a single iron plane that you could use for that, and george has provided an excellent handle picture, though it might be a bit steep as a first attempt.
Would you like me to take measurements off of some of my 28" jointers? (as to mouth location, handle location, etc?)
[OP]
Moderator
I definitely would, David. Thanks.
Did you mortise a solid block and use floats to true the opening, or did you do it 'kit' style, by slicing the cheeks off and re-gluing after cutting?
Guest
Every plane I've made has been mortised. the first one you do probably won't be a plane you'll be happy with, but the second one will if you note your problems on the first one and avoid them.
I opened mine with a chisel, hand drilled the mouth for the most part and floated it out after that, sawed the abutments with a zero clearance saw and then finished most of the parts (size wise to final finish with chisels and floats. It's possible to avoid most of the floats with beech (on cocobolo, it was a little bit more difficult to avoid using floats), but they do make some parts of fitting a little easier than chisels would be for most folks.
If you have a cheap piece of 12/4 something laying around (or an unused table leg blank), you can cut a mortise in it and finish the mortise out. Cherry or something similar would be a good choice.
(I'll post the measurements off of my jointers tonight)
Last edited by David Weaver; 09-15-2014 at 9:43 AM.
 Member
Not trying to hijack this but could a guy glue up to get a 12/4?
I got cash in my pocket. I got desire in my heart....
 Member
As always, John Whelan's book on making traditional planes is a good place to start.
The throat geometry for an abutment style plane (if that's what you have in mind) is pretty much the same, regardless of whether it's a smoother or huge jointer. If you are making a double iron, the threads David and I put up a couple months ago may be helpful. His is much more detailed than mine.
If you are going single iron, I put up a thread a long time ago, it was called "single iron fore plane" or something like that, in three installments. Derek Cohen also has an excellent description of building a single iron strike block plane on his website. And, as Dave mentioned, Caleb has excellent drawings on his website, but they won't help that much if you are going double iron.
Here is a link to an excellent article on making a closed tote: http://www.oocities.org/plybench/handle.html
There are some basic principles of traditional plane design that I've never seen written up in one place, so I'll try. They apply to almost any size.
- The distance measured along the sole from the toe to the back of the the mouth slot should be about 1/3 of the total length. A little more or less is fine.
- The plane should be approximately square in section. If the height is a little less than the width, that's fine. On a big jointer/try planer, even one that's never been resurfaced, the height is often a little less, maybe 1/4", than the width. On a small smoother, the opposite is true.
- The width is normally 5/8" greater than the blade. That's because the wall thickness behind the abutments (where the blade goes) is just under 5/16", maybe a 64th under. Add in 1/32 clearance for the blade, and you have 5/8. This can be a little less for a small plane, but I wouldn't make it more than 11/16 max, even on a monster plane.
- The abutments are usually 1/4" thick. For a coffin smoother, I'd take that down to 7/32. For a big plane, I'd keep it at 1/4". Of course, they will taper to nothing at the bottom, and the throat will widen to its full width (the blade plus 1/32") at the front.
- For details like the mouth and eyes, I would consult the prints on Caleb's blog.
One more thing, if you haven't built a traditional plane before, I'd recommend starting with a jack or fore. The bar is lower, and if you completely screw up you haven't wasted as much wood.
P.S. get a blade before you start, and base all your measurements off that!
Last edited by Steve Voigt; 09-15-2014 at 9:51 AM.

 Contributor
Might go check out those Chinese Hand Tool Forums for that GE Hong fellow's videos. The one I made was 18" long
IMAG0084.jpg
Could lengthen it a bit, too. Mine now has a 2" wide iron, with a chipbreaker. Expand the width as needed for the irons on hand. All I had was a $3 Buck Brothers iron and a Stanley Chipbreaker.
Guest
Yes. For a big jointer, you'll want something a little bigger than 12/4, though. I was suggesting that as a test piece because it's cheaper than 16/4 material, and easy to find (there are maple leg blanks everywhere for about $30) quartered material. For the first mortise someone makes, there are some mistakes that are likely to be made, and they'll be the same on a mortise intended for a 2" iron as they will be on a mortise intended for a 2 1/2" iron (a typical large jointer size).
My wood jointer is made from parts I bought from Steve Knight. Steve took two pieces of 8/4 wood and roughly carved 1/2 of the plane bed in each edge/side. I glued the two pieces together and finished the plane bed. Steve did the initial forming of the plane bed with a CNC router. I have often wondered how this method would work if one did all the work with hand tools.
I suspect it would be easier to rough out the bed in the two halves as one has access to two sides of the piece of wood being worked. There is the fact that the two sides are not going to match exactly after gluing them. I did not find the small difference to be much of a problem since I was flattening all the surfaces of the plane anyway This is a compromise between making the plane body out of a single piece of wood vs the other major method of using four pieces of wood. I am not a fan of the outside edges of the plane being a thin laminate which has to hold the whole plane together. I don't think a single glue line down the center of the plane presents as many potential issues as gluing the four pieces of wood together to make a body.
I'm sure there is a reason no one else seems to use this method of making plane bodies. I imagine wood movement in a 1 3/4" thick x 26" plane could be a major concern with this method. I should mention that my plane is made from Purple Heart matched halves. I can say that I glued the pieces together well over two years ago. I just checked the entire length of the plane for the zillionth time with my engineering square and find the entire length as square as my old eyes are able to determine. I think the reason Steve suggested Purple Heart is it's stability/lack of movement over time. I have four planes 7 1/2-26" long all glued up over two years ago with no observable movement in the bodies or cracking/separating at the glue lines.
Last edited by Mike Holbrook; 09-15-2014 at 11:46 AM.
Member
interesting I was thinking to have the glue line parallel (like the in the French video that's been floating around) to the sole, not with a glue line in the sole. probably a horse apiece, I've seen em both ways.
Last edited by Judson Green; 09-15-2014 at 12:08 PM.
I got cash in my pocket. I got desire in my heart....
Member
Did you read Davids thread about building his jointer a couple of months ago? In between the noise there is tremendous information in that thread.
I really can't find it anymore.
[OP]
Moderator
I did not, and googling I could not find it.
Member
Don't recall David doing one about a jointer recently, maybe I missed it or it was about something else and and got segued. I did read, mostly, his and Steve's coffin smoother threads.
Found one of George's
http://www.sawmillcreek.org/showthre...r-plane-I-made
I got cash in my pocket. I got desire in my heart....
Member
A smoother! It was a cocobolo smoother!
http://www.sawmillcreek.org/showthre...light=smoother
 Contributor
Hi PrashunOriginally Posted by Prashun Patel

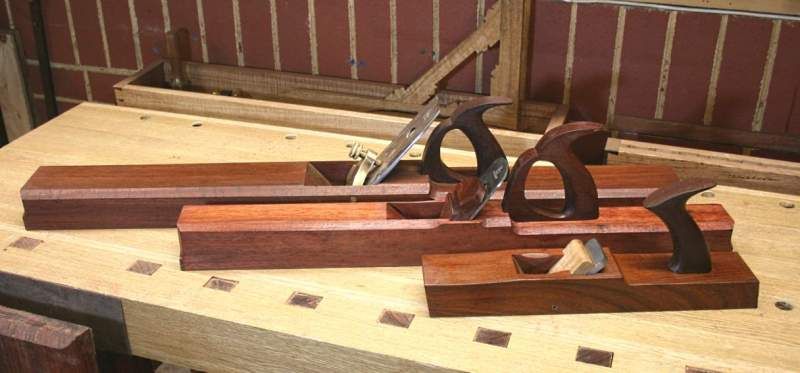
The first step is to decide on the dimensions of the plane. I would base the width on the blade, and suggest that this be between 2 1/4" - 2 1/2". The bed angle will depend on whether you plan to use a single- or double iron. For single iron I would go to 50 degrees. I found that a length around 28" is about as long as I want to go. I have made a few jointers, and cut a 30" down to 26", and much preferred the plane then.
Below are 36" and 28" jointers and a 15" jack ..
Whether you choose to use a lever cap or a wedge, or laminate or chop out of solid wood, that is up to you. I have made them all and there is not difference in performance if made correctly.
What is important to me is that they feel balanced and offer feedback. I find high sided "slabs" to feel dead in my hands. For me, getting my hands closer to the wooden surface feels better. There is a very big difference in feel between a LV BU jointer and a woodie. The LV feels like using a spokeshave (terrific). That is why I wind up with razee style woodies.
Lastly, the placement of the mouth and the style and placement of the handle will make-or-break the plane. Have a look at examples. It would make an interesting discussion point here. For a long plane I like the mouth a little further back than traditional. There is a great deal of difference in feel and control between a LV BU Jointer and a Stanley #7. Both are 22" but the LV has the mouth an inch or two further back, and this works.
Regards from Perth
Derek
 Posting Permissions

 Reply With Quote