Page 1 of 2 12 LastLast
Results 1 to 15 of 16

Thread: Split Top bench feedback, likes and dislikes....

  1. #1
    Join Date
    Feb 2003
    Location
    Pleasant Grove, UT
    Posts
    1,503

    Split Top bench feedback, likes and dislikes....

    For those of you who have worked on Split Top benches, what have you liked and disliked about them? I'm specifically interested in the split aspect, whether with the thin stop/chisel holding strip as in the Benchcrafted Split Top Roubo, or the wider tool tray style of Robert Lang's 21st Century Workbench
    It came to pass...
    "Curiosity is the ultimate power tool." - Roy Underhill
    The road IS the destination.

  2. #2
    Join Date
    Dec 2010
    Location
    South Coastal Massachusetts
    Posts
    6,824
    I'm considering the same feature, on my next bench top.

    I'll offset mine slightly, so the "front" of the bench is deeper than the back.
    I want to drop in a batten, about 18" in from the front.

    That's wide enough for most of the boards I surface plane.

    The 21st century bench design is intriguing, but I already have enough stuff cluttering my bench.
    Tool trays gather tools, and that's not necessarily a good thing in my shop.

  3. #3
    Folks,

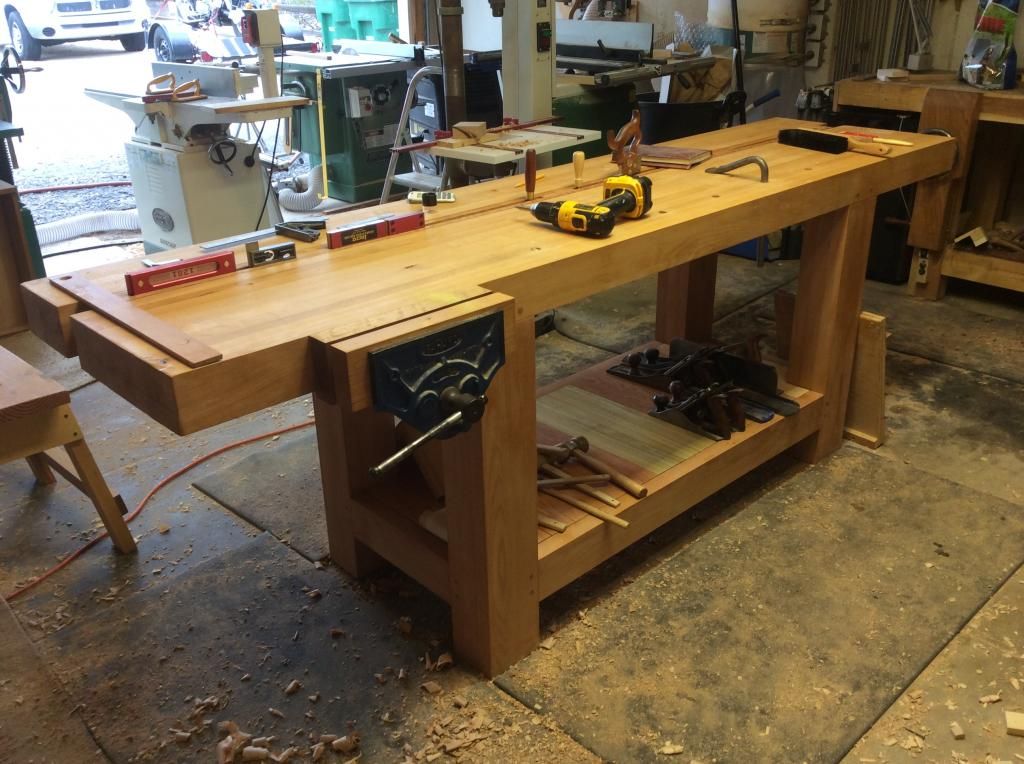
    I just lost a long reply, it must have gone to reply purgatory or thin air. I've no time to recreate right now but will try later. Bottom line, lots of build advantages almost no use disadvantages. I find an asymmetrical split very useful. Here is a photo of mine.


  4. #4
    Join Date
    Feb 2011
    Location
    W Michigan
    Posts
    35
    My bench is a split-top with 12" in front of the split and 12" behind. What I've found is I wish I had put the split further back (like Ken did above). 12" (for me at least) is too close to the front if I use the split with a planing stop and if I drop tools down it (saw, chisel, whatever) it is again closer to the front of the bench than I would like. I have gone back and forth on whether I would do a split-top again or not. I could easily enough make a planing stop if I had a solid-top bench. The only thing I would really lose is temporary tool storage. Split-tops are easier to construct just because of the decreased weight of the top pieces, but once it is built and in use for the way I use a bench there is not a huge difference between split-top and solid. I actually find myself covering the bench with some 1/8 hardboard sometimes so I don't lose small pieces down the split. Hope that helps.

  5. #5
    Join Date
    Jan 2005
    Location
    Ottawa, Ontario
    Posts
    420
    I built the version sold by Lee Valley Tools. I built it from scratch. The only change I would make it to move the recessed tray further to the back. Tha tray is a very handy place to temporarily (yeah, right) store tools such as saws, knives, markers, etc. It works for me!
    Best regards,

    Ron

    You haven't really been lost until you've been lost at Mach 2!


  6. #6
    Join Date
    Apr 2013
    Location
    Wild Wild West USA
    Posts
    1,542
    Be sure to see David Charlesworth's book for his spit top bench out of yew. Beautiful.
    I went with a Klausz for my main bench.
    When I need split top I use two plaining beems side by side on various supporting structures depending on the sichyation.
    Sharpening is Facetating.
    Good enough is good enough
    But
    Better is Better.

  7. #7
    Join Date
    Jan 2005
    Location
    Milton, GA
    Posts
    3,213
    Blog Entries
    1
    I too have plans for those two benches and have been meditating on the specifics of the top. Bob Lang posted on a couple of posts here concerning his workbench design. I believe if he were remaking his bench he would change two things 1) reduce the size of the tool trays to 3-4" internal space from the 6" in the plan 2) make the front section of the bench a little larger and the rear a little smaller, I think. Bob's removable tool trays have always seemed to me to be the most versatile option if one decides to go with a split top. There are at least two old threads that discuss this question which you may find interesting:

    http://www.sawmillcreek.org/showthre...tury+Workbench

    http://www.sawmillcreek.org/showthre...tury+Workbench
    Last edited by Mike Holbrook; 09-22-2014 at 11:53 PM.

  8. #8
    Join Date
    Sep 2008
    Location
    N. Idaho
    Posts
    1,621
    I've had a split top Roubo for about a year now and was on the fence about whether to make split or solid topped. As Ken notes, there are some build advantages and I'd definitely build up two halves again. That said, I put in a solid spacer because I didn't want to lose small bits down the slot and thus have more or less a function solid top. I have not once even thought about pulling the spacer out for any task. I have thought about gluing it all together, but the thought of having to move it makes me rethink (with the split top, i could still pull apart and move by myself, barely).

    Good luck!
    C
    "You can observe a lot just by watching."
    --Yogi Berra

  9. #9
    I will try to reconstruct most of the lost post. Most of the listed advantages of a split top do not amount to a hill of beans, like most bench builds folks over think what ever the style build. What seems a "must have" most likely will at some time in the future become a pain in the rear or at best a feature that is seldom or never used. Build a simple bench that is solid, heavy, and with good joinery that respects wood. To that end a split top is a good choice because the main advantages of a split top are in the ease of build especially for the one man shop and it gives room for the base and top to move with the seasons.

    Some of the build advantages are: Splitting the slab into two smaller, lighter (relative, still too heavy to move with ease) slabs helps in a one man shop, with two slabs you can use a home shop planer to true the slabs, and when it is time to fit the slabs to the base the joinery does not have to be perfect, just close enough. The other build advantage is getting the base to something over 600mm for stability when the needed working area for most furniture builds is a little over 300mm. Some of the listed working advantages are: Using the split fill as a stop, tool storage in the split fill, and using the split for clamping. Of those the only one I use with any regularity is the working tool storage in the split fill and that is mostly for squares and saws.

    I've two split top benches and one small solid top bench, one bench with a symmetrical split with each slab about 300mm wide, the other bench with an asymmetrical split with the front slab about 375mm and the back slab 195mm. Both bench tops with the split are about 625mm wide. The extra working real estate on the asymmetrical bench makes a perfect bench for my way of working. With the symmetrical bench the only failing is the split is where ideally a holdfast dog hole would go. As always YMMV.

    If I build another bench for myself, even if I have a helper, it will be another asymmetrical split top. I have found no working down side and the ease of build closes the deal.

  10. #10
    Join Date
    Jun 2013
    Location
    Neither here nor there
    Posts
    3,838
    Blog Entries
    6
    I have decided on the split top for my next bench. Since your question was for people who already own one, I will only comment on the tool tray question- I HATE tool trays, which I call "clutter catchers." Personal preference I guess, but certainly my next bench will not have one. I prefer a small bench behind me on which I place my tools, all laid out neatly. (Okay, maybe at the beginning of the project they are neatly laid out, if I were to be honest.) Behind the bench in my shop is a cabinet with drawers that has a wood top. The drawers keep my most-used tools, and I lay them out as I use them, and put them up when done.

    The tool tray on the bench, in sharp contrast, has all sorts of things land in it, including, for some odd reason, an unopened pair of shoelaces. I have no idea how or why they got there, but I left them to remind me never again to have a bench with a clutter catcher.

  11. #11
    Quote Originally Posted by Adrian Ponik View Post
    My bench is a split-top with 12" in front of the split and 12" behind. What I've found is I wish I had put the split further back (like Ken did above). 12" (for me at least) is too close to the front if I use the split with a planing stop and if I drop tools down it (saw, chisel, whatever) it is again closer to the front of the bench than I would like. I have gone back and forth on whether I would do a split-top again or not. I could easily enough make a planing stop if I had a solid-top bench. The only thing I would really lose is temporary tool storage. Split-tops are easier to construct just because of the decreased weight of the top pieces, but once it is built and in use for the way I use a bench there is not a huge difference between split-top and solid. I actually find myself covering the bench with some 1/8 hardboard sometimes so I don't lose small pieces down the split. Hope that helps.
    Adrian,

    Before starting the last bench build I debated split vs.solid. When I started the build, the planned slab was going to be solid. As the build progressed the ease of build of the split won once I thought through the working advantages vs. disadvantages of the split and how the disadvantages could be overcome by simply making an asymmetrical slab. Then the problem was how much of a difference between the front and back slabs was optimum. The numbers I came up with were close to 400mm for the front and near 200mm for the back. It has worked beautifully.

    ken

  12. #12
    Join Date
    Jan 2005
    Location
    Milton, GA
    Posts
    3,213
    Blog Entries
    1
    Wise comments Ken. Malcolm, I too have plans to build a mobile "German Workbox" which I was thinking might replace the often cluttered tool tray in my current bench. Then I reread a few of Bob Lang's comments on the advantages of his individual tool trays which got me thinking.

    Bob's tool trays are constructed like little drawers that fit in the recess between the two pieces of the top. This design has several meaningful advantages I think. Shavings, sawdust and other trash may be swept into one or more of the trays and the tray easily removed from the bench and emptied. The compact Hammer bench I am currently using has a built in tool area. I can testify that it is annoying to have to remove all the tools from the tool area and struggle with getting the refuse out of the tray. If this is not done regularly I find my tools fade into a sea of wood shavings and other refuse. My bench is cluttered right now because I have not stopped to remove everything on it and in the tool tray so that I can clean off all the shavings. I'm not even sure what is lurking under all those shavings. I hope there isn't something sharp hiding in that refuse.

    Individual trays serve as caddies to move specific tools/parts back and forth to the bench, chisel collection, scraper collection, spokeshave collection, sharpening devices... Individual trays may also serve to organize/locate specific tools/parts so they are easy to find. One tray for pencils and measuring devices, one for screws, dowels , small wedges... one for allen wrenches and screwdrivers...A better system than constantly trying to locate a specific tool/part, say a small allen wrench or particular small dowel or wedge in a sea of other tools and refuse.

    I also think the smaller removable sections are much easier to deal with than say a full bench length insert. I'm not so sure I would go to the trouble to remove, move, flip... a full length insert regularly. If I could empty the trash out of a single tray section and replace it with a plane stop section without having to remove all the tools from the entire tool tray and then replace them when I was done, I would be much more likely to take advantage of that particular feature of a tool tray. I might build one of the longer walls on one of my trays 1/4" higher than my top. Turn that tray one way and it is a work stop, turn it the other and the extra height makes a good refuse sweeping stop and handle. Maybe a divider or two in one section...I think the same principals apply to using the gap for clamping or other purposes.

    Certainly it will take additional time to build individual tool trays but I think the variety of uses those trays can be put to justifies the extra design and construction time. Apparently Bob has found his tool trays to be a useful part of his bench design.
    Last edited by Mike Holbrook; 09-23-2014 at 10:26 AM.

  13. #13
    Join Date
    Jul 2011
    Location
    Ottawa, Ontario, Canada
    Posts
    105
    I went split top though I originally didn't plan to do so. My split is almost 2" wide and I love it for two reasons:

    1. Easier to clean benchtop
    2. It's an additional clamping site along the whole bench without worrying about holes everywhere.

    I have no plans to add tool holders or fill the gap. I was originally against the idea because of misconceptions of increased flattening difficulty, stability and my tools falling through. In fact, it keeps me digilent putting my tools away as a side effect. Flattening was aided by the split top IMO. It was easier to flaten one section and then use that as a reference for the second.

  14. #14
    Join Date
    Nov 2010
    Location
    Port Angeles, WA
    Posts
    60
    My split top is based on Mike Siemsen's Nicholson, and I have two gaps in it just because of the stock size I had. I would build a similar bench again; I use planing stops in the gaps all the time, and find it an excellent way to work. Bear in mind that I only use hand tools, so your mileage may vary. Ignoring the saw here, you can see the 1x stock that I keep in the gap, and just raise/lower as needed. The boards are covering up the near-side planing stop.

    IMG_6998-M.jpg

  15. #15
    Join Date
    Dec 2010
    Location
    South Coastal Massachusetts
    Posts
    6,824
    That's the ticket.

    This is precisely what I have in mind,
    only not so pretty.

Tags for this Thread

Posting Permissions

  • You may not post new threads
  • You may not post replies
  • You may not post attachments
  • You may not edit your posts
  •