Results 1 to 10 of 10

Thread: My new "Tool Chest"

  1. #1
    Join Date
    Mar 2004
    Location
    Cockeysville, Md
    Posts
    1,805

    My new "Tool Chest"

    So here we are cleaning out the storage locker for the last time and putting all the junk in our garage till we can sort out who wants what and what goes to Goodwill. Mostly it's furniture that's really not worth anything and certainly no complete sets. However, in amongst all the stuff is a chest built long ago that I may turn into a tool chest. I's made from 1 1/8 poplar planks with mitered dovetail corners. The story is it belonged to my wife's great great grandmother and it was her sea chest when she arrived in America at 9 years old, sometime around 1810. It was there after used as a blanket chest till around 1880 when Luther Fraizer used it as a travel chest when the B&O sent him on business trips. He was pretty high up in the telegraph department and did a fair amount of travel. After his death it was used as a toy chest which is what my wife remembers.

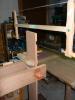
    Anyway it's 46" x 24" x 24". the ends, front and back are one piece poplar, the top is one wide piece with a small piece where the hinges mount and has breadboard ends. the bottom is 2 pieces of poplar held on with what looks to be some kind of cut nails. The dovetail joints are perfectly tight and the whole chest is very solid, no twists or creaks when it's moved or carried. Sturdy!

    I'm considering adding some supports for 3 sliding or more sliding trays, unsure is I want them to run the 46" length of perhaps make them run the other way. The inside is unfinished but the outside is covered in a dark brown thick paint, most likely lead based. Not sure if I want to strip it and refinish or leave it as is. There are 2 wheels remaining on the bottom and i'll need to find 4 low profile replacements. The lid will need some repair where the metal straps are and some kind of lid support or chain as nothing holds it open.

    Have any suggestions on how to proceed???

    Brian

    20140928_100336_DxO.jpg20140928_100401_DxO.jpg20140928_100420_DxO.jpg20140928_100442_DxO.jpg20140928_100534_DxO.jpg20140928_100733_DxO.jpg20140928_100753_DxO.jpg
    Last edited by Brian Hale; 09-28-2014 at 4:35 PM.
    The significant problems we encounter cannot be solved at the same level of thinking we were at when we created them.

    The penalty for inaccuracy is more work

  2. #2
    Join Date
    Oct 2004
    Location
    SoCal
    Posts
    866
    Congratulations for being a DxO user! Me too.

    To the chest, having made precisely two with two in progress, I am now very clearly an expert. For the bottom I would screw a couple planks to the sides/ends to support the next set of casters or wheels. If it's to be a toolbox, you will want it up in the air - your back will thank you. The breadboard ends look as if they need help. If you cannot take apart and repair then maybe glue up a new top. Battens would serve to hold it flat and also as a saw till. For the exterior, I'd probably strip and then plane/sand down to good wood at which point I would use a good oil based varnish on it. You might choose to use milk paint or some other coating.

    JMO & YMMV

  3. #3
    Join Date
    Mar 2004
    Location
    Cockeysville, Md
    Posts
    1,805
    Yep, DxO makes some killer software! I use ViewPoint 2 all the time, Does amazing things with my 10-22mm lens

    Just removed the 3 straps from the lid and found the breadboard end was snapped off right with the grain. Quick glue up and you can't see the seam. The sides sit completely on top of the bottom boards and taking some measurements from the inside Versus the outside the bottom appears to be just shy of 2" thick. The base moulding hides this.
    The significant problems we encounter cannot be solved at the same level of thinking we were at when we created them.

    The penalty for inaccuracy is more work

  4. #4
    Join Date
    Sep 2007
    Location
    Longview WA
    Posts
    27,453
    Blog Entries
    1
    Just my thoughts, would be to keep it as is. It can always be refinished tomorrow, but you can never return to what it is once it is redone.

    Of course the shipping tag made me think of this.

    That would make one heck of a tool chest.

    With runners going lengthwise you could have tills at both ends and still keep longer tools at the bottom.

    jtk
    "A pessimist sees the difficulty in every opportunity; an optimist sees the opportunity in every difficulty."
    - Sir Winston Churchill (1874-1965)

  5. #5
    Join Date
    Mar 2004
    Location
    Cockeysville, Md
    Posts
    1,805
    I agree, lengthwise runners make more sense. A 48" long till would not want to slide without racking.

    I was wondering how to keep the tag intact but those tacks/nails holding it to the case don't want to let loose so perhaps leaving the outside as is is the best idea. As for the inside, well even after 4 days of being open with a fan blowing in it it still smells like moth balls..... Yuck. I believe it's going to get a coat of shellac

    Brian
    The significant problems we encounter cannot be solved at the same level of thinking we were at when we created them.

    The penalty for inaccuracy is more work

  6. #6
    Join Date
    Dec 2010
    Location
    South Coastal Massachusetts
    Posts
    6,824
    The only things this really needs is a reglued top and a plywood bottom attached.

    You could even build skirt to hide new casters.
    If you build traditional tills into this, I think you'll find yourself
    forever moving things out of the way.

    I would build stackable trays, instead.
    That way you could segregate tools by function, and just haul them all out.

    I don't know about you, but bending over to get things is the last thing I want to do in my shop.


  7. #7
    Join Date
    Jun 2010
    Location
    twomiles from the "peak of Ohio
    Posts
    12,181
    Maybe this would give some ideas?tool chest #2 opened.jpg
    There is a center divider, and the left and right halves have different trays. Right side has two sliders, left side one tote i can lift out and carry around.
    trays.jpg
    Another divider down below seperates plane stowage from the drill storage. Coping saws hang on a hook on the front wall. I will need to wax the runners, sometime.

  8. #8
    Join Date
    Mar 2004
    Location
    Cockeysville, Md
    Posts
    1,805
    Good looking box Steve!!

    Since my new shop has tons of floor space and not a lot of wall space I've thinking this box will hold most of the handsaws as opposed to a wall mount till. There's also that collection of braces and bits that might find a home in it along with a few 36" Starrett squares that never seem to fit anywhere else. So it looks like a couple sliding trays and some lift out tills might be the way to go and keep the lower section for the saws or whatever.

    I'm not much of a planner when it comes to things like this but I'm good at adjusting my habits to fit the area I'm working in so I see this box as something that will evolve over time.

    I spent some time today sanding the inside to get ready for a coat of shellac. Even after 4 days with the lid propped open and a fan blowing at it the smell of moth balls is overwhelming. Yuck.

    Brian
    The significant problems we encounter cannot be solved at the same level of thinking we were at when we created them.

    The penalty for inaccuracy is more work

  9. #9
    Join Date
    Dec 2010
    Location
    South Coastal Massachusetts
    Posts
    6,824
    Got any loose shavings in the shop?

    Maybe some newspaper?
    Something dry, and absorbent inside will
    draw whatever vapor remains trapped.

  10. #10
    Join Date
    Mar 2004
    Location
    Cockeysville, Md
    Posts
    1,805
    Good idea Jim. I had planed a bunch of Spanish cedar a couple weeks ago and the shavings are still in the shavings can. Maybe I'll dump some in the box and see what happens.......

    Brian
    The significant problems we encounter cannot be solved at the same level of thinking we were at when we created them.

    The penalty for inaccuracy is more work

Posting Permissions

  • You may not post new threads
  • You may not post replies
  • You may not post attachments
  • You may not edit your posts
  •