Page 1 of 2 12 LastLast
Results 1 to 15 of 19

Thread: Slider Modification and a little shop re-arrangement

  1. #1
    Join Date
    Mar 2003
    Location
    SE PA - Central Bucks County
    Posts
    65,842

    Slider Modification and a little shop re-arrangement

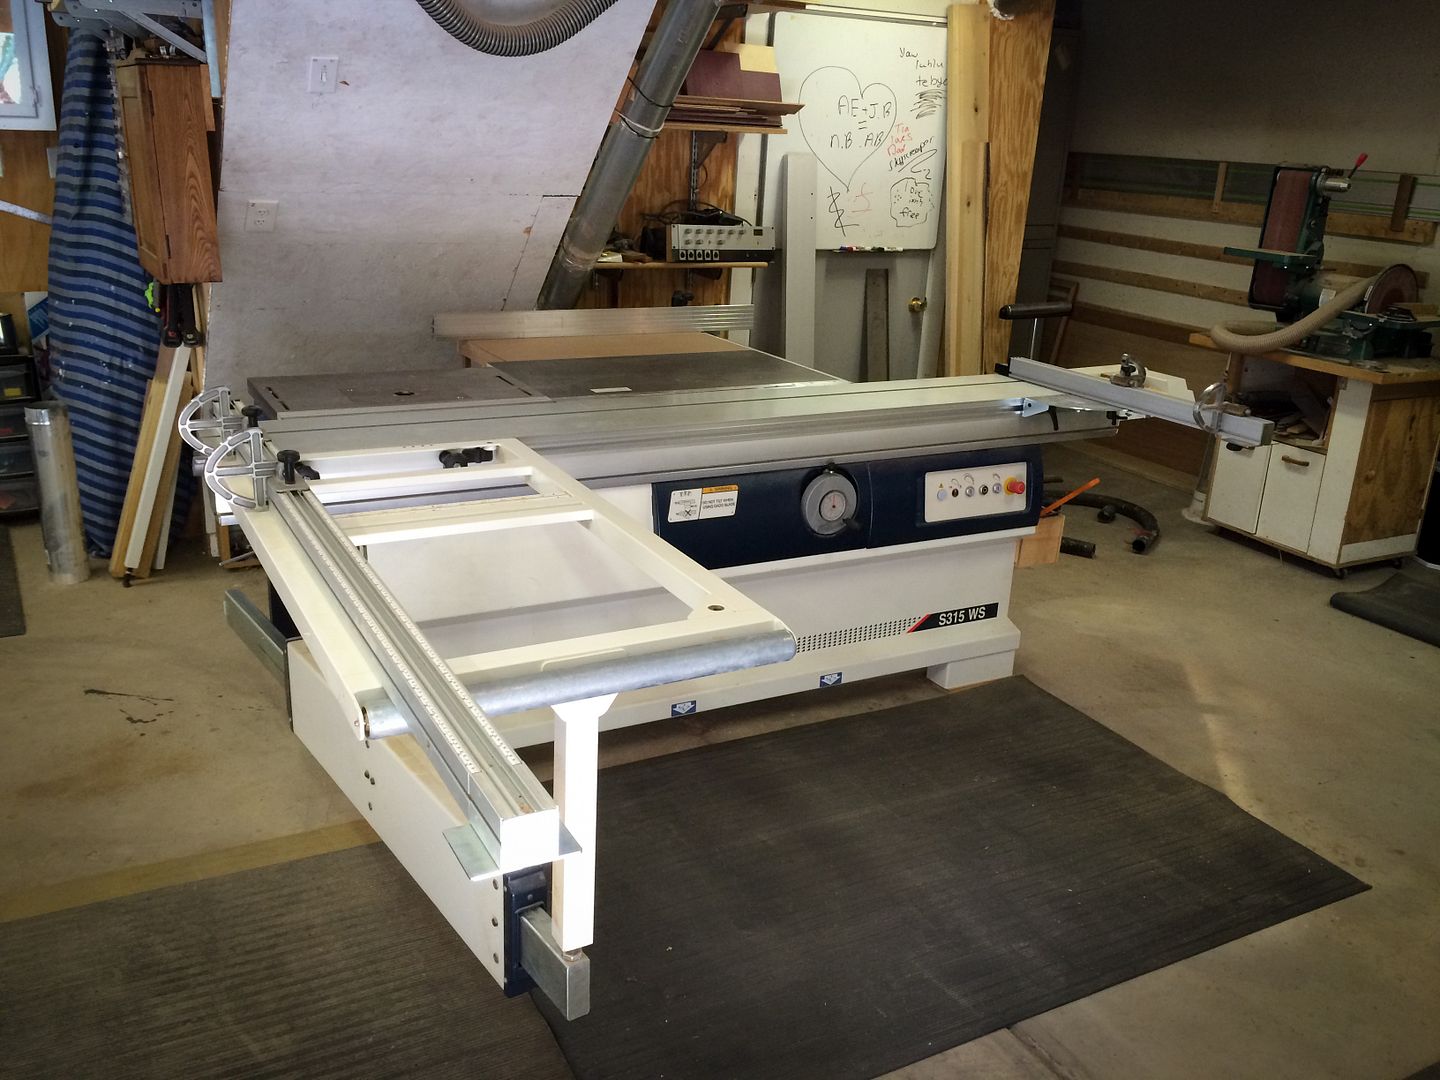
    My shop has been pretty functional for a long time now with the way it's been arranged, but with my increasing use of sheet goods in the past couple of years due to tack trunk commissions, I've been suffering a little with work flow challenges. Over the past six months, I thought about it quite a bit and in the last few weeks I finally "did something about it". My main tool hub consists of a MinMax S315WS sliding table saw (2007) and a MiniMax FS350 J/P combo (2003) that face each other in the shop in kind of a "galley" arrangement. Their parallel positions have been perfect for material handling "in those directions". Where I've had a challenge is when I have the big outrigger on the slider for handling full sheets of plywood...the material was literally overhanging the J/P when I need to shave off the end of the sheet and just moving my own body around the machine while it was loaded meant sometimes crawling under it. Not a very comfortable thing for a now 57 year old occasional sawdust maker!

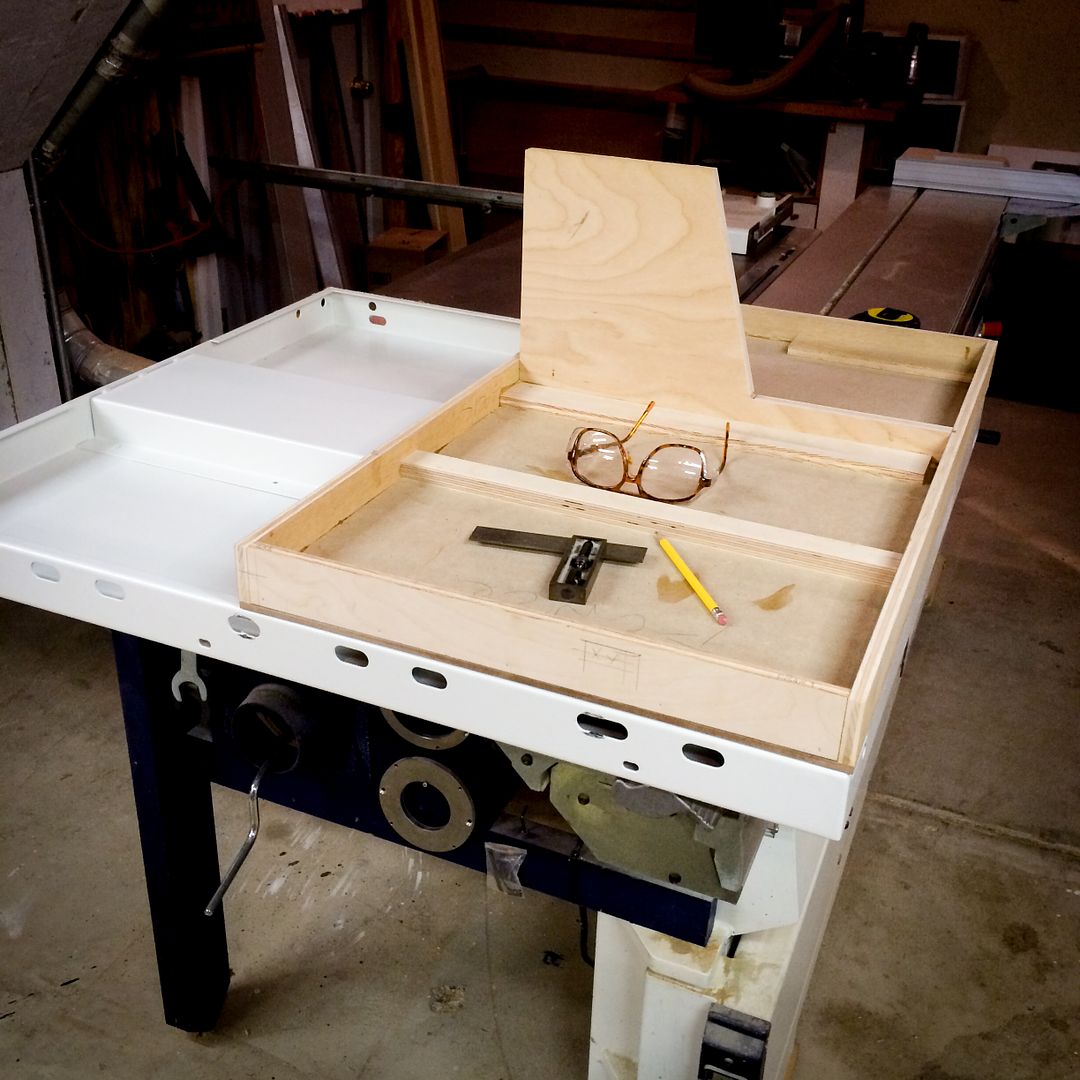
    The solution became apparent when I realized that like so many table saw owners (regardless of type), that big table that stretches off to the right of the blade for "ripping support" is more inclined to be either just empty space or quite often an "inadvertent storage are for stuff". I honestly never do any ripping of anything wider than a few inches with the fence so for me, that truly was wasted shop space. So reducing the size of that table was the primary answer; the secondary part of that was "by how much"? I didn't want to physically cut down the fence rail and compromise the saw's actual capacity. I might get lucky and win the lottery, making a much larger shop possible. Or someday, my heirs might need to sell the tool and having the original configuration could be important for value. Based on some measuring, etc, I determined that I could gain 16" of additional "shop width" without cutting the fence rail by reducing the right-side aux table to 20" wide. Since that table is heavy steel, I had to make a new one as a replacement and chose to use available materials in my shop cut-off storage. Yea, I'm sometimes cheap.

    After removing the steel table, I used it to make direct measurements for the new table and subsequent to this step (not shown in the photo), I installed an aluminum angle to provide further strength and support along the fence side of the table. That aluminum spans the same distance as the original steel table.


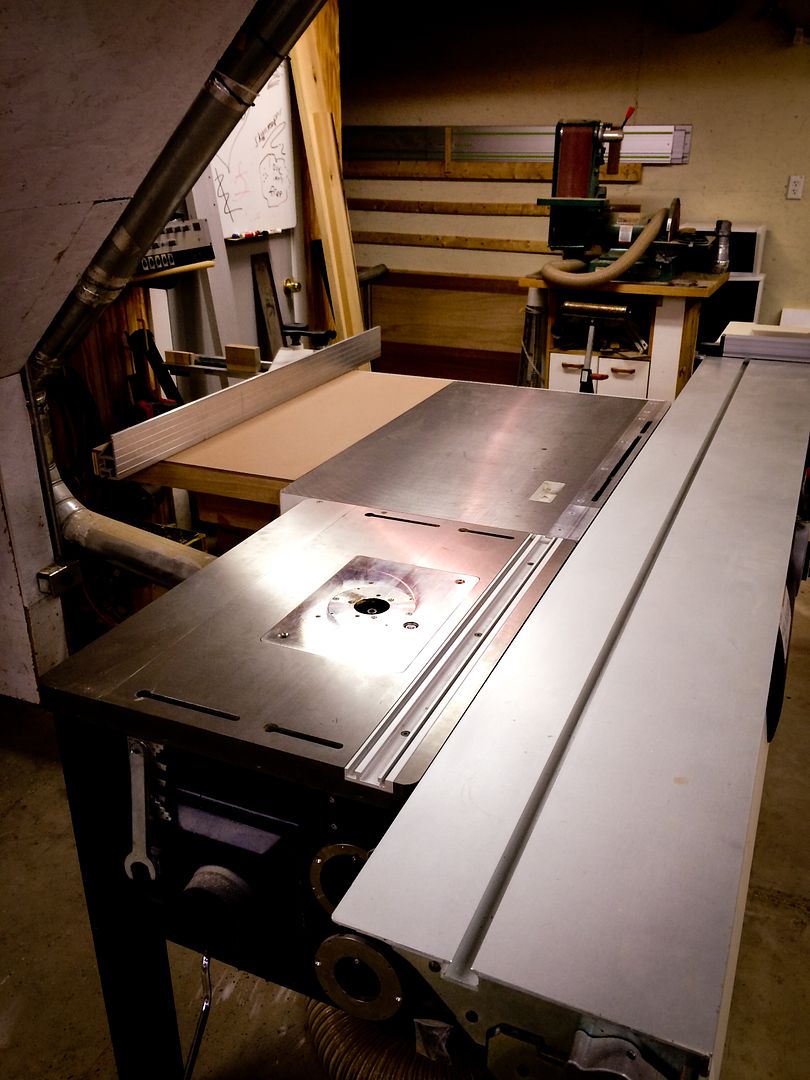
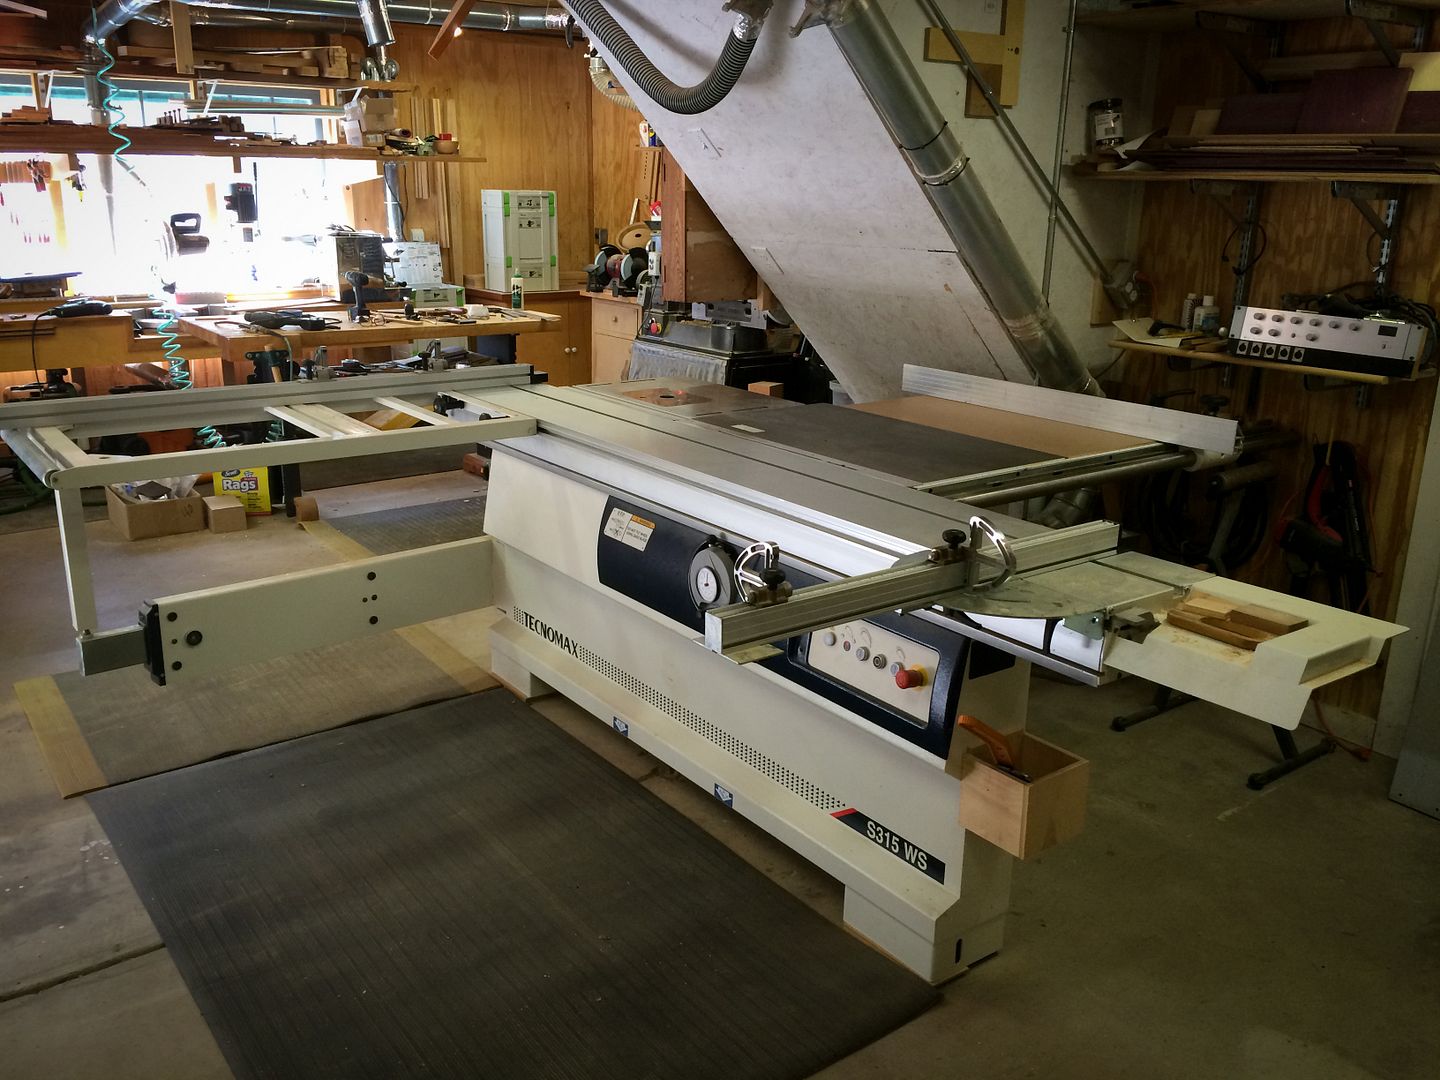
    The end result was exactly what I needed...this photo was taken prior to moving the saw


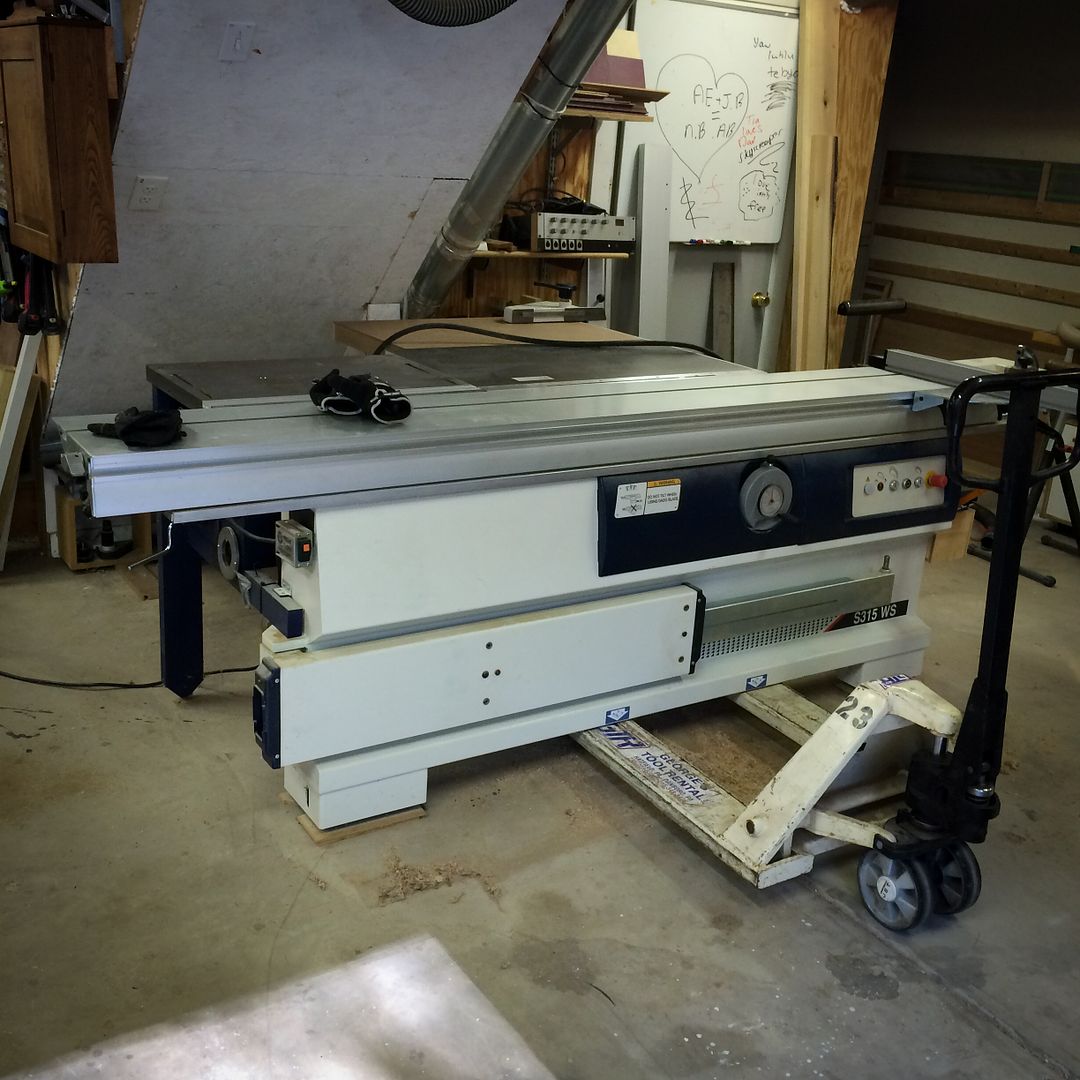
    Since you don't just push on a 1500 lb tool to make it more, it was necessary for me to rent a pallet jack (which was the same exact one I rented when I first bought the saw...LOL) The $27 for four hours was worth every penny...and about $1.50 an inch for the movement. I'll also mention that I was glad a friend of mine was available to help. While the pallet jack easily lifted the machine, my shop floor is sloped and this was, in effect, an uphill move. It took both of us to get that done...I could not have moved it by myself.


    The final position relative to the wall (and stairwell angled wall) is as shown here


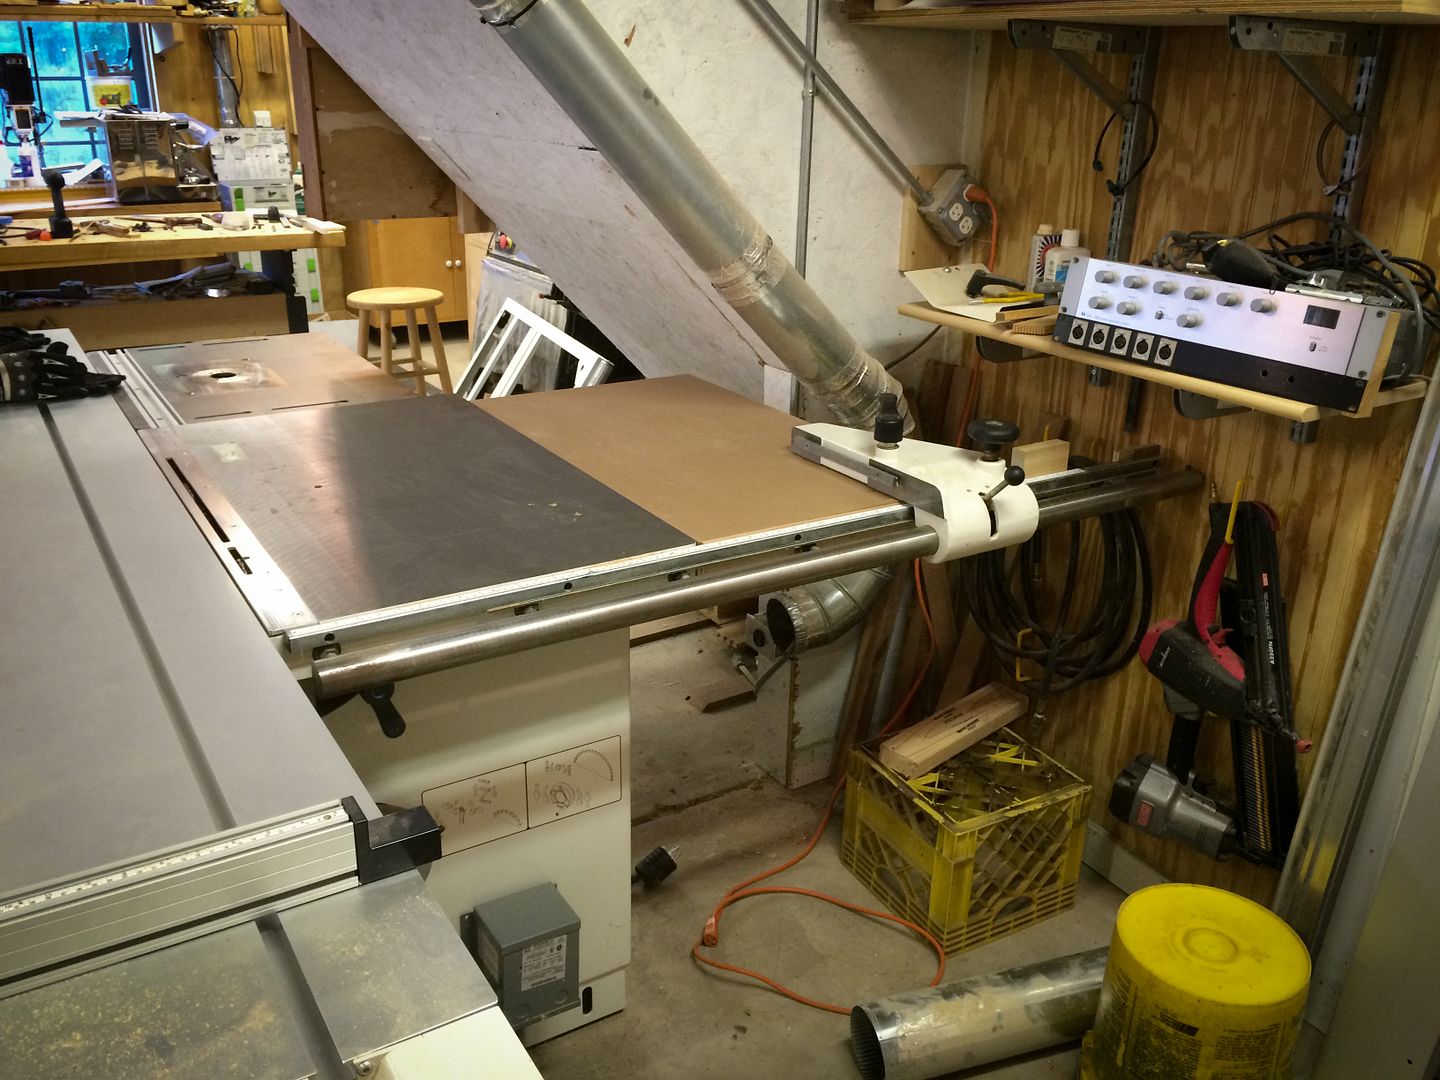
    Just in general, I'm pleased with this change...it looks good and the space feels bigger for sure...16 tiny inches, but it's a notable difference


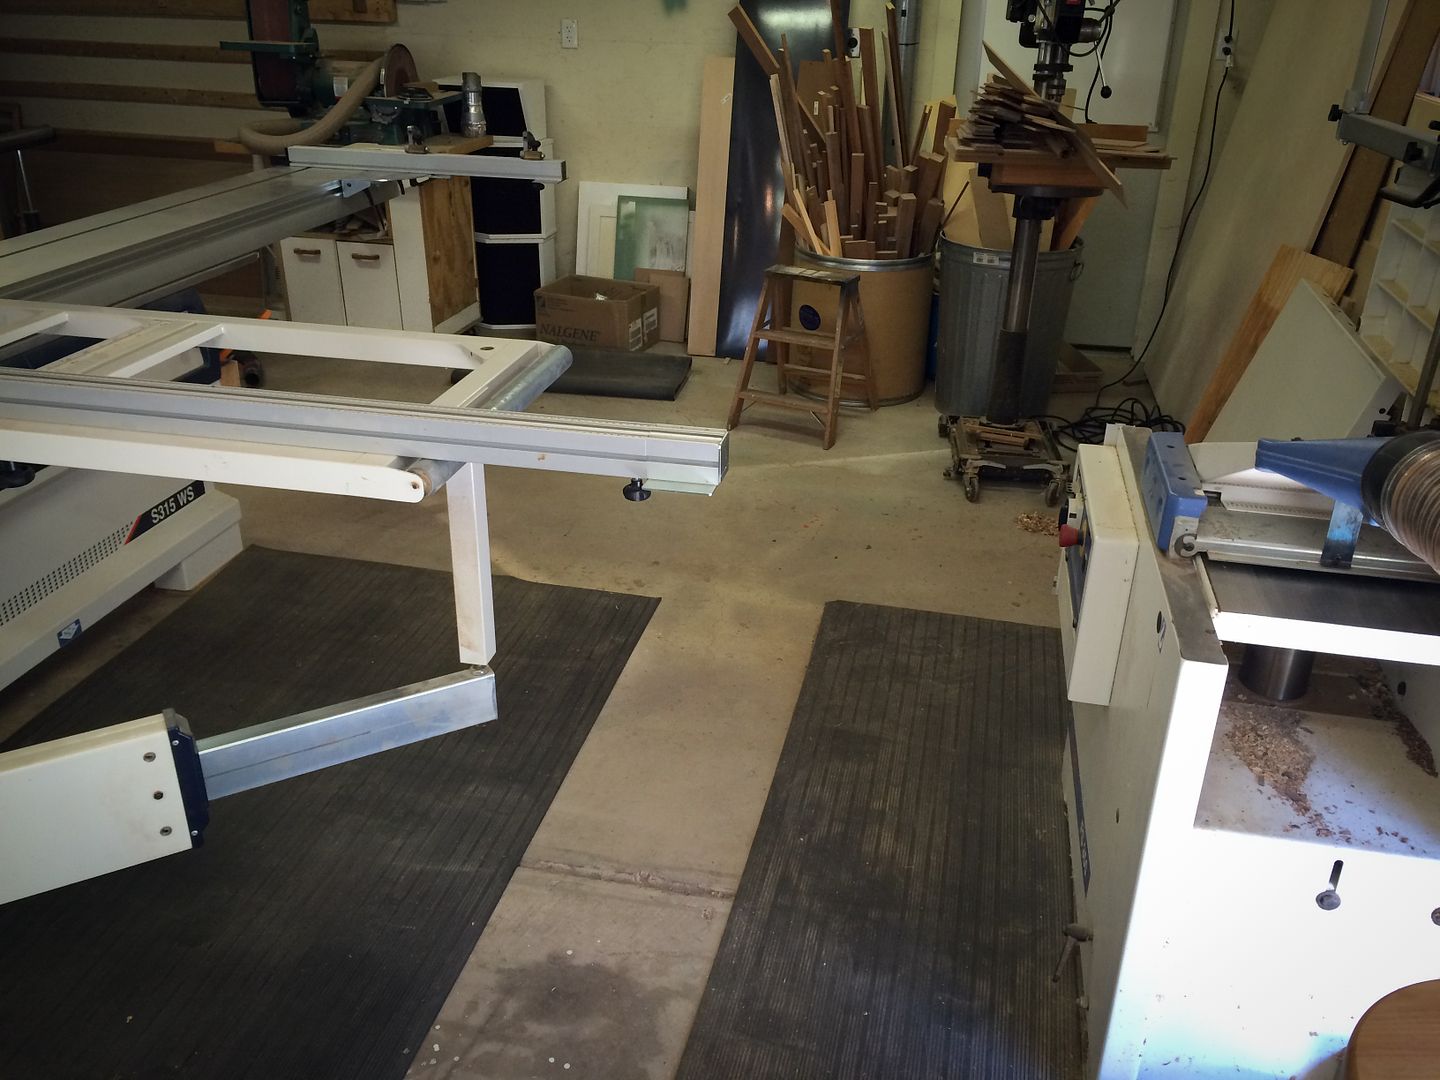
    But this is the real kicker...check out the available clearance now between the saw and the J/P. Not huge, but...exactly what I needed. It also means I can keep the big outrigger on most of the time, which helps with accuracy. It's also heavy to lift on and off...


    That's the saw modification and move. The next post will give some photos of other space improvements (still in progress)
    Last edited by Jim Becker; 09-29-2014 at 9:39 PM.
    --

    The most expensive tool is the one you buy "cheaply" and often...

  2. #2
    Join Date
    Mar 2003
    Location
    SE PA - Central Bucks County
    Posts
    65,842
    The second part of this shop workflow improvement was moving the remainder of the "odds and ends" lumber storage upstairs with the rest of my solid material and moving the small tools/finishing cabinet into the back of that space. To get started with that, the "big orange power tool" did some heavy lifting. Well, I did the lifting out of the shop and back in the shop, but it carried it all up the hill to the upstairs back door. There were about 5 or 6 loads like this to move.


    And the racks are a little more full now...but still have space if I happen to get lucky and have a visit from the wood goddess...


    That left careful disassembly of the rack...and this rack setup was original to the shop in 2000 and moved to this spot when I took over another "garage bay" a year or so later. It will get used again when I decide where upstairs I'll put it.


    Once it was gone, the original sheet goods portion remained and will be used for longer cut-offs, etc.


    But that dark corner (a light will get installed...) is the perfect spot for my cabinets, getting them out of another area so I can use that space in a better way.


    Some other things I'll be doing when I have the opportunity include installing a trap-door/hatch that will permit moving longer boards from upstairs directly down into the shop, some lighting improvements and hopefully a better way to deal with small off-cuts of both solid and sheet stock. I don't like to waste material, but there's a limit to what one can hang onto.
    Last edited by Jim Becker; 09-29-2014 at 9:41 PM.
    --

    The most expensive tool is the one you buy "cheaply" and often...

  3. #3
    That turned out great, I can see how that would allow for substantially better workflow. Plenty of room to access your jointer.

  4. #4
    Join Date
    Mar 2006
    Location
    SoCal
    Posts
    22,510
    Blog Entries
    1
    Great show and tell Jim. Thanks!
    "A hen is only an egg's way of making another egg".


    – Samuel Butler

  5. #5
    Join Date
    Mar 2003
    Location
    SE PA - Central Bucks County
    Posts
    65,842
    Quote Originally Posted by Phil Thien View Post
    That turned out great, I can see how that would allow for substantially better workflow. Plenty of room to access your jointer.
    Phil, believe it or not, most of the work flow issue was with the slider in use with full sheets in cross-cut orientation, not the J/P. The J/P is only used in "batches" for flattening and thicknessing...mostly the latter and the tables are normally "up" and out of the way. I never edge-joint...the slider takes care of that. (one of the benefits of a sliding table saw)
    --

    The most expensive tool is the one you buy "cheaply" and often...

  6. #6
    "Like"

    Erik Loza
    Minimax USA

  7. #7
    Join Date
    Mar 2003
    Location
    SE PA - Central Bucks County
    Posts
    65,842
    Quote Originally Posted by Erik Loza View Post
    "Like"

    Erik Loza
    Minimax USA
    LOL! Another forum I moderate at actually has a "like" button...
    --

    The most expensive tool is the one you buy "cheaply" and often...

  8. #8
    Join Date
    Dec 2003
    Location
    SF Bay Area, CA
    Posts
    15,332
    Looking good, Jim!

    That is also a good point about rail length. I tend to do most of my work to the left of the blade and when I go right, it isn't very far. Hmmmm......
    Last edited by Chris Padilla; 09-30-2014 at 12:36 PM.
    Wood: a fickle medium....

    Did you know SMC is user supported? Please help.

  9. #9
    Join Date
    May 2008
    Location
    near San Diego: unincorporated section of county
    Posts
    764
    Good move. I have a similar setup. When I ordered my slider, Felder had a sale on a specific set of options which included the widest rip to the right possible. I talked them into swapping the fence bar and extension tables for the narrowest rip possible while maintaining the sale price. Great for me as I do almost all my ripping on the sliding table. Saw sits close enough to the wall that I can still squeeze the car in at night (condition of SWMBO before I could buy the saw )

  10. #10
    Join Date
    Dec 2006
    Location
    West Central Mn
    Posts
    40
    That looks as though you will now be fully utilizing your available space. I recently bought a SCMI slider and am very much interested in your miter guage set up. What can you tell us about it? Is that a factory miter or aftermarket? The extrusion looks to have the same profile as your larger crosscut extrusion. Do you have any closer pics of the guage? If it is an aftermarket extrusion, where did you find it? TIA

  11. #11
    Join Date
    Aug 2011
    Location
    New York, NY
    Posts
    2,203

    FAO Wayne

    The miter fence shown above is the OEM one from SCMI. Prepare yourself for some sticker shock if you’re interested as the cost from Parts Pronto is $1,400, miter gauge only, no flip stops or side support table.

    Erik shared this alternative with me which I’m going to try to set up as soon as I’ve got some free time: http://benchmark.20m.com/tools/Hamme...ceinstall.html

    I’m going to be using a JDS AccuMiter which is a bit heavier construction than the Incra. Will share the results once I’ve got it set up.

  12. #12
    Join Date
    Jul 2006
    Location
    Lexington, KY
    Posts
    283
    Are you ok with your MM16 against the wall like that? I started out that way but could never get the doors fully open for blade changes. I would have to scoot the saw away from the wall on the mobile base so the doors could pivot 130-140 degrees to allow clearance for the blade along the left side of the saw. I ended up moving my saw across the shop to where it sits out in the floor now.

  13. #13
    Join Date
    Feb 2011
    Location
    Southeastern PA
    Posts
    140
    Thanks for sharing this Jim. Since this group helped me so much with the purchase of a slider (MM SC4 Elite) a few years ago, I'm always interested in other people's setups.

    You mentioned you do all your ripping except for narrow stock with the slider. I've seen a few threads on this but still do not understand the exact mechanics or ripping accurately with the slider. Do you have a separate jig or hold down you use for ripping with the slider or do you rip with the configuration shown in the picture? I see you have the outrigger and miter fence on at the same time. Do you use the stops on each fence for accurate and repeatable ripping?

    I love my slider but have yet to graduate to ripping with the slider. I just find it easy to slide the rip fence to an accurate position and use that vs. fussing with the fences on the slider side of the saw. But I'd prefer to switch if I can for safety and convenience of the slider.

    Thoughts? And thanks again for the post. Very helpful.

  14. #14
    Join Date
    Dec 2005
    Location
    London, Ont., Canada
    Posts
    2,200
    Nice mod, Jim. What is that piece of electronics on the shelf to the right of your TS ?? looks like an amp of some kind?

    And that offcut bin by the drillpress... yeah, I see what you mean about too many off-cuts! :-)

    Nice bit of storage upstairs. Lots of wood! It'll be interesting to see the hatch. Maybe a chain-hoist also for moving loads downstairs?

    ...art
    "It's Not About You."

  15. #15
    Join Date
    Mar 2003
    Location
    SE PA - Central Bucks County
    Posts
    65,842
    Quote Originally Posted by Michael Koons View Post

    You mentioned you do all your ripping except for narrow stock with the slider. I've seen a few threads on this but still do not understand the exact mechanics or ripping accurately with the slider. Do you have a separate jig or hold down you use for ripping with the slider or do you rip with the configuration shown in the picture? I see you have the outrigger and miter fence on at the same time. Do you use the stops on each fence for accurate and repeatable ripping?
    First edge is done with the flattend and thicknessed board on the wagon up against that miter gage for stability through the cut...hands holding it down on the wagon otherwise. What's nice about this is that you can make that edge match the grain pattern and direction you want to derive from the board. You're not constrained by following a fence with the edge you inherited. And you don't need to edge joint it afterward, either...the cut is that good. The parallel rip requires a jig, although you could simply measure and mark the end that first contacts the blade and use a stop at the same measurement on the miter gauge. A parallel rip jig merely provides you a stop farther up the wagon from the ones on the miter gauge. The repeatability is really nice and because you are transporting the wood through the blade while it's firmly held down, you don't get the tiny variances you can get pushing a board along a traditional rip fence. Here's the simple jig I made:


    That said, this method is best for rips that are wider than 2-3" or so because narrower than that makes for a challenge with holding/clamping the workpiece safely. You don't want to hand-hold that close to the blade for sure! Narrower rips are done with the fence and a push block/push stick for safety.

    Quote Originally Posted by Art Mulder View Post
    Nice mod, Jim. What is that piece of electronics on the shelf to the right of your TS ?? looks like an amp of some kind?

    And that offcut bin by the drillpress... yeah, I see what you mean about too many off-cuts! :-)

    Nice bit of storage upstairs. Lots of wood! It'll be interesting to see the hatch. Maybe a chain-hoist also for moving loads downstairs?

    ...art
    It's a TOA amplifier that is mated to those custom white speakers over on the floor near the off-cut bins in the photos. The speakers are custom that I built years ago for a small sanctuary...70v line. That organization folded a couple years ago and I'm getting ready to sell the system if I ever remember to list it somewhere.

    No chain hoist needed....'just going to put a hatch door that I can lower long boards through. I can carry smaller stuff down the inside stairway...long stuff, however is hard to bring down that way because of the 90º bend at the bottom before the last two stairs.

    Quote Originally Posted by Wayne Fuder View Post
    That looks as though you will now be fully utilizing your available space. I recently bought a SCMI slider and am very much interested in your miter guage set up. What can you tell us about it? Is that a factory miter or aftermarket? The extrusion looks to have the same profile as your larger crosscut extrusion. Do you have any closer pics of the guage? If it is an aftermarket extrusion, where did you find it? TIA
    The miter gauge is OEM and came with my slider in the deal I worked out way back at purchase. It's not inexpensive, but dead-nuts accurate. I use that for most cuts...the bigger outrigger I really wasn't using much until lately with the tack trunk commissions I've been gaining and it wasn't on the saw for space reasons when not actually in use. I now have the option to leave it on for longer periods of time with the reconfiguration of the tool. That was the primary motivation for this little project!
    Last edited by Jim Becker; 10-02-2014 at 9:02 PM.
    --

    The most expensive tool is the one you buy "cheaply" and often...

Posting Permissions

  • You may not post new threads
  • You may not post replies
  • You may not post attachments
  • You may not edit your posts
  •