Alan, do you have a picture of the jig you use?


 [OP]
Moderator
[OP]
Moderator
Alan, do you have a picture of the jig you use?
Member
Prashun - here are pictures of the jig I built. It is a slightly modified version of the Nick Offerman flattening jig that was featured in the FineWoodworking article. I oversized it a bit to accommodate a 44" wide slab I was making into a dining room table. I clamp everything to my assembly table and level it. I can then store all the individual pieces when I am not using them. I will re-run them through my J/P if they warp at all. Ideally I would love to be able to do slab flattening in some sort of outdoor setup because of the mess it makes.
Flattening Jig.jpgElm Top Flattening.jpg
[OP]
Moderator
Thanks, Jeff. That's very nice. I'll build the Offerman jig, I guess.
Here are the slabs. I'm not sure if it's more work to build a huge rig/jig for this or to just flatten it by hand...
Contributor
Here's a thread about flattening big slabs with a router bridge ---
http://www.sawmillcreek.org/showthre...highlight=slab
 Moderator
For this kind of thing, I'd also go to the trouble to build the jig and use a router, especially when multiple slabs will be involved...like for a future dining table I have planned that uses a couple of large cherry slabs. I'd probably opt for a 1/2" shank bit in the 1.5-2" diameter range and if I could find one with a slightly rounded edge, that would be my choice...more forgiving on overlaps. The nice thing about using the jig is you can shim and work things out to get an even thickness, too.
--
The most expensive tool is the one you buy "cheaply" and often...
Member
If multiple slabs will be involved, probably worth buying the Woodhaven planing sled and supply your own rails.
https://www.youtube.com/watch?v=8aWz...642BB5BB948ADE
[OP]
Moderator
Thanks for posting that thread, Jamie. That's exactly what I'm trying to do - bookmatched halves. The issue is that my bench space isn't large enough to accommodate this, so I have to do it on horses. The string trick is just the ticket I need to get my my rails level.
I am also very interested in how you draw bolted the two halves. I think my neighbor would love the ability to take the table apart if/when they move.
Can you post some pics of that? What bolts did you use?
Contributor
Unfortunately, no pics. The draw bolts are pieces of 3/8" threaded rod. There are 1/2"-diameter holes in the edges of the slab, leading to routered-out nut pockets. The threaded rod goes into the 1/2" hole before the slabs slide together.Originally Posted by Prashun Patel

 Contributor
I used a 1" bit to do this slab. Never heard of Magnate brand.
0905031424.jpg
Never, under any circumstances, consume a laxative and sleeping pill, on the same night
 Contributor
Prashun - SOP hardware for long countertops. Google countertop draw bolts, and get a jillion hits.
one example, at random:

When I started woodworking, I didn't know squat. I have progressed in 30 years - now I do know squat.
Member
Most others had great ideas, I'd add if you going to sling a bit over 1", I'd make sure that router has soft start. That's a lot of torque to wind up all at once. I've got a sled I use for making 8 sided pencil post beds that uses a 7518 and a 2.5" bit. I make sure it's under control and without the soft start, I'd not want to try it. Any other use she'd be in a table. Good luck and stay safe.
 Contributor
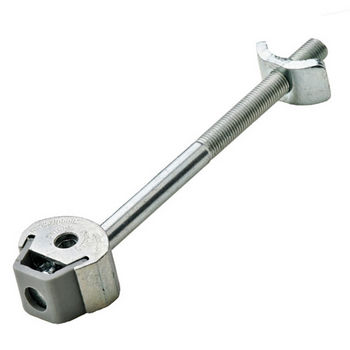
I use the 100 mm Zipbolt Countertop Connectors from Lee Valley ($2.10 @)
[OP]
Moderator
Thanks, Kent. I will use these. I saw these @ LV. I was concerned that the little allen hole would strip out. These slabs are > 100 lbs each.
I might just do as Jamie did and use draw bolts with an open-ended wrench.
Keith, thanks for the idea about the softstart. I have a Hitachi 2hp that has a variable speed, so I will probably use that.
I'll be using this bit. I gotta say though, this slab is surfacing so nicely with planes - any direction, no tearout - and it's already close to flat, I'm tempted to just do it by hand...
WHAT AM I SAYING?!!!!!
[OP]
Moderator
I decided to use some QS white oak; I may have to do this in the future, so I wanted something reasonably stable. I made 'L's on the bottom for clamping, per Jamie's design.
Making rails this long was a challenge for me. I ripped them as long as I could with a track saw, which produces a better jointed surface on long stock than my table saw (read: me at my table saw). Then I screwed/glued extensions.
They were still not flat or square enough, so I screwed the two rails together then ran the rig through my planer. This produced two identical 108" extended rails that were perfectly square to the faces.
I'll pocket screw identical cross pieces between the rails to support the slab and to shim it up closer to the top of the rails. I overhung the clamping "L's" by 1/4" on the inner face to allow registration for those cross pieces, and to help distribute the load.
I can't help but feel this is a little over-engineered. This slab loves being hand planed, so I'll likely correct any sins at the end with that.
Question: How do you guys rip thick things with portable tools? My track saw doesn't have the depth of cut. I am considering planing the thickness down to accomodate the max cut 1 5/8 of the track saw.
How do you joint thick edges?
I was considering this if the track ripped joint isn't good enough:
Glue the two halves together. Route a 1/4" channel through the seam. Rip the pieces apart. Flush trim the edges on each half with a top-guided bit and then from the other side if necessary with a bottom guided bit. Will doing it in multiple passes compromise the truth of the joint? I am concerned that using a 2" long flush trimming bit may flex if I do it in a single pass. Am I wrong?
Stupid? Too much effort?
Last edited by Prashun Patel; 10-31-2014 at 10:24 AM.
Contributor
So you have a track saw which can cut a straight line the length of the slab. It just doesn't have the depth of cut. One approach is to make two passes with the saw -- one from the top of the slab, and the other from the bottom of the slab. I wouldn't worry about precisely aligning the bottom cut with the top cut. I'd offset the bottom cut slightly to the waste side. Then I'd stand the slab on edge and get out those handplanes to trim the bottom cut to flush with the top cut.
If it turns out that your tracksaw doesn't cut perfectly straight, you may see a gap in the middle or at the ends when you butt the two planks together. Again, a handplane can improve the fit.
For ease of transport, I'd build this big table top as two planks which assemble on-site. That is, there is going to be a seam running the length of the top. I might even put on a microbevel like manufacturers of prefinished flooring. The seam won't be visually obnoxious; you're already seeing these two big planks. And the seam/crack/microbevel means that the edge-jointing on the slabs doesn't have to be 100.000% perfect.
Last edited by Jamie Buxton; 10-31-2014 at 11:40 AM.
 Posting Permissions

 Reply With Quote