Results 1 to 11 of 11

Thread: Installing moulding above built-in...

  1. #1
    Join Date
    Feb 2009
    Location
    Bucks County, PA
    Posts
    973

    Installing moulding above built-in...

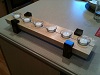
    My built-in is nearly complete (yeah, right), with only the moulding above it remaining to be done. But I'm not exactly sure how I want to install it. As you can see, the moulding consists of an upside-down base cap, some space made up of drywall to mimic a full upside-down baseboard, and then a crown piece. I have the original crown that was on the wall, so I will be reusing that. I had to cut the original base cap however, so I have a replacement one for that.

    I was thinking I could build a stud-wall of sorts to go between the ceiling and the top of the bookcases, and then attach the drywall and moulding pieces to that. The rails that are on top of the bookcases are not permanently attached. They were mainly just there so I could cut the stiles to length and to get the overall look. Their final height will have to be taller to meet up with the base cap moulding.

    So is this stud-wall idea a good one, or should I go with something else?


    IMG_0986.jpgIMG_3054.jpg
    And there was trouble, taking place...

  2. #2
    Join Date
    Sep 2012
    Location
    Wapakoneta,Ohio
    Posts
    427
    personally, I would fill it in with wood to match the cabinets. You could pocket hole it from the front and cover the screw slots with trim, or put cleats in behind the panel and nail it with brads from the front. There are alot of options as far as dressing it up.

  3. #3
    Join Date
    Feb 2014
    Location
    Lake Gaston, Henrico, NC
    Posts
    9,029
    Powergrab.

  4. #4
    Join Date
    Feb 2009
    Location
    Bucks County, PA
    Posts
    973
    Quote Originally Posted by Max Neu View Post
    personally, I would fill it in with wood to match the cabinets. You could pocket hole it from the front and cover the screw slots with trim, or put cleats in behind the panel and nail it with brads from the front. There are alot of options as far as dressing it up.
    Are you suggesting that I just install wood vertically between the top of the cabinets and the ceiling, and then attach the moulding to that? Using cleats would probably work better for that. Note that this built-in is close to 13' wide, and the gap is around 9" tall, so it's a lot of material. The existing space between the base-cap and the crown is drywall, which I have lying around in spades, so that's why I was thinking of using that instead of solid wood. I might create a small version as a mockup just to get the feel for how everything would go together.

    And yes, Tom, Powergrab might be a better option than nails... especially since I do not own a nail gun or a compressor.
    And there was trouble, taking place...

  5. #5
    Join Date
    Feb 2014
    Location
    Lake Gaston, Henrico, NC
    Posts
    9,029
    I built this raised panel coffered ceiling with MDF and PowerGrab. I used PowerGrab so we didn't have to spend hours sanding puttied nail holes. It's been up in our house for 7 or 8 years now, and no cracks anywhere. The coffers are about 4 feet wide, the narrow way. The tapered edges of the panels are separate, individual pieces.
    Attached Images Attached Images

  6. #6
    Join Date
    Jan 2012
    Location
    mid-coast Maine and deep space
    Posts
    2,656
    Trying to build a stud wall soffit after the fact will be difficult as will trying to run a 2x along the ceiling to support your crown.

    I suggest that you make up a right angle piece out of 3/4" plywood - maybe 6" high on the face (or more) and 2'' to 3" wide on the flat piece that will sit on top of the cabinet. The idea is to create a secure sub face to which you can attach a sheetrock or MDF or plywood as a frieze board. You can then attach the trim to the frieze board.

    If you leave a few gaps or cut some pockets in the face of the board you will then be able to clamp the assembly with Power Grab or some other adhesive (and maybe a few screws from inside the cabinet) to hold the plywood assembly in place and provide a solid backing for the actual face of the frieze board. Alternatively, the plywood assembly face piece rather than being full length could be spaced apart pieces that are tall enough to nearly fill in the 9" space and fully support the crown X whatever wide will give you a good yield with scrap stock on hand. As long as you have some support for the face and trim every 10" or so you will be more than fine especially if your face board is solid material rather than just sheetrock. I would try to make the bottom of the plywood right angle as full length as possible. In the case of using pieces for the vertical face I would also add a full length rip of ply behind that to align and strengthen the assembly.

    How's that -clear as sheet rock mud? I can do a sketch if you like.

    Cabinet is looking great by the way - Nicely done!
    Last edited by Sam Murdoch; 12-22-2014 at 4:43 PM. Reason: Nice cabs
    "... for when we become in heart completely poor, we at once are the treasurers & disbursers of enormous riches."
    WQJudge

  7. #7
    Join Date
    Feb 2009
    Location
    Bucks County, PA
    Posts
    973
    Quote Originally Posted by Sam Murdoch View Post
    Trying to build a stud wall soffit after the fact will be difficult as will trying to run a 2x along the ceiling to support your crown.

    I suggest that you make up a right angle piece out of 3/4" plywood - maybe 6" high on the face (or more) and 2'' to 3" wide on the flat piece that will sit on top of the cabinet. The idea is to create a secure sub face to which you can attach a sheetrock or MDF or plywood as a frieze board. You can then attach the trim to the frieze board.

    If you leave a few gaps or cut some pockets in the face of the board you will then be able to clamp the assembly with Power Grab or some other adhesive (and maybe a few screws from inside the cabinet) to hold the plywood assembly in place and provide a solid backing for the actual face of the frieze board. Alternatively, the plywood assembly face piece rather than being full length could be spaced apart pieces that are tall enough to nearly fill in the 9" space and fully support the crown X whatever wide will give you a good yield with scrap stock on hand. As long as you have some support for the face and trim every 10" or so you will be more than fine especially if your face board is solid material rather than just sheetrock. I would try to make the bottom of the plywood right angle as full length as possible. In the case of using pieces for the vertical face I would also add a full length rip of ply behind that to align and strengthen the assembly.

    How's that -clear as sheet rock mud? I can do a sketch if you like.

    Cabinet is looking great by the way - Nicely done!
    I think I understand where you're going, but a sketch would be nice. Thanks.
    And there was trouble, taking place...

  8. #8
    Join Date
    Feb 2008
    Location
    Northwestern Connecticut
    Posts
    7,149
    A cleat on top of the cabinets, a cleat on the ceiling, at least 1 1/4" as a nailer.....plung into the sides to break the molding at the right spot, use 1/2" maple ply so you can nail to it, double cope the moldings, done. No need to involve Sheetrock, though I suppose it's cheaper. You could add cleats up and down then infill with studs held in by pocket screws to support drywall, this will give nailing support for base cap detail and crown. Still have a double cope on your hands. Pretty straight froward either way. That's not a great rise, not much to worry about, drywall can go 16" on center, it's the crown that needs a nailer.
    Last edited by Peter Quinn; 12-22-2014 at 8:00 PM.
    "A good miter set up is like yoga pants: it makes everyone's butts look good." Prashun Patel

  9. #9
    Join Date
    Jan 2012
    Location
    mid-coast Maine and deep space
    Posts
    2,656
    Quote Originally Posted by Steve Wurster View Post
    I think I understand where you're going, but a sketch would be nice. Thanks.
    OK so a sketch it is -

    Screen Shot 2014-12-22 at 10.35.13 PM.jpg

    As I wrote above this can be made with scraps or a full piece - whatever you have.
    "... for when we become in heart completely poor, we at once are the treasurers & disbursers of enormous riches."
    WQJudge

  10. #10
    I'm late to the party, but when I read the original post, my first thoughts were to fill it in and keep the base cap and crown consistent with the room along the front, top of the built-in, which is basically what followed in the posts below it.

    Sam's sketch is a good idea. If your ceiling rafters run perpendicular to the wall behind the built-in, you could alternatively nail a 2x4 to the ceiling, and another to the top of the cabinet to accomplish the same task of attaching the face material to.

  11. #11
    Join Date
    Feb 2009
    Location
    Bucks County, PA
    Posts
    973
    Sam, thanks for the sketch. I had previously wondered if I could make a series of L brackets similar to what you drew. But mine were individual pieces and not connected. I think yours would work better. I can then build up material onto the plywood as needed. And I should have enough scraps and whatnot around to make the brackets.

    Keith, yes, the plan is to keep the base cap and crown consistent with the rest of the room. I still have the original crown piece (the one picture shows where it used to be), but I have to replace the base cap piece. The rafters do run perpendicular, so I can fasten a cleat to them.

    Peter, what do you mean by, "plung into the sides to break the molding at the right spot"? Since I have the existing crown I should not have to cope that piece. Unless of course the room is wider at the new spot compared to the original corner, which is a distinct possibility. But I will have to cope the base cap piece.

    Thanks all for your help.
    And there was trouble, taking place...

Posting Permissions

  • You may not post new threads
  • You may not post replies
  • You may not post attachments
  • You may not edit your posts
  •