Results 1 to 14 of 14

Thread: Inlace Liquid Inlay matrial

  1. #1
    Join Date
    Sep 2006
    Location
    Deep South
    Posts
    3,970

    Inlace Liquid Inlay matrial

    I have been making some keepsake boxes with carved lids using the vcarve inlay technique described on the Vectric website. The process works really well and I recommend it to anyone who wants to do inlays with really fine detail. Right now, I am trying to branch out and create inlays with a metallic or pearl look. I have ordered a kit from Inlace Liquid Inlays. Here is the website. It has very few useful application instructions.

    http://www.inlaceonline.com/

    I am hoping that someone else has used this stuff and can maybe offer some tips for using it. I would really appreciate it if someone has some pictures of how they used it.

  2. #2
    Join Date
    Apr 2008
    Location
    SW Ohio
    Posts
    2
    Not much info on it out there yet.

    http://woodworker.com/pdf/InLaceInstructions.pdf

  3. #3
    Hi I think its on you tube please let us know how it works for you cheers Frank

  4. #4
    Join Date
    Sep 2006
    Location
    Deep South
    Posts
    3,970
    Yes, there are a couple of Youtube videos I found on Inlace but they are both a lot of someone just talking. Either one could be edited down to a three minute video with no loss of real content.

  5. #5
    Art that is true it is limited but it dose look an interesting product if it works cheers Frank

  6. #6
    Join Date
    Feb 2007
    Location
    Piedmont Triad, NC
    Posts
    793
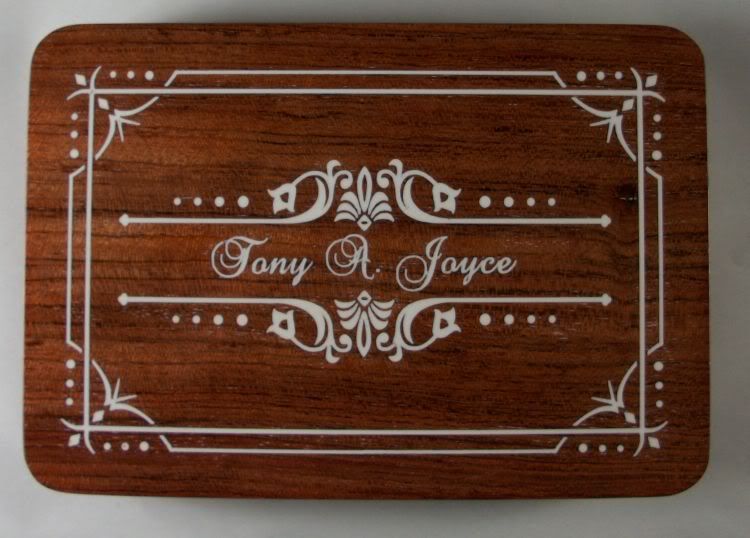
    I have not used the Inlace product, but I have filled with "Castin' Craft Clear Epoxy" with "Pearl Ex" power.
    I did not get the results I wanted, but never got around to doing more samples. You will have to seal the wood before filling to keep it out of the grain.
    This was supposed to be a mother of pearl powder. For scale the box is about 3-1/2" X 4-1/2".


    Tony
    Last edited by Tony Joyce; 12-29-2014 at 9:13 AM.
    "Only those who have the patience to do simple things perfectly will acquire the skill to do difficult things easily.”
    Friedrich von Schiller (1759-1805)

    "Quality means doing it right when no one is looking."
    Henry Ford

  7. #7
    Join Date
    Sep 2006
    Location
    Deep South
    Posts
    3,970
    Wow, thanks so much Tony. Perhaps the photo is better looking than the actual piece but the overall effect is just what I'm looking for. Nice design too. The Inlace product isn't an epoxy. It is based on polyester resin/hardener instead. My first quick experiment leads me to believe the material won't bleed out into the surrounding wood like epoxy or stain. If that turns out to be a problem, I thought of 2 possible solutions. I could cut the image with maybe .020" or so offset depth to allow for a little more drum sanding. Alternatively, I have successfully used spray shellac as a mask with certain paints.

  8. #8
    Join Date
    Feb 2007
    Location
    Piedmont Triad, NC
    Posts
    793
    Art,
    There is some bleed of the white in the picture of the box. I only used two coats of lacquer to seal the grain(Bubinga). I've had good luck using lacquer(I spray a lot) as a mask to keep fillers from bleeding. Usually it takes two or three coats to work well.
    The plate is not filled level like the box. In fact it is a grain filler. This seems to be faster and easier for pieces that don't need to be level filled.

    I was not satisfied with cutting deeper and sanding back, you loose too much detail. IMHO


    Tony

    Edit: my album has some other examples of filled V-carve. http://www.sawmillcreek.org/album.php?albumid=513
    Last edited by Tony Joyce; 12-29-2014 at 4:25 PM.
    "Only those who have the patience to do simple things perfectly will acquire the skill to do difficult things easily.”
    Friedrich von Schiller (1759-1805)

    "Quality means doing it right when no one is looking."
    Henry Ford

  9. #9
    You might want to try polymer clay as well. I tried the Inlace and wasn't thrilled with it. You can get polymer clay at Hobby Lobby or Michael's. It comes in a variety of colors, but I like the white the best.
    Live Oak Forge
    40W Epilog Mini 18
    Shopbot 32"x24"x6" PRT
    Shopbot 48"x48"x6" PRS
    Next Engine Scanner
    Artcam
    CorelDRAW X5
    Multiple and various other implements of destruction

  10. #10
    Wow that's super work it must take a lot of time but it is sure is worth it

    cheers Frank

  11. #11
    Join Date
    Dec 2014
    Location
    Phoenix, AZ
    Posts
    10
    As far as using inlace, there are a few trips that I can offer you, as I use inlace quite a bit and have had really good luck with it. 1st of all, make sure that the area that you are going to inlay is very clean. Any dust or sawdust will cause the inlace not to stick properly. When mixing your resin, be sure to get the mix as close to the directions as possible. I use a syringe to add the hardener to the epoxy and it seems to work very well. You also do not want to mix up more than you can use reasonable in 15 minutes. Much past that time frame, then the mix starts to both harden and settle giving uneven results. The material will self level if you get the mixture correct, so use some scrap material and see where the mix between epoxy and hardener gets the best leveling. You will have good results if you have a little patients and test it out with slightly different epoxy = hardener mixtures until you find out what will work best for you. I do a number of inlays for custom made pens, and even some on things like decorative baseball bats, gavels and stuff. Just do not get in a hurry. Once you apply it, don't put it back into the lathe before the material is completely dry. I let it sit for a minimum of 24 hours, personal preference, before I even think of turning it. If it is a wider piece of inlay, more than about 1/3 inch, I will give it about 48 hours before I do anything with it. Yes, it is supposed to dry much faster than that, but would much rather be safe than sorry!

    Best of luck with it!
    Arizona Sign and Decorated Products
    AZHAMSIGNS

    Universal M-30 30w Laser with Rotary
    LaserPro Venus 12w Laser
    3 Carvewright Machines
    Sega Vinyl Cutter
    Dye Sublimation Equipment
    Featuring 3 Richo SG3110DN's
    12x14 Heat Press
    Multifixture Mug Press

    Full Wood Turning Shop
    Full Custom Woodworking Shop

  12. #12
    Join Date
    Feb 2003
    Location
    In the foothills of the Sandia Mountains
    Posts
    16,641
    Tony, your carvings are beautiful. Can you describe your grain filler technique and provide some product suggestions? I have been using spray paint to color my v-carvings after applying 2-3 coats of shellac. It works OK on flat pieces where I can scrape/sand off excess paint. I would like to find a better method for non-flat carvings.
    Please help support the Creek.


    "It's paradoxical that the idea of living a long life appeals to everyone, but the idea of getting old doesn't appeal to anyone."
    Andy Rooney


  13. #13
    Join Date
    Feb 2007
    Location
    Piedmont Triad, NC
    Posts
    793
    Quote Originally Posted by Bruce Page View Post
    Tony, your carvings are beautiful. Can you describe your grain filler technique and provide some product suggestions? I have been using spray paint to color my v-carvings after applying 2-3 coats of shellac. It works OK on flat pieces where I can scrape/sand off excess paint. I would like to find a better method for non-flat carvings.
    Bruce,

    This is what works for me and seems to go quickly. After I have my V-carve done I sand to a finish grit(I use 150) I apply two to three coats(sanding between coats) of high solids lacquer(I use SW PreCat). After the lacquer dries I apply "Behlen Pore-O-Pac™ Grain Filler" (I use Med. Brn. Wal.) with a brush being sure to load all the cracks and crevices. I let it start to haze over and wipe the heaviest excess off(I use a plastic squeege on flat areas). As it hardeners I remove more of the excess. After it sets over night I wipe the haze off the high areas with a rag until the rag is clean after wiping. If some areas still have a haze I lightly dampen a rag with MS and lightly wipe them off. I let it set for a while(couple hours) and then top coat with one or two coats of lacquer. Sounds involved, but it goes quickly(at least to me) and is pretty easy.

    I notice shellac.net has Behlen's lacquer products in spray cans. Including a high solids lacquer.

    Hope this is of some use and if you have any other questions let me know.

    Tony Joyce
    "Only those who have the patience to do simple things perfectly will acquire the skill to do difficult things easily.”
    Friedrich von Schiller (1759-1805)

    "Quality means doing it right when no one is looking."
    Henry Ford

  14. #14
    Join Date
    Feb 2003
    Location
    In the foothills of the Sandia Mountains
    Posts
    16,641
    Thank you Tony, I'll gather the ingredients and give that a try.
    Please help support the Creek.


    "It's paradoxical that the idea of living a long life appeals to everyone, but the idea of getting old doesn't appeal to anyone."
    Andy Rooney


Posting Permissions

  • You may not post new threads
  • You may not post replies
  • You may not post attachments
  • You may not edit your posts
  •