Page 2 of 4 FirstFirst 1234 LastLast
Results 16 to 30 of 52

Thread: North American vs Euro TS Fences and Safety

  1. #16
    Join Date
    Aug 2009
    Location
    'over here' - Ireland
    Posts
    2,532
    I'm no expert Peter/most of my experience is with man made boards and am interested to hear other views. I'm another however that wouldn't want to move away from using a slider.

    I'd say the risk of the rear of a workpiece getting unintentionally skimmed arises mostly from poor technique - the actual fence end position relative to the blade, and the location and direction of the push/type of pusher need to be reasonably correct. If the fence is pulled back much past the centreline of the blade though then some care is in my limited experience needed (while not overdoing the pressure) to keep the rear end of the workpiece snug against the fence - because there's some possibility of it trying to hang a right around the end of the fence with the result that the LHS/rear end may tend to push into the side of the teeth on the leading/cutting edge of the blade. Which isn't necessarily a significant risk as the teeth are cutting down, but it creates some potential to skim the end of the edge of the workpiece. (especially on a 10in blade which is where i've seen it happen)

    Get it right and there's no problem, and the workpiece even eases a little away from the blade as it clears the fence.

    My K3 Hammer is actually fitted with an Incra TS LS (full length) rip fence. I have however a shorter DIY sub fence made from a length of anodised heavy aluminium angle that mounts off the T slots in it. (i couldn't find a suitable section to pull off the alternate low/high fence option as the Unifence though) This as the others functions as a short/low fence when required - it can be very useful to clear the riving knife mounted top guard.
    Last edited by ian maybury; 01-09-2015 at 4:37 PM.

  2. #17
    I've been told the long style fence position still finds use in euro saws for cutting panels and the like and it provides a nice support all the way doing that. The short style is for cutting natural wood that can have twists and tension in it. I have a euro sliding saw but the fence is pretty weird, not full length, but not a short euro style either. It's an old saw though.


  3. #18
    Join Date
    Oct 2005
    Location
    Helensburgh, Australia
    Posts
    2,710
    Quote Originally Posted by Peter Aeschliman View Post
    Yeah, that sounds pretty terrifying.


    The thing I still don't get- when you only have a few more inches left in your cut, it really doesn't seem like the workpiece would be adequately supported because it only has a few inches of contact on the fence.
    Once the cut is substantially started the saw blade becomes the guide not the fence. How many times have you seen a misaligned fence cause burning because the operator insisted that the timber being cut must lay against the fence? if that operator had allowed the timber to be guided by the blade the burning would not have happened.
    Chris

    Everything I like is either illegal, immoral or fattening

  4. #19
    Join Date
    Jan 2013
    Location
    Pittsburgh, PA
    Posts
    868
    Hi,

    Many years ago I bought a Delta Unifence for use with my craftsman contractors saw. I used it in the normal American fashion with great success and never thought about doing it differently, until reading some posts here about how the Europeans use a short fence.

    I swung the Unifence over to my new Grizzly cabinet saw when I bought it about two years ago. The grizzly has a riving knife. When ripping now I pull my Unifence back so that the end is about even with the beginning of the blade. I like the feeling when ripping this way. I have not noticed any negatives about it. As mentioned by Chris, I think the blade and riving knife guide the workpiece as it is being ripped and moves past the end of the fence.

    I have not found the desire or need to return to the American way of positioning the fense for the most part. I do have a couple jigs that I used for ripping some narrow tapered pieces, where I need the fence set a American style, but other than that I keep it in the European position for ripping and feel quite comfortable doing so.

    Bill
    Too much to do...Not enough time...life is too short!

  5. #20
    Join Date
    Mar 2003
    Location
    SE PA - Central Bucks County
    Posts
    65,850
    Quote Originally Posted by Dennis Aspö View Post
    I've been told the long style fence position still finds use in euro saws for cutting panels and the like and it provides a nice support all the way doing that. The short style is for cutting natural wood that can have twists and tension in it. I have a euro sliding saw but the fence is pretty weird, not full length, but not a short euro style either. It's an old saw though.

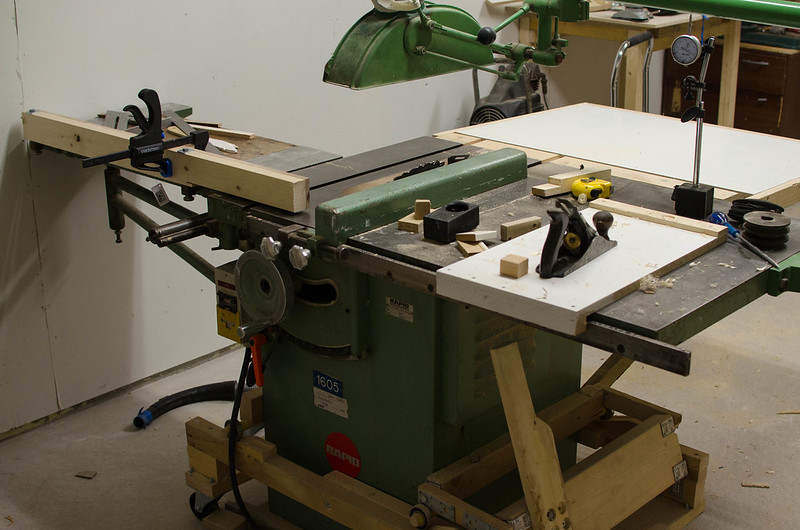
    Dennis, the saw you show in the photo is a cabinet saw with a sliding table add on, primarily for cross-cutting...it's very different than a Euro format slider. On the latter, the edge of the wagon (the sliding part) is nearly right up to the blade. When you are using the sliding table, the principles of a short fence for material positioning before the cut can apply as long as your material is controlled by your sliding table and fence. When ripping, it's best to have a full length fence that's adjusted to perfectly parallel to the blade or slightly away from the back of the blade for maximum safety. You could easily make a cap for your current fence that would extend its reach beyond the blade for ripping.
    --

    The most expensive tool is the one you buy "cheaply" and often...

  6. #21
    I've been considering a cap for my fence, but actually to shorten it so it'd be more like this:
    https://www.youtube.com/watch?v=d7QXIN2X8-w

    I've ripped 4 meter long boards using this setup (plus extra infeed and outfeed supports) and it's worked quite well for me. Some of the professionals I've talked to with "proper" saws dedicated ripping operations also advocate setting the blade as high as possible, contrary to the common american and uk opinion:
    https://www.youtube.com/watch?v=luS0q1GmjxM
    Last edited by Dennis Aspö; 01-10-2015 at 4:35 AM.

  7. #22
    Join Date
    Aug 2013
    Location
    Hatfield, AR
    Posts
    1,170
    I replaced the UHMW fence on my saw with a taller piece of laminated MDF. I drilled 4 holes in that fence so I can screw a short "rip" fence piece onto it for when I'm dealing with solid lumber. Works great, just don't forget to add the 3/4" thickness (or whatever thickness of material you use) for the added fence. I've seen videos of folks building a similar set up but with cam knobs or t-nuts. I just screw/unscrew mine.
    -Lud

  8. #23
    Join Date
    Feb 2011
    Location
    Central WI
    Posts
    5,666
    Dennis, the video demonstrates the English way to rip. High blade but with a nose guard on the crown. Very important. The high blade pushes the stock down and reduces the tendency of the long board to ride up and over the blade. Robinsons are rare but made some great machines. I have a Robinson slider that will be a 2015 project. DaveIMG_1068(3).jpg

    Disregard other pic.
    Attached Images Attached Images

  9. #24
    Join Date
    Mar 2010
    Location
    Southern Md
    Posts
    1,138
    My craftsman came with a short aluminum extrusion that T slotted to the fence. Owners manual didn't really discuss its use and of course I had no clue, first saw I ever owned or used so now I know what its for.

  10. #25
    Join Date
    Feb 2003
    Location
    Doylestown, PA
    Posts
    7,568
    Quote Originally Posted by Grant Wilkinson View Post
    I follow David's approach. I didn't cut my long fence. I merely attached a "short fence" to it. The short fence ends just beyond the gullet on the blade. It does seem a little strange at first as you lose the support for the piece just behind the front of the blade. However, since the blade is no longer cutting at that point, there is no need for that support.
    I think that using Grant's idea of an attached 'short fence' to try ending the fence at different places on the blade has merit. I have a fence with a T slot in the face. I jointed and planed a poplar piece exactly 1" thick and as high as the fence. That way the tape on the fence is sorta useful, just offset 1". I counter bored 2 holes with screws and T nuts so I can fasten the poplar subfence anywhere along the primary fence. It also has a cutout to bury a portion of a dado stack if I wish. Make something like that and experiment to see what feels comfortable to you.

  11. #26
    Join Date
    Aug 2009
    Location
    'over here' - Ireland
    Posts
    2,532
    Short rip fences on dedicated rip saws seem to be a pretty long standing tradition, this is a Wadkin: http://www.usedwoodworkingmachines.c...products_id=29 The sort of kick back a saw of this build and weight could produce doesn't bear thinking about - no wonder they recognised there was an issue.

    The term 'rip' presumably means cutting natural wood in the direction of the grain - which brings the risk of cuts springing in whatever direction as stress is released.

    Ply or other man made boards are that much more stable, and so kick back is presumably much less of a risk with that sort of work. (although some modern plywood i've seen was as a result of manufacturing defects/veneer overlaps and the like pretty inclined to spring/bend when cut free) Which nevertheless is presumably why it's deemed more acceptable if not OK (?) to use a long fence on large panel cutting (but give me a slider instead any day) - the scenario where a short overlap rip fence has some potential to end up skimming the last part of the cut as a result of the by this stage relatively unsupported work skewing a bit towards the end of the cut.

    But then ripping I guess isn't necessarily intended to be a precision/high surface finish activity either - in at least traditional environments the presumption would presumably be that the stock would subsequently be planed - and would anyway be cut over length. We on the other hand may as a result of not being fully equipped end up trying to produce glue ready joints off the saw.

    An associated issue for the average woodworker may be that we tend to use a single saw to do all our machining, and also that many are very much built down to a price. So it's possible in a market where some saws are supplied with 'safe' short fences to end up trying to cut large panels on a lightweight budget saw with a less than precisely set up (and often rather flexible) short rip type fence - which can't be ideal.

    I guess as before that the risk of problems while ripping on a traditional long fence is significantly reduced by accurate set up, good rigid fences and good technique - but that there still has to be a residual risk that a short/adjustable fence can greatly help reduce. The set up in the Steve Maskery video has to be a decent way of achieving this on a more traditional long fence saw.

    I guess too there's a challenge/learning task implicit in the situation for all of us - we need to learn the ins and outs of the different sorts of cuts to put ourselves in a position to recogise when there's more risk about, and when as a result to use particular set ups. It's interesting that for example that sliders are still fitted with rip fences - there has to be scope for a manual setting out set ups for different cuts types....

    PS for most of us the issue in the end seems to be the above - there's such a wealth of knowledge and set ups involved in using whichever saw type we're used to that changing over requires a lot of re-learning of methods.
    Last edited by ian maybury; 01-11-2015 at 9:24 AM.

  12. #27
    Join Date
    Jan 2007
    Location
    Ottawa, ON Canada
    Posts
    1,473
    Peter: It has not been my experience that I get any tapering of the last few inches of the cut. It does take a bit of getting used to, but when you do, it's great to simply push the piece that was against the fence to the right a bit and not be concerned about any pinching between a cutting blade and the fence.

    Curt: I did exactly as you did. My fence has a T slot on the face. I cut a piece of 1" MDF the height of my fence, put 2 countersunk holes in it and used square headed bolts to hold it to the fence. I can slide it anywhere along the fence I like. I have a long one attached the same way for rabbets. It is full length.
    Grant
    Ottawa ON

  13. #28
    Isn't it adequate to set the fence so it stops in the middle of the blade, then you get a few inches of support at least for the last part, and the back portion of the blade is free.

  14. #29
    "Once the cut is substantially started the saw blade becomes the guide not the fence."

    Ok, let's try this out. Start ripping a board as usual with any fence you like. Stop the saw and keep the board in position. Move the fence away from the board. Restart the saw and finish the cut. Who wants to go first?


  15. #30
    Join Date
    Aug 2009
    Location
    'over here' - Ireland
    Posts
    2,532
    Guess the clearance that results from the width of the kerf relative to the plate not to mention that carbide teeth cut off the side too means that the saw blade does not necessarily to any real degree guide the work. Cove cutting too strongly suggests otherwise: http://www.rockler.com/cove-cutting-table-saw-jig
    Last edited by ian maybury; 01-11-2015 at 10:06 AM.

Posting Permissions

  • You may not post new threads
  • You may not post replies
  • You may not post attachments
  • You may not edit your posts
  •