Page 3 of 3 FirstFirst 123
Results 31 to 45 of 45

Thread: New Base For An Old Turntable

  1. #31
    Join Date
    Jul 2012
    Location
    Punta Gorda, FL
    Posts
    3,028
    I think I'm finally getting there. There being that place where I'm most likely not to want to change things anymore.


    I may not even cap the tops of the legs. But it might be cool to run a strip of cocobolo to match the maple strip along the top edge. Cutting that in would be a challenge.

    When the inlay is done, I'll cut the ebony into a square and glue it on the left side, probably over the maple strips. Or should I make it flush with the panel? I've been thinking about forming a bevel around the perimeter of the ebony square but maybe recessing it a bit into the wood and just let the bevel stand proud might look better.

    The cocobolo strips on the left leg now stand proud a bit. I'm thinking of leaving that. I still want to do something to the feet, either a 45 bevel or a roundover. I'm leaning toward the bevel and bringing it up to about 1/4" shy of the bottom of the panels. There should be enough left on the bottom of the feet to install decent sized felt cushions. I'll have to run some samples to see how that looks.

  2. #32
    Quote Originally Posted by Julie Moriarty View Post


    Where's the motor?
    It's removable. I usually store mine attached to a good bottle of beer. If you want a more permanently attached motor, it's going to cost a few more bucks...

    http://knewconcepts.com/power.php

    Obviously, it's overkill at our level, though if I was doing a lot of inlay, I'd seriously consider the hand powered one. The motorized one really makes a lot more sense for metal work, like jewelry. Then again, if I were REALLY doing a lot of inlay, like if that was my specialty (which it never will be), I might consider laser cutting it.

    I'll admit that I avoid inlay as much as I can. I buy my truss rod covers pre-inlayed with my logo on them. It's all CNC cut (maybe lasered for all I know), and for what they charge to do it, I would have to have pebbles in my head to muck with it myself.

  3. #33
    Join Date
    Apr 2009
    Location
    Mandalay Shores, CA
    Posts
    2,690
    Blog Entries
    26
    Julie,

    Like Mike, I think your bench pin is too thin, has a poor mouth shape and is cantilevered too far out. It probably bouces when you are cutting. That will make it very difficult. I make bench pins out of stiff 5/4 material with a taper to 1/8" or so. If you don't have a socket or dovetail for the bench pin, you'll need a robust clamping arrangement.

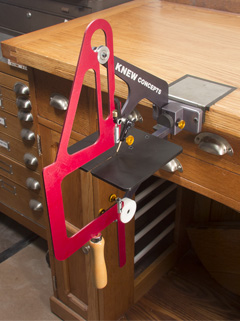
    Jewelor's saw saws are tensioned by flexing the frame while fastening the blade in. Personally, I don't like that and went to the Knew Concepts style. LOML who teaches silversmithing / Jewery making is old school. She cuts even thinner metal with great precision. Practice helps.

    She teaches body position (seat very low and piece just below eye level. The saw is only manipulated vertically. If you tip, twist, or otherwise yaw the saw, accuracy is diminished and blades break. I like to sit higher but can isolate my arm movement in a consistant fashion. Turning is often described as "sawing in place." No forward pressure is present.
    Shawn

    "no trees were harmed in the creation of this message, however some electrons were temporarily inconvenienced."

    "I resent having to use my brain to do your thinking"

  4. #34
    Join Date
    Jul 2012
    Location
    Punta Gorda, FL
    Posts
    3,028
    John, I saw the motorized version and since it was $2,100.00 and the manual version is $335.00 to $400.00 that makes us worth something between $1700.00 and $1765.00. If I bought the $335 version I could increase my value a lot!

    Shawn, in Larry Robinson's The Art of Inlay, he talked about tapering the end of the bench pin so he can slide the piece off and prevent if from being sucked into the vacuum. He also said his vacuum setup sucks from both the top and bottom. I had the crevice tool clamped to the top when I was cutting and a lot of dust ended up on my cutting hand.

    When I grow up, I'll have something like this:

    I really never thought cutting shell would require so much stability, but now that I've done it, I can understand why.

    But if I am going to continue doing this (and I'd like to) I need something that will make routing the wood easier. I'm seriously considering this:
    but w/o the edge guide. I would add the dust collector though, even though I might have to cut open the front. And adding another light might be a good idea. I'm VERY far-sighted and need all the help I can get with up-close work.

  5. #35
    Join Date
    Jul 2012
    Location
    Punta Gorda, FL
    Posts
    3,028
    I lost my measurement sheet and had to clamp everything together again to get the measurements for the 1/4" MDF turntable platform that sits in the base. Once it was all clamped together, I decided to check it against the original base by setting it on top. I've been working with top-inside dimensions for the new base.


    Side-to-side the fit is perfect. When I match the front inside of the old to the new, the back of the new extends beyond the old back. That's because the back was modified for the dust cover to be able to lift back and rest in the up position. With the exterior of the new being what it is, I can't see incorporating the old dust cover with the new base. I'll have to figure something else out.


    With and without the template I made for forming the new platform. I'm almost tempted to ditch the 1/4" MDF for real wood. Hmmmmmm.....


    Preparing to cut the MDF. I'll have to look into the idea of using real wood a little more.

  6. #36
    Join Date
    Jul 2012
    Location
    Punta Gorda, FL
    Posts
    3,028
    I decided to give solid wood a try. It seems like almost everything I do involves, "Let's try this..."

    I had some 1/2" maple from making drawer sides. I used that to make a picture frame, then took my template, drew the outline, and cut the waste with a jigsaw.

    The ~1/4" oak plywood template is to the left. I'm putting turner's tape on that so I can use it to rout the profile.


    Not a good idea using such a thin piece for the template. It was closer to 3/16" thick than 1/4". And an equally worse idea taking this to the router table. I did manage to get it done without incident but it wanted to fly out of my hands several times. Overall, a poor decision.


    I had to finish up on the spindle sander. But I'm happy with the decision to use wood over MDF. I think it will add to the aesthetics and strengthen the base. I'll probably dye it ebony to match the original color. The going on this has been slow. Other matters have been more pressing. And the figure-it-out-as-you-go-along method tends to slow things up. A lot.

  7. #37
    Join Date
    Jul 2012
    Location
    Punta Gorda, FL
    Posts
    3,028
    I did a dry fit this morning to make sure the turntable fit okay.


    My original plans were to dye the maple platform black, like the original, but after I inserted the turntable, I'm leaning toward just leaving it natural.

    I still have to do the cocobolo trim on the feet. I went to Woodcraft yesterday with my 10% off birthday coupon and treated to myself to a few things. One of them was a mini aluminum miter box, perfect for the 1/4 x 1/4 cocobolo strips. The SCMS was overkill and every once in a while it grabbed the cutoff and sent it airborne. I'll wait on the inlay. I ordered the Micro Fence Dremel base but it won't be here for several weeks. I guess they don't carry any in stock.

    The other thing I'm questioning is using the old dust cover or trying to make a new one. That might be above my pay grade.

    I really don't care for the look but the challenge of making a new one that worked with the base is daunting. I wouldn't even know where to start.

  8. #38
    Join Date
    Dec 2003
    Location
    SF Bay Area, CA
    Posts
    15,332
    Clear acrylic or plexiglass might be a start. They glue together fairly easily and cleanly...once you get the hang of it.
    Wood: a fickle medium....

    Did you know SMC is user supported? Please help.

  9. #39
    looks great, Julie! Time to make a matching wooden top for it.

  10. #40
    Join Date
    Jul 2012
    Location
    Punta Gorda, FL
    Posts
    3,028
    Quote Originally Posted by Mike Sherman View Post
    Time to make a matching wooden top for it.
    You make it sound so easy.


    First coat of lacquer. I sprayed a bit too thick on two of the sides and the cocobolo bled into the maple. I'm not very good with spray cans. My HVLP sprayer is packed away.

  11. #41
    Join Date
    Jul 2012
    Location
    Punta Gorda, FL
    Posts
    3,028
    All done!


    Okay, ALMOST all done. Still have to do the inlay. I'm sure it's no surprise THAT'S not done.

  12. #42
    Nice design and colors, kinda carnelian and pearls.

  13. #43
    That's very nice, Julie. The big question is, what records do you plan on playing on that thing?

  14. #44
    Join Date
    Jul 2012
    Location
    Punta Gorda, FL
    Posts
    3,028
    Quote Originally Posted by John Coloccia View Post
    The big question is, what records do you plan on playing on that thing?
    Why, the greatest album of all time, John!

    And no laughing at that shelf. I built it with a Craftsman circular saw and router c. 1978. Oh, and a 1/2" Skill drill that I used to drill holes into the shelf sides for dowels made from a broomstick.

  15. #45
    Join Date
    Jul 2012
    Location
    Punta Gorda, FL
    Posts
    3,028
    I finally got the chance to get back to the logo inlay. My routing wasn't the best, but neither was the cuts I did on the MOP. Hey, first time.


    Before I applied the CA, I packed in some ebony dust to fill the voids. When I applied the CA, it looked to me like the MOP was melting. There was white bleeding out of it. I hit it with accelerator and it smoked - too much CA, I guess. As I sanded it down, the bleed out stayed in certain areas. I had to dig those areas out with an X-acto knife and fill them with ebony dust. I reapplied CA but didn't use accelerator and let it set overnight. As I sanded round 2, the black in the MOP began to emerge. I don't know why. I finished sanding at 320.

    The "l" wasn't perfectly straight but if I sanded it anymore, I would have lost the thickness. I was able to get all the letters to be pretty even across the bottom. I don't want to settle for this but I also am not ready to start all over again. We're only one garage painting away from calling in realtors and after that I'll need a break. And if the house sells quickly, I may not be able to get back to starting over until we're settled in the new place.

Posting Permissions

  • You may not post new threads
  • You may not post replies
  • You may not post attachments
  • You may not edit your posts
  •