Page 2 of 3 FirstFirst 123 LastLast
Results 16 to 30 of 45

Thread: New Base For An Old Turntable

  1. #16
    Join Date
    Jul 2012
    Location
    Punta Gorda, FL
    Posts
    3,028
    Quote Originally Posted by Mike Sherman View Post
    I foresee many wayward turntables following you home in your future.


    I hope not!

    I did get the turntable back together and cycled it manually. Everything worked... then it didn't. Turns out I lost an E-clip somewhere along the way. Once I find a replacement, it should be fully functional. I'll bet it's been a good 25 years since it's spun a record. Just hoping there's no more surprises.

  2. #17
    Join Date
    Jul 2012
    Location
    Punta Gorda, FL
    Posts
    3,028
    Back to work!


    You know what I hate? Ripping tiny little strips on a table saw that is looking to shorten your fingers!!!

    That rant aside...


    I'm using figured maple instead of quilted maple, to match the glue ups on the top edges.


    Here's where I was having a hard time. When I looked at the maple/ebony legs, I wasn't sure this was the right way to go. So I took the figured sapele I used to make the body on the first Strat and milled it to a smaller version of the maple corner feet. It's a really beautiful wood but I just don't know if it works with the cocobolo/maple side panels.

    What do you think?

  3. #18
    Personally, I like it better than the maple/ebony. I thought that was a little too busy, and I thought the maple contrasted with the cocobolo was a little jarring..and then you run into the ebony end caps. That's just my personal tastes, though. I'm totally a minimalist, and that's not to say that I don't think things should be adorned, but I'm always looking to do the absolute minimum to a piece. I like doing just enough that it feels right, and finished.


    To me, and again it's just my own taste, what you have there now seems very balanced and pleasing. It's like a sentence, or a musical phrase. The panels make the statement, the the legs are a satisfying period at the end.

  4. #19
    Agree. I don't like the walnut and maple one either. Took me a minute to figure out why, it's the black void next to the warm brown and creme. The one you did is quite nice.

  5. #20
    Join Date
    Apr 2009
    Location
    Mandalay Shores, CA
    Posts
    2,690
    Blog Entries
    26
    I'm not crazy about it nor the earlier version. Maybe just cocobolo legs?
    Shawn

    "no trees were harmed in the creation of this message, however some electrons were temporarily inconvenienced."

    "I resent having to use my brain to do your thinking"

  6. #21
    Join Date
    Jul 2012
    Location
    Punta Gorda, FL
    Posts
    3,028
    I wanted to do the legs in cocobolo but that requires a trip to the hardwood store. It's 45 minutes away and I don't need any other wood. I don't even have enough to cap the maple with cocobolo.

    The turntable forum fans voted for the maple/ebony. I agree though that it doesn't seem to work. I don't have much stock 6/4 or larger. This is where you kick yourself for not measuring three times before cutting. I still don't know what I'll do with the legs.

    After an intense day preparing for a meeting Saturday, I had to walk away from the computer and de-stress. I've been thinking about making the Dual logo in MOP bedded in ebony. Like this:


    I started by routing a piece of ebony and was almost done with the "l" when I decided I had better first see if I can even cut the letters. I got them cut but my left hand (the one holding the MOP) is like rubber and my eyes are crossed. I probably had over 500+ magnification.


    Thems some wiggly lines! But it's my first try at this. I have no idea how anyone can make a living doing this! I spent well over an hour on just those four letters, probably closer to 1-1/2 hours. I don't see a lot of inlay in my future.

    I'm going to finish the inlay. It will be about 1-1/2" square when done. Then I'll see how it looks with the maple/ebony feet and go from there.

  7. #22
    That's not bad, Julie! Those will clean right up with a file. I agree with you, though. I HATE doing inlay.

  8. #23
    Join Date
    Jul 2012
    Location
    Punta Gorda, FL
    Posts
    3,028
    Quote Originally Posted by John Coloccia View Post
    That's not bad, Julie! Those will clean right up with a file. I agree with you, though. I HATE doing inlay.
    John, I have been trying to file them but the going is REALLY slow! Is that normal or do I need better files?

    And is this something that requires a boatload of patience or are there faster ways of doing it? I have a StewMac saw with their fine tooth blades and it seems at times the saw isn't even cutting.

  9. #24
    Not this saw, I hope?

    http://www.stewmac.com/Luthier_Tools...tting_Saw.html

    How can you ever get proper tension with that thing? I have a standard jeweler's frame, and I happen to use these blades:

    http://www.gesswein.com/p-2302-ultra...tion=&perpage=

    3/0 size


    That's not to say they're the best blades...I just bought a gross to try them, and that's a LOT of blades, so I haven't need to buy anymore, especially with the trickle of work in my shop since the kids were born.

    The blades should cut very consistently through the MOP. I think that saw frame you have is just not tensioning well. Another "trick" is to concentrate on the saw hand moving up and down, like a machine, and steer the MOP through the blade with the other hand. It's almost like you've turned yourself into a strange sort of manual scroll saw. Sometimes, it's easier to feed the material precisely than it is to steer the saw precisely. In practice, you end up doing a bit of both. I'm assuming you're using a bench pin of some sort, which you must be because I can't imagine how else you're working with the MOP.

    I'll also bet you dollars to donuts that at least SOME of the wiggle in those lines comes from uncertainty of exactly where you're cutting in relation to the line. When I inlay, or really whenever I need a very precise cut straight off a saw, I try to arrange it so that my blade is splitting the line. This way, no matter how much I wobble, so long as my blade stays inside the line, I've automatically reduced my error to the width of the line minus the saw kerf, and that's usually a very small error indeed. I find that much easier than trying to stay just inside or outside of the line. Some of your cuts are really well done, like some of the curves on the A, so the skill and eye are there. You MIGHT just need a more precise target to aim for.

    Yes, it's not easy to file MOP. Coarse files work best, but they're hard to find in small sizes. It's really best to inlay right off the saw. Alien's, like George and probably Mike, can do that. Normal people like us do a lot of fussing and cussing. The fact is, we just don't do enough of it to become proficient. If you did it every day for a week, it would be easy...easier, anyway.
    Last edited by John Coloccia; 04-09-2015 at 9:13 AM.

  10. #25
    I have to agree with John on the blade tension. Those Stew-Mac coping/jewelers saws aren't very good. I use several saws with varying throat and lengths that I switch between depending on the piece/shape. For most of the bull work, I use a Craftsman Jewelers saw. Saws with a shorter throat will give you more control for strait-line accuracy. For lettering like what Julie is cutting, I tend to use a medium tooth blade for speed. I mainly use the fine blades with a short throat saw for the smaller pieces and scroll work. One thing of importance to point out is balancing the feed rate and stroke speed to the medium you are cutting to avoid heat build up in the blade and material you are cutting (same as the "speed-and-feed" that machinists always point out). Shell has inconsistencies of hardness throughout the piece that also can cause the blade to wander. Like anything, the more practice you have, the easier it becomes...it's a time consuming task!


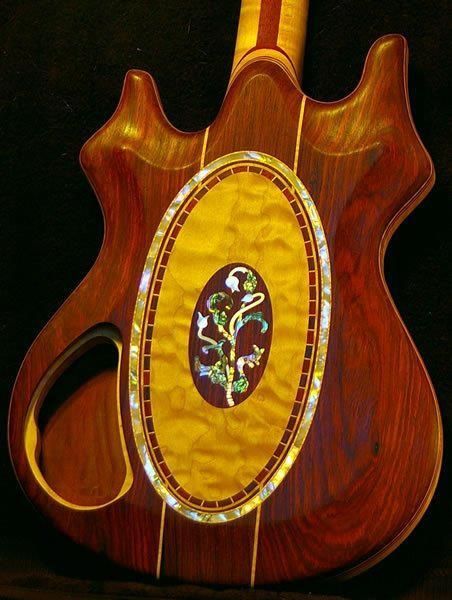
    It took 26 hours to do this inlay.

    Last edited by Mike Sherman; 04-09-2015 at 10:40 AM.

  11. #26
    Join Date
    Jul 2012
    Location
    Punta Gorda, FL
    Posts
    3,028
    John, you got pretty much all your guesses right, including the saw. The blades SM sells require you to squeeze the frame of the saw closed just to be able to grab the blade ends. It's like they were trying to save on blade material.

    Mike, that is some beautiful work! Only 26 hours? It would take me forever and still not be close to yours. Wow! You must have the patience of a saint. Simply beautiful!

    As for this sad sack, I sort of worked my way to a method of sawing where I held the shell with my left hand and sawed with my right. The saw handle was below with the blade set to cut on the downstroke. I printed out a sheet with about a dozen Dual images on it and then cut out a letter from one, sprayed it with glue and attached it to the shell in such a way as to minimize cutting. I made one of those boards with the V cutout and did all the cutting there. I cut trying to keep one side of the blade on the line. Occasionally I would lose sight of the line because my eyes lost focus. I'm looking right at it but I can't tell where I am. I think the muscles in my eyes were fatigued. That's usually when I lost the line of the cut.

    I found trying to start the cut at precisely one point was difficult. The blade hopped a lot, no matter which direction I sawed. So I would start clear of the line and saw to it. I also found it was better for me to start the cut and keep going around the whole letter rather than cutting it in sections. The problems with starting the cut dictated that. I was surprised how tight of a corner the saw can cut though. Probably the hardest thing for me with cutting the shell was holding it. My hand started to cramp. I was worried the shell might break so maybe I was holding it too tight.

    But so far, the thing that's really challenging me is routing the wood. Just like with the bass. Creating the line. Seeing the line while routing. Keeping the dust clear of the line. This has caused the most frustration. I know I have to figure out a way to work through it if I'm ever going to find any enjoyment doing inlay. Already I'm thinking of taking another stab at it. There's this thing in me that when I do something I know I can do better, I have to prove to myself I actually can do better. But that's my problem.

    Here's the mess I've created with this TT base build:

    What's that they say about a messy workshop reflecting on one's state of mind?

  12. #27
    Julie, thank you for the kind words! The first thing I notice in the pic of your bench is the "birds-beak" you are using might be causing some of your frustration.
    The "v-slot" and length are much too large which will cause chatter when sawing, and also provides less surface area to support/hold the shell. The BB's I use have a "V -slot" aprox 1.5" long and aprox 1/4 - 3/8" at the widest point (edge of BB). It also helps to use very hard wood for the BB clamped as close to the bench for less vertical movement from flexing.

    Addressing your starting cut issue. Position the blade against one side of the V-slot using it as a vertical guide, and bring the shell to the blade on the cut line. Use a downward stroke to scribe the initial cut. Once the initial scribe cut is made, position the shell and blade away from the slot wall and cut away.

    For the routing/dust issue. If you're going to continue doing inlay work, you might want to consider making a bench top down-draft box/table. Works wonders!
    Last edited by Mike Sherman; 04-09-2015 at 4:15 PM.

  13. #28
    Join Date
    Jul 2012
    Location
    Punta Gorda, FL
    Posts
    3,028
    Thank you, Mike, for the tips! When I made the BB I just grabbed a straight piece of oak and cut a V on the bandsaw. I thought there was probably some guidelines as to making one but in my infinite wisdom regarding inlay work I just winged it. I'll follow your advice and make something more appropriate. I also like the downdraft table idea. I've tried the StewMac air pump method. That was maybe 50% effective. And it's such a small area you can't get a vacuum hose in there. If I wasn't wearing a respirator, I would just blow the dust away.

    I was playing with the feet again. I did find a piece of cocobolo I can use to cap the maple. I don't want to leave end grain exposed. And I had some narrow strips of cocobolo that I am thinking of doing something like this:

    Imagine another strip of cocobolo being in line with the top strip of maple insert on the panel. I think it works better than the maple/ebony feet.

    I don't know why I'm putting so much time into this project. It really isn't that important to me. The original base hardly has a scratch on it. Yet here I am doing things I normally don't do for something I can't see myself feeling a sense of pride after it's finished. But I still want to make this something special and I can't figure out why.

  14. #29
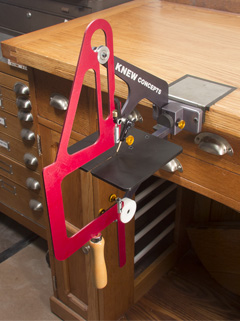
    FWIW, for my bench pin, I took a small piece of wood, made the bird's mouth, and screwed it to the end of a 2X4. Then I take that and clamp it in the face vice of my bench. It's nice because I can align it at eye level when I'm sitting down. Less strain.

    Check this out:
    http://knewconcepts.com/precisionMk3.php

    It's on my wish list.

  15. #30
    Join Date
    Jul 2012
    Location
    Punta Gorda, FL
    Posts
    3,028
    Quote Originally Posted by John Coloccia View Post
    Check this out: http://knewconcepts.com/precisionMk3.php

    It's on my wish list.


    Where's the motor?

Posting Permissions

  • You may not post new threads
  • You may not post replies
  • You may not post attachments
  • You may not edit your posts
  •