Page 4 of 6 FirstFirst 123456 LastLast
Results 46 to 60 of 83

Thread: Sharpness Epiphanies

  1. #46
    Quote Originally Posted by Derek Cohen View Post
    It strikes me that for most this whole area is a non-issue.

    I appreciate that professional workmen of Yesteryear attempted to preserve the expensive steel because it was a significant part of their overhead. Today, very few professional furnituremakers would use their handtools enough to wear them out, and they are cheap enough for this to be less of a concern (a friend if mine is a high end furnituremaker who is known as a specialist in handtools. I've watched him work many times, and only a small percentage of his work is done with handtools. His LN chisels still have the first hollow grind he put on them several years ago). It is more likely to be the jobsite carpenter who grinds a cheap chisel on a beltsander that will reduce blades to a stub more rapidly. The amateur who does use handtools may care more, but still is unlikely to use up the steel in their lifetime. There may be a few years of wastefulness until they dial it in.

    Derek
    A friend is a high end furniture maker, known as a specialist in handtools? And he hardly ever sharpens his chisels? You are straining credulity.

    I have never seen a Tormek or a sharpening jig in a professional shop. I am sure there are some, but the idea that they are necessary is far fetched. The "workmen of Yesteryear" tended to use grindstones that were in the 20 inch diameter range, not much of a hollow grind. Try it sometime.

  2. #47
    Join Date
    Feb 2004
    Location
    Perth, Australia
    Posts
    9,494
    A friend is a high end furniture maker, known as a specialist in handtools? And he hardly ever sharpens his chisels? You are straining credulity.


    Warren, I did not say that he hardly ever sharpens his chisels. I wrote that he has not re-ground them since the first grind.

    Why do you persist in misinterpreting what I write?

    The "workmen of Yesteryear" tended to use grindstones that were in the 20 inch diameter range, not much of a hollow grind. Try it sometime.
    Why?

    Regards from Perth

    Derek

  3. #48
    Join Date
    Nov 2013
    Location
    United Kingdom - Devon
    Posts
    503
    Stewie, mine is the Westons Scrumpy Cloudy Cider. One of my friends has a family that makes it "the old way". I only feature in the first photo http://www.foto8.com/live/the-cidermen/. It was a terrific bit of scrumpy!

    I wish we still had our big grindstone, it made way for more machines and became a feature at my Grandparents house. Replaced by........a tormek! :-)

  4. #49
    Join Date
    Nov 2013
    Location
    United Kingdom - Devon
    Posts
    503
    Derek, I think I may have got it.

    Firstly this is your favorite method so it has to be based on your method. So in your example grinding means raising a burr before honing again. On the first hone after this "burr grind" you would indeed use little more length on the tool on the first hone only if you lifted for a secondary. After the first hone both hollow hone and secondary then remove the same amount of length as they have to overcome wear/damage

    I think because I don't grind to the edge this had me confused. And for those not doing a "burr grind" my original point of all methods remove the same still stands. Do I have it or am I still missing it!

  5. #50
    Join Date
    Oct 2013
    Location
    Atlanta
    Posts
    104
    I may have started something I didn't intend to, as I was more merely curious about the difference between flattening the entire bevel vs creating a microbevel. I didn't mean to imply that one procedure or another would have a significant impact on the wear of the tool. I'm just trying to figure out what is going to be the optimal way to hone without spending too much time on it.

    I may have mentioned that I don't have a grinder and don't fancy myself using one at the moment, so hollow grinding is something of a moot point for me right now, though it is good to know that it is an option.

  6. #51
    Join Date
    Nov 2013
    Location
    United Kingdom - Devon
    Posts
    503
    Adam, it's just a good natured discussion, truly it is . Most importantly you seem to be doing great and getting good results, keep doing it!

  7. #52
    Join Date
    Oct 2013
    Location
    Atlanta
    Posts
    104
    Quote Originally Posted by Jim Koepke View Post
    My guess is a lot more metal is removed from the overall length of a chisel or plane iron by taking it to the grinder than removing a few ten thousandths of metal from the bevel on bench stones be they oil or water stones.

    Most of the time my "quick polish" is raising a burr on a 4000 stone, cleaning off the burr and polishing the bevel with an 8000 stone and then a few strokes on a leather strop.

    The slow shortening of the blade will likely take longer than the rest of my lifetime. A former work associate of mine nearly wasted away a blade by removing a lot of metal at the grinder. Surprisingly, he didn't over heat it.

    jtk
    Jim,

    that process sounds reasonable and simple. I suppose it's the initial establishment of the primary bevel that's a little more time consuming, but once that's done it's just a matter of honing the bevel briefly as you describe. Maybe worth a try on the 1/2" chisel that hasn't seen a stone yet and see how that goes.

  8. #53
    Quote Originally Posted by Graham Haydon View Post
    mine is the Westons Scrumpy Cloudy Cider. One of my friends has a family that makes it "the old way". I only feature in the first photo http://www.foto8.com/live/the-cidermen/. It was a terrific bit of scrumpy!
    So I was outside splitting some sections of beech log that a neighbor brought by. I walk into the house (I am not making this up) and my wife hands me a glass of home-brewed hard cider…she's the brewer in the family. Then I sit down to read your posts, and it's all about cider. I think it was a providential sign that I should have a second glass.
    Scrumpy is a great name! Enjoy!
    "For me, chairs and chairmaking are a means to an end. My real goal is to spend my days in a quiet, dustless shop doing hand work on an object that is beautiful, useful and fun to make." --Peter Galbert

  9. #54
    Quote Originally Posted by Derek Cohen View Post
    Sorry Steve, but we are not on the same path this time. I think it may be terminology (some refer to a secondary as a micro, and vice versa - I do not).

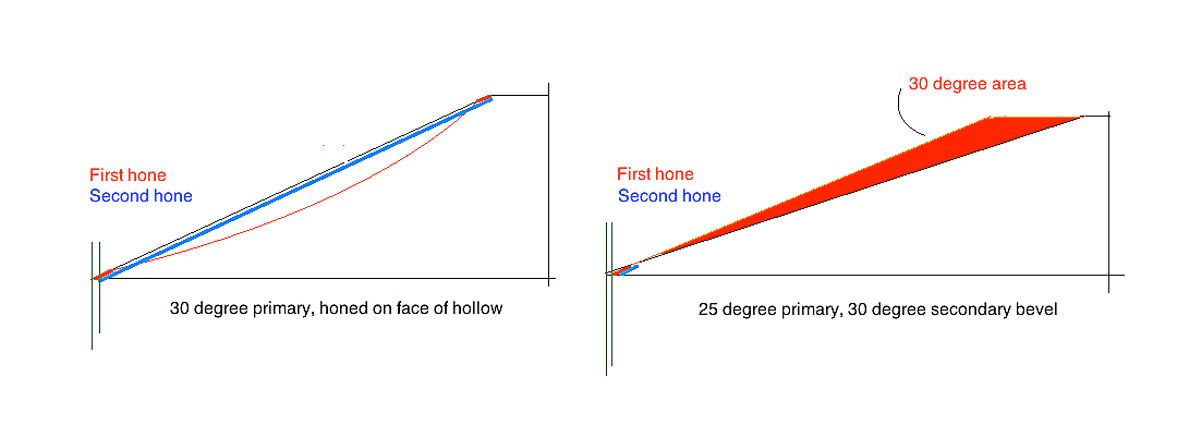
    Firstly, a coplanar grind/hone simply means "in a straight line", or "in the same plane". Therefore, when you hone directly on the surface, a 30 degree primary bevel produces a 30 degree cutting edge. There is no secondary bevel. Get the hollow close to the front of the blade, and you will have a coplanar micro (small) bevel.

    No one has mentioned which method requires more or less strokes. You introduced that. In this light, you suggested lifting the wear, which would create a secondary bevel. I did not suggest this. I am referring only to honing on the hollow (which creates a coplanar bevel face). As I noted before, this is essentially the same as honing on a flat bevel, but with a much reduced amount of steel to hone. Only in this regard do I mention speed, which is faster with the hollow vs the flat. I am not including the secondary hone here, which can be as fast or even faster to do, but not as easy to re-do.

    Regards from Perth

    Derek
    Derek, I'm more than happy to drop this, but just a couple clarifications first.

    I know what coplanar means…I used to teach math, you know. But you are missing my point. Your hollow grind (in your first diagram above) is an arc, and so by definition does not have a fixed angle. If it did, we'd have no use for calculus! Look at your diagram and draw a tangent line to the arc, right in the center of the arc. That line is parallel to to your "coplanar bevel," and so has the same angle. But if you draw the tangent line at the bottom of the arc, where the cutting edge actually is, that tangent line has a considerably shallower angle than your coplanar bevel. Conversely, at the top of the arc, the tangent line is steeper than your coplanar bevel. There is no such thing as "get the hollow close to the front"--the hollow is always in the center, it can't be any place else, unless you are not grinding away all of the old bevel. No matter how steep or shallow your hollow grind is, when you balance that hollow on your stone and hone, you will steepen the angle at the cutting edge, and reduce the angle at the heel of the bevel. That is why your coplanar bevel is in fact a secondary bevel.

    Also, just to be clear, the reason I brought up lifting the back of the blade is that it was implied in your second diagram. I thought that was your intent, that the first diagram shows honing by balancing on the hollow, while your second diagram shows registering on a flat (could've been a hollow also) and then lifting the back of the blade.

    This is making my head hurt. I'd have that beer now, but I already drank some of Graham's cider, er, scrumpy.
    "For me, chairs and chairmaking are a means to an end. My real goal is to spend my days in a quiet, dustless shop doing hand work on an object that is beautiful, useful and fun to make." --Peter Galbert

  10. #55
    Join Date
    Oct 2013
    Location
    Atlanta
    Posts
    104
    Quote Originally Posted by Graham Haydon View Post
    Adam, it's just a good natured discussion, truly it is . Most importantly you seem to be doing great and getting good results, keep doing it!
    Thanks Graham! I have a Hock kit plane that took me forever to finally get in working order, right up until yesterday (filing the mouth open was tedious!). Just now I decided to "let's see how this goes as a smoother", put a slight camber on the blade and it's cutting through red oak scrap like a hot knife through butter without leaving any track marks that I can see. So I'm very glad to feel like I'm "getting it" now.

  11. #56
    Join Date
    Nov 2013
    Location
    United Kingdom - Devon
    Posts
    503
    Excellent Adam, life feel good when it comes together. What you can be sure of just when it feels like it's coming together along comes a curve ball!

  12. #57
    Join Date
    Feb 2004
    Location
    Perth, Australia
    Posts
    9,494
    I think I have figured it out. Steve, I'm sorry to say that I must disagree with your reasoning (more likely I do not understand your reasoning) - that this is more about geometry than calculus .. and the answer becomes apparent when a missing element is added in.

    Firstly the bottom line: the hollow grind and the secondary bevel remove the same amount of metal. There is a provisor, however. I will come back to this part (keep you in suspense! ).

    What was missing from our computations? Well, the hollow grind was on a bevel face of 30 degrees, and honing would take place on the hollow, with the hollow acting as a jig for the hone. The secondary bevel of 30 degrees would take place on a bevel face of 25 degrees. What was missing is that in both situations the honing is at 30 degrees. One imagines that the 30 degree secondary bevel is removing extra steel, but it is not - it is only removing the steel that would have been ground away if the primary bevel was 30 degrees ...


    The orange section in the second figure represents the area of steel ground away from the 25 degree primary bevel that would be present if it were ground to 30 degrees.

    The red lines represent the first hone. This should remove the same amount of steel from both blades as long as the 30 degree angle is maintained.

    The blue lines represent the second hone. Again, this should remove the same amount of steel from both blades as long as the 30 degree angle is maintained.

    Here is the provisor: freehand honing on the hollow grind essentially ensures that the bevel angle is maintained. However, this is not the case for the secondary bevel. Only a honing guide will ensure the angle is kept. When freehanding there is the tendency to increase the angle slightly. Eventually this will remove more steel this way, plus a later regrind to re-establish the angle will use up still more steel. By contrast, removing waste from the hollow does not alter the bevel angle, and ensures that the same amount of steel continues to be removed as always.

    A hollow like this will last a long time ...


    Regards from Perth

    Derek
    Last edited by Derek Cohen; 04-26-2015 at 1:41 AM.

  13. #58
    Join Date
    Nov 2013
    Location
    United Kingdom - Devon
    Posts
    503
    Thanks for the diagrams Derek. Diagram 2 shows the black line of the grind angle projecting beyond the red first hone. If when we grind we leave in a sliver of hone both methods changes the length by the same amount. I think these diagrams only work if you grind to a burr so to speak?

  14. #59
    Join Date
    Feb 2004
    Location
    Perth, Australia
    Posts
    9,494
    Hi Graham

    Don't take the diagrams too literally - they are just rough drawings for illustration. Perhaps someone might redo them using SketchUp. That would be more accurate.

    Still the answer is there, I believe. Time for a Scrumpy?

    Regards from Perth

    Derek

  15. #60
    Let me be the voice of reason:

    Hard cider, axes and other thing related to sharp tools do not mix. LOL

    Beyond the nuances and uber details, guys, I like hollow grinding because I usually touch up the edges freehand and I can rock the tool to find the "primary" bevel, then lift up slightly to hone the "secondary" bevel. This, to me, is the biggest advantage of hollow grinding.

    Adam - trust me, you WILL want to get a grinder and try this technique before its over with.

Posting Permissions

  • You may not post new threads
  • You may not post replies
  • You may not post attachments
  • You may not edit your posts
  •