Results 1 to 9 of 9

Thread: Honing guide for high skew angle blades?

  1. #1
    Join Date
    Aug 2009
    Location
    'over here' - Ireland
    Posts
    2,532

    Honing guide for high skew angle blades?

    Wondering if anybody has come across a honng guide to handle very high skew angles in fairly wide blades?

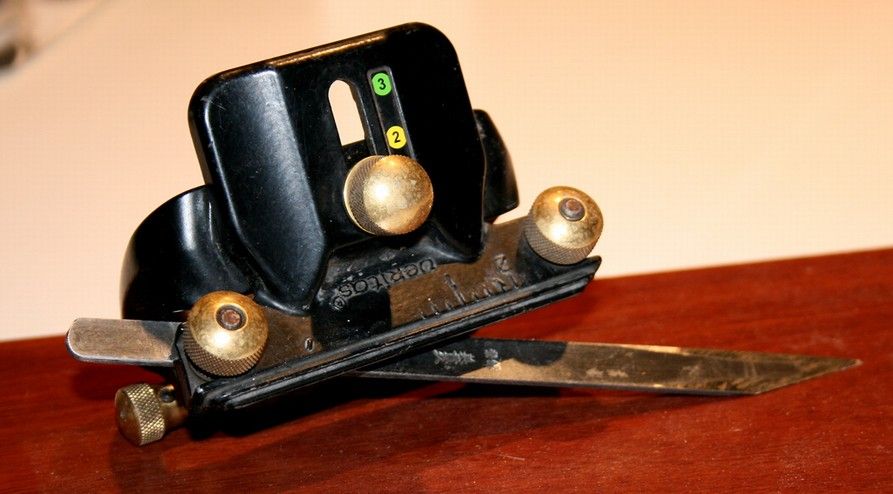
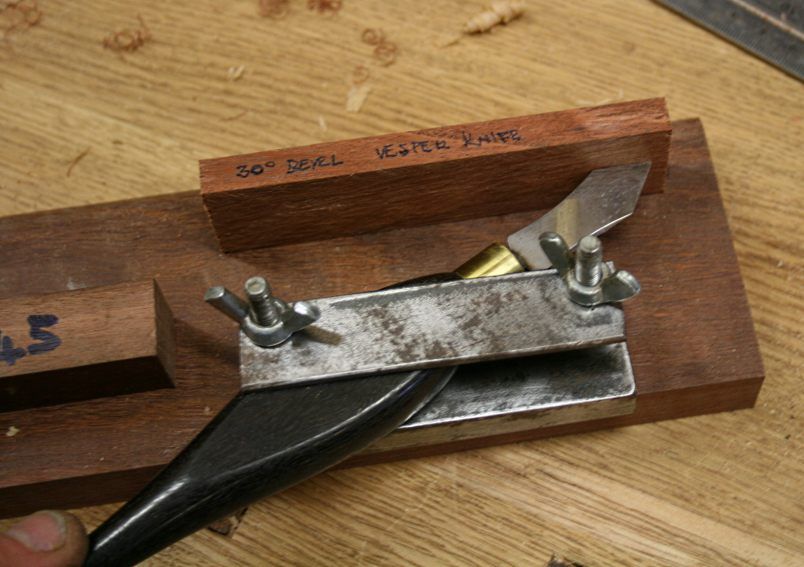
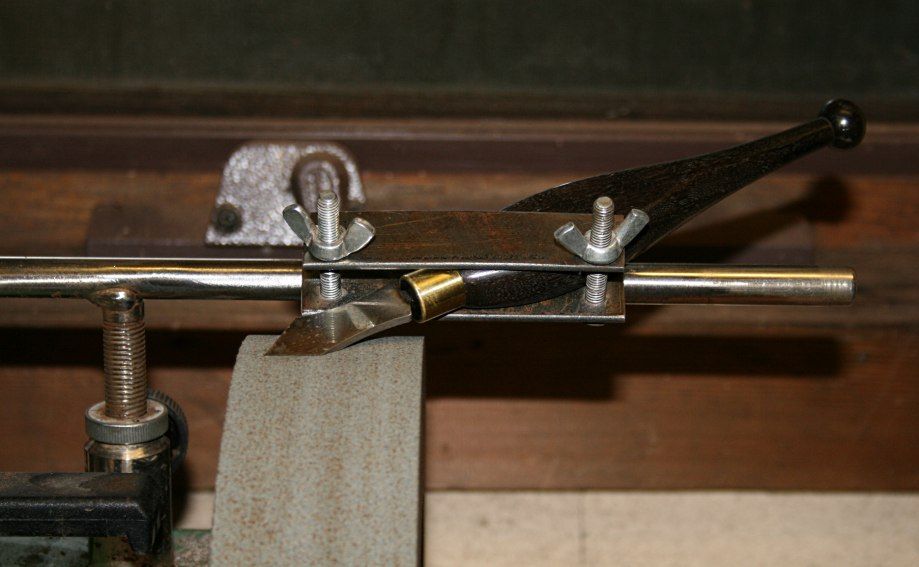
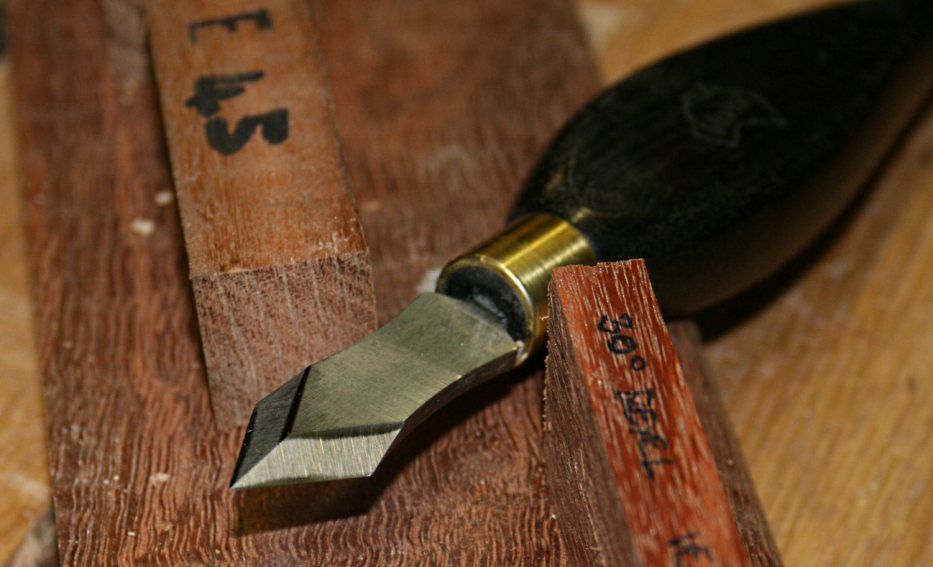
    I've been playing with some marking knives of a similar pattern to the Japanese type but quite a bit larger, and needed to set them up with a 40 deg skew edge and a 25 deg bevel. I got them done on the Veritas Mk 2, but it's less than ideal in that the very high skew angle and the relatively long blade projection leaves the support roller offset miles from behind the cutting edge and mostly off the side of the waterstone.

    Some sort of purpose made guide would be useful, one that places a (prefereably narrow) support roller on a line at 90 deg to the mid point of the cutting edge, and provides an adjustable bevel angle.

  2. #2
    Would a piece of plate or bar steel with a taped hole on each end work? This would move the roller to the left or the right of the standard mounting location. You would install the bar to the blade holder and the other end would have the roller attachment screwed in.

  3. #3
    Join Date
    Feb 2004
    Location
    Perth, Australia
    Posts
    9,494
    Hi Ian

    Of course you know that there is a skew angle jig for the Veritas Mk II honing guide?

    http://www.leevalley.com/US/wood/pag...=1,43072,43078

    I came up with a system for the Mk II before this jig was available ..


    But I do not think you want to sharpen such simple skew angles.

    And, you are correct, trying to use the Mk II for a narrow Japanese marking knife is possible but not a preferred method. I did try that some years ago ...


    So you see, someone is telling you to learn to do these freehand!

    Fortunately, these blades have wide bevels and register well.

    On the other hand, if you want a freehand method that is easier, then simply hollow grind the blades. This enables them to register very easily and hone quickly without tears.

    Here is a hollow ground Chris Vesper knife. The bevel skew is similar to the Japanese knife. I did this on the Tormek ...


    And freehanded ...


    Do this help?

    Regards from Perth

    Derek

  4. #4
    Join Date
    Aug 2009
    Location
    'over here' - Ireland
    Posts
    2,532
    Thanks for the photos Derek. All good stuff - I have to say too that i find your site a great resource. This is the third attempt - my normally reliable Mac keeps on crashing for some reason. Think it was a problem on a web page i had open in the background.

    I muddled by on the two knives last night by doing something very similar to your pic of the Japanese knife in the Mk 2 guide. Hand sharpening is an option, but having spent most of my life doing it and only recently discovered the beautifully regular flat bevels delivered by honing guides i guess i'm spoiled. It'd be nice to find a suitable guide.

    You might be interested in a related CBN wheel story. I have my pair (180 and 80 grit WTW in 8in dis) set up on a low speed grinder, and while i haven't built a work rest yet was able to use the 80grit to grind off the much too shallow stock bevels on the knives. The damn things are magic. No vibration, minimal drag - and feels like there's no work being done - but minutes later there's several mm of steel gone and a pile of metal powder on the bench. You have to really horse it to cause any significant amount of heat - the drag on stock stones must go mostly to heat. Makes it dead easy to free hand on them. Pity they are not suitable for mild steel and softer metals…..

    PS Thinking i'll possibly build something along these lines with an Eclipse type guide, but maybe in metal - it's not complicated: https://paulsellers.com/2012/11/grin...eshave-blades/
    Last edited by ian maybury; 05-01-2015 at 8:57 PM.

  5. #5
    Join Date
    Aug 2009
    Location
    'over here' - Ireland
    Posts
    2,532
    Just a follow on from the above post. I built the DIY knife and high skew angle sharpening jig below to use the Eclipse style honing guide as above in the past few days - it seems to work well. With a bit of luck it'll do spokeshave blades as well, and should also be handy for hand sharpening small blades of one sort or another. It's for use in addition to a Lee Valley Mk2 guide and skew gauge which will handle more moderate skew angles and longer blades.

    The principle isn't original - it's essentially a more precise/robust metal version of the typical wooden spokeshave honing clamp.

    It's by hand from UK sourced 50x8mm 6082 T6 aluminium flat strip (it's pretty close to the 6061 T6 grade commonly available in the US - it needs to be a strong heat treated grade as there's a risk otherwise of it bending when the clamp is done up) The pivot is a countersunk head socket screw, doing up the button head screw tightens the clamp. The tip of the button head screw locates in the blind hole drilled in the base so the two halves of the clamp are kept in line. !/4in flat strip might well be OK, but maybe trial something rough first as the clamp creates quite a lot of bending force, and the extra thickness has minimal downside if any.

    The knife in the clamp is a cheap UK made leather worker's carbon steel paring knife that comes in LH and RH form. I've been trying out a pair for marking - they are quite a bit larger/longer and thinner than the somewhat similar looking Japanese type. The (carbon) steel isn't bad, but i'm not sure yet how it'll hold up.

    The clamp gets a really good grip on it, especially when the two screws are adjusted so that quite a large area of the clamp bears on the blade, and not just a line at the tip....

    knife:s shave honing jig assembled.jpgknife:s shave honing jig parts.jpg
    Last edited by ian maybury; 05-14-2015 at 10:06 AM.

  6. #6
    Very innovative and well executed. I see it as useful for many awkward or very short blades. Steel would be desirable for allowing the ready use of a magnetic angle gauge like the Wixey.

  7. #7
    Join Date
    Aug 2009
    Location
    'over here' - Ireland
    Posts
    2,532
    Ta Mike. It was just a spur of the moment thing, and aluminium is easier to work than steel and doesn't require finishing. Steel would certainly be fine.

    Hadn't thought of a Wixey gauge as i rely on honing guide set up to get to a given angle - but it'd be possible bond a square of steel with some silicone to the top if needed. I thought at one stage of using an old plane iron as a base, or even to make the whole thing from a thick old iron and chip breaker. It would probably need to be a good thick one though to clamp well.

    One minor compromise is required when doing very highly skewed blades - there isn't as in most short blade holders room for a blade locating stop or step. It's not necessary to hold blades, but it would speed up setting. It'd be possible to place a thin steel plate (just thinner than the thinnest blade to be honed) with holes to match the screws between the jaws if needed to give repeatable blade location. It could then be lifted in and out as needed.....

  8. #8
    Join Date
    Aug 2009
    Location
    'over here' - Ireland
    Posts
    2,532
    More on the theme of sharpening highly skewed blades, and to share a few perspectives for good or ill. (there's no doubt other ways)

    The aluminium honing jig is the DIY one described and shown in the pics above - it works with an Eclipse type honing guide. (lightly modified in the usual way to give stable tool location as in the LN video on YouTube) This works very nicely for wide edged blades where side to side rocking isn't an issue as in the case of the UK leather workers paring knife shown in the jig in the pic in the post above - being set up for use as a marking knife. (the steel is about 1.5mm thick, and the bigger item is easier to hold - it's carbon steel and while it's not bad for a $10 item it's not clear if it's hard enough yet) The sharpened pair are shown in the first photo below.

    Having decided (since so many seem to use them) to try a traditional pattern marking knife for fine work - the small Chester http://www.chestertoolworks.com/markingknives.htm - nicely made with good steel in at a not too daft price - sharpening it was next up. I wanted to decrease the tip angle being used to working with Xacto type knives which tend to be sharply pointed and held low. This very narrow blade brought the issue of needing a different honing guide to support the aluminium jig - this time one with a wide track to stop it rocking from side to side.

    It turned out that it's easy to convert the honing guide supplied with the accessory top work table available for the big Worksharp for this purpose - which i happened to already have. It's seen in this piece in stock form: http://www.popularwoodworking.com/ar...pen-wide-tools

    The support rollers are attached to the outside of the sides of the WS guide, and end up too far apart to fit on a Shapton waterstone when the DIY 50mm wide aluminium honing jig is mounted in it. (this would also be the case with a 2in plane iron) It proved necessary to first cut two 6mm long sleeves from a bit of steel or brass tube of the right OD and ID and square the ends (in a drill chuck using a file), but these allowed them to be refitted using the same mounting/axle screws on the inside faces of the two sides as in the second photo. (the sleeves replace the cast in axle boss to the outside)

    The third photo shows the jig in use to grind the first edge of the marking knife on the Worksharp using a 180 grit diamond lapidary disc - which causes very little heating. (the second edge is not ground until the honing of the first is finished) The washer projecting from the opposite side of the DIY jig is a hair thinner than the knife blade, and acts as a spacer to prevent twisting as it's done up tight - which gives secure grip.

    Photos four and five show the jig in use honing the first side of the knife - it's transferred straight across from the Work Sharp to the waterstones without disturbing the knife in the clamp. (this is also how so far i have re-ground and then honed single bevels on Japanese chisels - but the work table on the Work Sharp must be set accurately at the same height as the disc for this to work with minimal honing) Best to pull a small blade like this towards you on the waterstones to prevent it digging in, and use only light pressure.

    When the first side of the knife is finished (honed to 12,000 in this case) the knife is flipped over in the aluminium jig to do the other side (the angle has to be set right - by eye in this case) and the process is repeated. It's possible with care to do a little dressing by hand on the waterstones to round over the ridge where the edges meet.

    The final photo shows the finished knife.

    Stropping on a hard flat surface will probably be the quick and easy way to maintain the edge - returning to the jig only when it needs a touch up on the Worksharp again. It's also not unduly difficult to hone these by hand, but it is tough to deliver accurately flat facets as with the jig if that matters to you...

    leather paring:marking knives bevel side.jpgws honing guide narrow track mod.jpgknife in jig for grinding on ws.jpghoning kife front view.jpghoning knife rear view.jpgfinish honed marking knife.jpg

  9. #9
    Join Date
    Aug 2009
    Location
    'over here' - Ireland
    Posts
    2,532
    Please pardon a third solo post, but a couple of updates to the jig which may be of interest in the event that anybody has any similar ideas. Hopefully it'll prove to cover the bases over time.

    The post above shows a washer used as a spacer on one side to prevent the top clamp tipping over with tightening when it's clamping on the other corner/side only as when e.g. holding the marking knife shown.

    The new photo below (the jig is shown loaded with a spokeshave blade) shows two updates:

    (a) The two M6 X 10mm o/a L x3mm nose L stainless dog point socket head set screws now added in holes tapped near the top edge of the sloped front of the top half of the clamp have several functions. When clamping off one side/corner as above the one on that side is backed out, but the one on the opposite side is used as an adjustable prop/spacer - to do the same job as the spacing washer. When honing a spokeshave blade as in the new photo below the cylindrical noses of the two screws act as stops to repeatably align the blade. The tapped holes must be accurately located for this to work. The jig can also be used on a wide/stable blade (e.g. an extra long spokeshave blade, or a large marking knife as in post 5 above) without the stops/with them fully retracted or removed - it easily grips a wide blade tight enough to get by without them provided the clamp is adjusted to make contact over a large area. (parallel to the surface of the blade).

    (b) The aluminium parts are now anodised to prevent staining and scratching. It's a pretty cheap process, especially if you get get in with a batch of parts - well worth investigating. Not as pretty as polished alloy though….

    finished knife:s shave jig with stops.jpg
    Last edited by ian maybury; 05-26-2015 at 6:38 PM.

Posting Permissions

  • You may not post new threads
  • You may not post replies
  • You may not post attachments
  • You may not edit your posts
  •