Page 1 of 2 12 LastLast
Results 1 to 15 of 20

Thread: Polissoir DIY

  1. #1

    Polissoir DIY

    I made this polissoir to be about 2" in diameter. The materials used were 2 broomcorn hand brooms and some waxed whipping twine. You can use many different natural fibers for the tool. The original (Roubo) was made with common rush and the ones sourced by Don Williams are made with broomcorn.

    Tools needed:
    2-3 hose clamps
    adjustable jaw pliers
    large durable needle (I used a size 22)
    dykes, dikes, side cutting pliers (whichever name you call them)
    small clamp
    solid knife

    Acquire your natural bristle material and twine. One broom was from the orange store, the other from the blue store, and the twine was from a marine/boating/sailing store.

    image1.jpg

    Take apart the broom by pulling off the nailed on end cap. This will give you easy access to the wire binding. Cut the wire binding under the cap or pull it off of the nail it is wrapped around. There is an outer layer and an inner folded layer that is bound by the wire.

    image2.jpg

    Separate the loose bristles from the bound and fold the bound bristles down. Cut the bristles that were folded down, leaving the inner most bristles in place. To the left is what is left after removing all bristles used. The right side shows the material from the two hand brooms. I surrounded the longer fibers with the shorted fibers in a mostly even layer. The inner fibers are the thicker, solid core fibers. The outer fibers do have a hollow core and are a little more soft.

    image3.jpg

    Bind the bundle with the hose clamps. I bound the far end of the bundle to keep things under control and the near end with two tightly closed hose clamps. The winding will start between these two tightly bound hose clamps. The hose clamps should be closed to the same diameter and be very tight. The area between should also be flat and not humped, I learned this the hard way.

    image4.jpg

    Thread the needle and push it through the flat area between the hose clamps. It helps to use the pliers to push the needle through and pull it out of the far side. Try to keep the entry and exit close to the hose clamp. This will make the wrapping smoother by not having to go over a layer of twine.

    image1 (2).jpg

    Move over about 1/4", or so, and push the threaded needle back trough the bundle. This will create a lock stitch for the twine to be wrapped. I then pushed the needle back into the bundle all of the way up to the eye. Pull the twine tight and trim the tail just shorter than the thickness of the bundle and pull through. This will terminate the end of the twine inside of the bundle.

    image2 (2).jpg

    Pull out several feet of twine and secure the spool end to a fixed object. I wrapped the twine over itself and around my pop up vise bench dog. This will lock the twine in place for you to pull against it.

    image3 (2).jpg

    Pull the bundle taunt and begin to slowly wrap the twine. Start next to the outer most hose clamp and pull the twine to where it is under flexed tension. When wrapping, keep the twine tight against itself but to where it falls on the correct side of the previous wrap. This will help in keeping each layer of the wrap tightly together and no gaps between.

    image5 (1).jpg

  2. #2
    Wrap until you have to stop to make an adjustment to the amount of twine you have anchored or you run out of space between the hose clamps. Do not wrap all of the way to the housing of the screw. You can get to within a wrap or two of it. While keeping the tension on the twine, wrap the twine over the completed area and over itself. This will keep the tension you have put into the handle and you will not loose your progress. Place your small clamp over the locked twine, and make the needed adjustments.

    image4 (2).jpg

    Now you can leapfrog the hose clamps. Remove the hose clamp that you are working away from and put it right next to the hose clamp you have worked up to.

    image2 (1).jpg

    Leapfrog the hose clamp you worked up to over the hose clamp you just moved. Place it 1/4" to 3/8" away from the hose clamp that is now the closest one to your worked progress. Be sure that each are tightened to the same diameter without having a hump between the clamps or between the next work area.

    image1 (1).jpg

    Work in this manner until you reach your desired length. Temporarily secure the end of the line by wrapping it around itself as you have done at each stopping point. Right where the last wrap ends and crosses over into the handle, push the needle into the bundle up to the eye of the needle. The needle should exit a few wraps down form the end of the wrapping. Now you can remove the tension from the clamp and keep the twine tight with your hand. Cut the tail, giving yourself plenty of twine to work. I left the tail about one foot long. Thread the eye of the needle and pull the needle through, trying to keep tension on the twine the entire time. This sounds much harder than it really is. Move over about 1/4" and push the needle back into the bundle in the same gap you went through. This will help hide the stitch and keep a smooth wrap. Have this stitch exit the bundle on the outside of the last wrap and about 1/4" to 1/2" from the entry of the first stitch. Push the needle into the first stitch hole on this end of the polissoir but down at an angle towards the first end. You want to be at an angle that would exit about 1/2" down from the end, but be a short enough distance that the needle will be long enough to exit. Again you will stop once the eye is starting to enter. Pull the twine taunt and trim to just shorter that the thickness of the polissoir. Pull the needle through for the last time. The tail of the twine should be hidden inside the bundle. By pulling this last stitch at an angle towards the start, the end should not work free when the tool is in use.

    image3 (1).jpgimage4 (1).jpg

    The polissoir is almost done.

    image5.jpg

    Use a strong knife to cut the polissoir free from the left over material. I used a rocking motion and rotated the polissoir to get the knife all of the way through.

    image6.jpg

    Here we go.

    image1 copy.jpg

  3. #3
    With scales.

    image2 copy.jpg

    2" diameter next to 1 1/4" diameter.

    image3 copy.jpg

    Some reading on prepping the polissoir for use.

    http://donsbarn.com/polissoir-line-u...e/#prettyPhoto

    https://s3.amazonaws.com/theBarn/Art..._Polissoir.pdf

  4. #4
    Nice tutorial. Will you dip it in some wax?

  5. #5
    Thanks!

    I will soak in wax then smooth and shape the end.

  6. #6
    Join Date
    Dec 2010
    Location
    South Coastal Massachusetts
    Posts
    6,824
    I wonder if this could be accomplished with shrink wrap for electrical wire?

    http://www.amazon.com/Anytime-Tools-...N%3DB000HDF8MU

  7. #7
    The twine it pulled with a lot of tension when wrapping in addition to the very tight hose clamps. I don't think that you would be to get the bundle to stay tight enough with electrical tape. I also don't think that it would be durable with the tape alone. I think the same thing would apply to the shrink wrap. The end of the polissoir is very tightly packed and sounds like a golf ball when bounced on a solid surface. If you were to tighten with a hose clamp or similar strong binding and then wrap with tape or shrink wrap that might work. But then you would have the uncomfortable lump of the fastener.

  8. #8
    Join Date
    Jan 2009
    Location
    Williamsburg,Va.
    Posts
    12,402
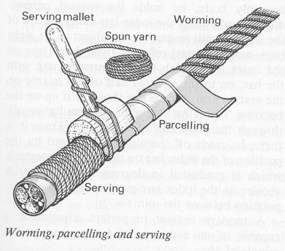
    You could get the wrappings tight by using a serving mallet.

    I'll leave you guys to figure out what that is!

  9. #9
    Join Date
    Aug 2013
    Location
    Princeton, NJ
    Posts
    7,296
    Blog Entries
    7
    I cheated and used google

    Bumbling forward into the unknown.

  10. #10
    Join Date
    Dec 2010
    Location
    South Coastal Massachusetts
    Posts
    6,824
    Not electrical tape - shrink tubing.

    No adhesive involved, just a heat activated
    polyolefin that reduces 3-4 diameters with a hot air gun.

    Not as pretty as the cording, to be sure.

  11. #11
    Join Date
    Jan 2009
    Location
    Williamsburg,Va.
    Posts
    12,402
    Amazing what you can dig up on Google!! We made serving mallets to tightly wrap copper wire on the couplings of leather fire hoses for the 18th. C. fire engine we built in 1982. You can wrap incredibly tight with them.
    Last edited by george wilson; 05-02-2015 at 8:30 PM.

  12. #12
    Yes, my mistake. I had read it as if you had said both and answered for both.

    I would be all for a faster and easier method that retained the low cost of this method. I would still require comfort. A polissoir was recently blogged that was made with a hose clamp and then wrapped with electrical tape. It looked rather uncomfortable to use.

    George, I like the idea of the serving mallet. It sure looks labor intensive to make tight wraps.

  13. #13
    Join Date
    Jan 2009
    Location
    Williamsburg,Va.
    Posts
    12,402
    You guys realize that a broom has to die every time a polissoir is made?

  14. #14
    I prefer to think of it as removing social stigma. Who really wants to hold a well used broom? But a polissoir, well that is a different story. A well used polissoir develops character over time, a certain air of superiority.

  15. #15
    Join Date
    Mar 2015
    Location
    Virginia
    Posts
    1,211
    Quote Originally Posted by Kyle DuPont View Post
    I prefer to think of it as removing social stigma. Who really wants to hold a well used broom? But a polissoir, well that is a different story. A well used polissoir develops character over time, a certain air of superiority.
    To compare apples to apples though, you have to tell us how to say "well used broom" in french, so we can try that out before we all start cutting up our brooms just to sound more sophisticated.

    I only have one broom and did not want to cut it up, but I tried it last evening with the end grain of a piece of roughly cut soft pine on a piece of oak. That was the closest thing I have laying around to what the polisher looks like after you have it all tightly wrapped. I am guessing the pine is probably a little softer then the compressed straw, but it worked pretty well. I am looking forward to trying the technique with something approximating the correct material.

Posting Permissions

  • You may not post new threads
  • You may not post replies
  • You may not post attachments
  • You may not edit your posts
  •