Thanks for sharing the update Brian. I appreciate the "confessions" of a nicked mortise and such. Helps me feel human.
Also, I'd like to point out on one of the pics that a small piece of wood fell on your floor. Very sloppy


 Friend of the Creek
Thanks for sharing the update Brian. I appreciate the "confessions" of a nicked mortise and such. Helps me feel human.
Also, I'd like to point out on one of the pics that a small piece of wood fell on your floor. Very sloppy

 [OP]
Contributor
[OP]
Contributor
Cheers!
LOL, it was quickly dispatched after the photo....never to be heard form again.
I think it's good to share those sort of things as well, all part of a progression. It's like looking at the internal workings of 18th century furniture or Ming cabinet work, the outside is pristine but there can be some evidence of the handwork internally. I shoot for a very clean result, but some evidence of handwork will be present.
My ideal is a perfectly clean result in every aspect and I acquire new tools with that in mind, often times specialized tooling can greatly improve execution. Like sawing a dado vs planing one, the result produced by way of the plane should have very clean walls, ect.
Bumbling forward into the unknown.
 Contributor
I too noticed some chips on your bench top in one of the pictures and was concerned you were falling off your game
30" seems like a good width, my 24" seems a little narrow at times since it sits off the wall.
I also agree that good tools inspire (as does a tidy carpet!).
C
"You can observe a lot just by watching."
--Yogi Berra
[OP]
Contributor
LOL!
Good tools do very much inspire. I was pretty exhausted yesterday afternoon....then a granite block and a chisel both arrived one after the other....what could I do but put them to work.
Speaking of which, the next series after this may be a sharpening setup. I'm a bit over working on the floor and I've been banished from the kitchen.
Bumbling forward into the unknown.
Friend of the Creek
Please don't tell me you're using the kitchen granite counter top for sharpening.
[OP]
Contributor
LOL, no way, but I did like using the sink the soak my stones. I'm heeding George's warning not to use sink, however, and have been soaking them in a glass bin. Apparently the slurry can build up in your drain pipes.
Last edited by Brian Holcombe; 06-11-2015 at 4:12 PM.
Bumbling forward into the unknown.
Guest
I admit to not entirely groking your overall design but have faith that it will reveal itself in time so am just enjoying the ride until we get there
One question - what is the advantage/reason for the bevelled shoulders on the tusked tenons? That's a somewhat unusual design feature so I assumed you had some functional reason for doing it...
[OP]
Contributor
Enjoy! It should reveal itself shortly. This is going to be an incredibly simple looking design.
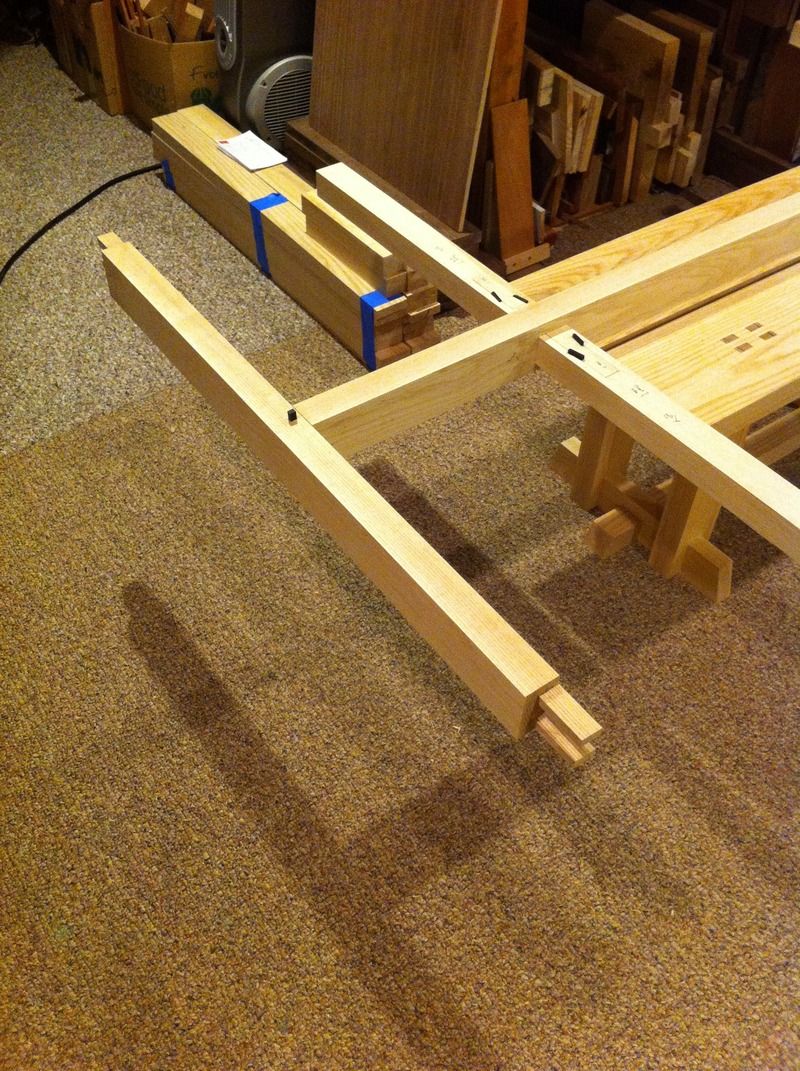
The goal of the tusk tenon is basically to leave an I-beam section of the main beam. Chris Hall has been kind enough to offer me guidance with the particulars of the tusk tenon, so probably best just to link his explanation of the tenon;
http://thecarpentryway.blogspot.com/...i-shogi-4.html
My experience is that it forms a very secure joint and the housing adds a good measure of resistance to twist. The angled housing serves to remove the bare minimum of the top of the beam and also drives the joint to seat securely into the rabbeted bottom half of the housing and flat onto the tenon.
This is an experiment for me as much as it is anything else, I've been working toward improving my skills and abilities and taking these next steps in joinery has helped me to do so. Now my mortising has to be more spot on, as well as all other abilities required for the cutout and also I'm finding that I have to put more thought into procedure for the cutout because it's not always intuitive (for me so far) in how to proceed.
Last edited by Brian Holcombe; 06-11-2015 at 5:17 PM.
Bumbling forward into the unknown.
[OP]
Contributor
Tusk tenons are complete and now onto the corner joints. These are double tenons that are wedged, I haven't decided if I will use two wedges per tenon or just one. I have completed the majority of the cutout on the tenons and in doing so have setup three marking gauges, two of which will be used to transfer marks throughout the project.
Not a huge update but good progress.
 Member
This ongoing build has to be one of my favorites on the forum. There's so much to learn and is being taught. For example, I had had zero idea what's going on here:
.Originally Posted by Brian Holcombe

But I think new stuff is coming to light for me thanks to this:
which might as well be the cover to an updated guide on intricate joinery.
Brian, as I've said before, thanks for sharing your wizardry.
[OP]
Contributor
Thanks Barry, glad you are enjoying. I think you'll get a kick out of what I have planned for terminating those stretchers into the legs and side rails.
Bumbling forward into the unknown.
 Member
Add me to the list of grateful readers! Thanks for sharing this! We're learning a lot from it.
[OP]
Contributor
Thanks Will, Cheers!
Bumbling forward into the unknown.
[OP]
Contributor
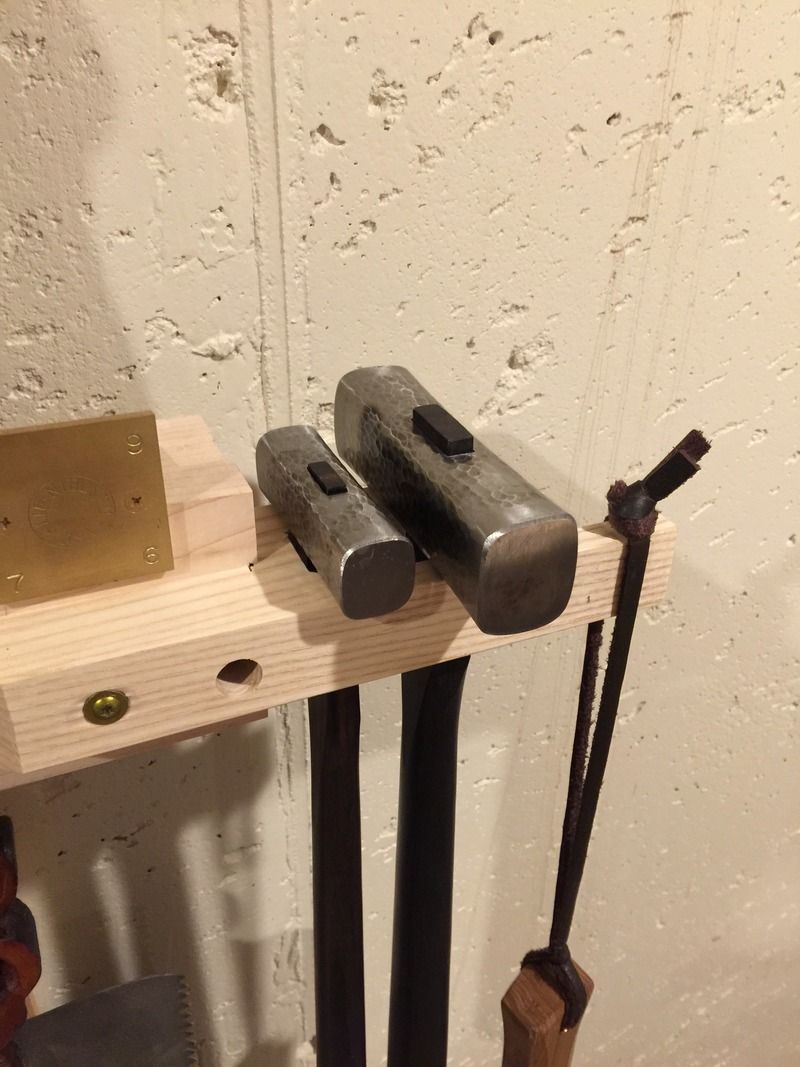
I've been a little busy this past week, but getting geared up with a few additions to the shop;
The small hammer
Bumbling forward into the unknown.
Brian, GREAT thread, like everyone else who posted I am really enjoying your work!
I also confess to not really understanding the Asian joinery, although freely admit it's really cool and very much admire your talent.I'm really looking forward to the rest of the build.
Please don't mention to the LOML you're able to successfully execute two major builds simultaneously for beautiful family heirlooms that will be enjoyed and appreciated for generations! You're really making me look bad; regrettably at the next meeting of the Husband's Union I may have to raise the topic of some kind of sanction that requires you to publicly acknowledge this is in fact not possible for mere humans, and that you are clearly a member of a superior alien race sent here to teach us the error of our ways
Sincerely, thanks for taking the time to post your build pictures and thoughts. I'm really learning a lot.
All the best, Mike
Last edited by Prashun Patel; 07-01-2015 at 2:22 PM.
 Posting Permissions

 Reply With Quote


