Page 1 of 2 12 LastLast
Results 1 to 15 of 17

Thread: New Epilog Mini 24 giving poor etching results on right side - help!

  1. #1

    New Epilog Mini 24 giving poor etching results on right side - help!

    I have settings that have worked great for rasterizing images on this 2-tone acrylic on the left side where I've been doing tests, but now that I'm using the full 24" bed for production, I'm seeing terrible performance on the right side.

    This is on a new machine, under 2 months old with little use yet. These settings were 75% speed 35% power, which worked great on the left... I lowered it way down to 30% speed and 17% power and got much better results, but it is just so slow that way! And since I got perfect results with the other settings on the left, it's confusing.

    Pics are below. Possible problems I think are:

    1. My settings
    2. Bed not being flat (but it's new?)
    3. Laser not being aligned (but it's new?)

    I've got instructions on how to check the second two, I just find it really odd that settings which work great on the left yield these results on the right. Each image is rotated 90 degrees so "left" is up.

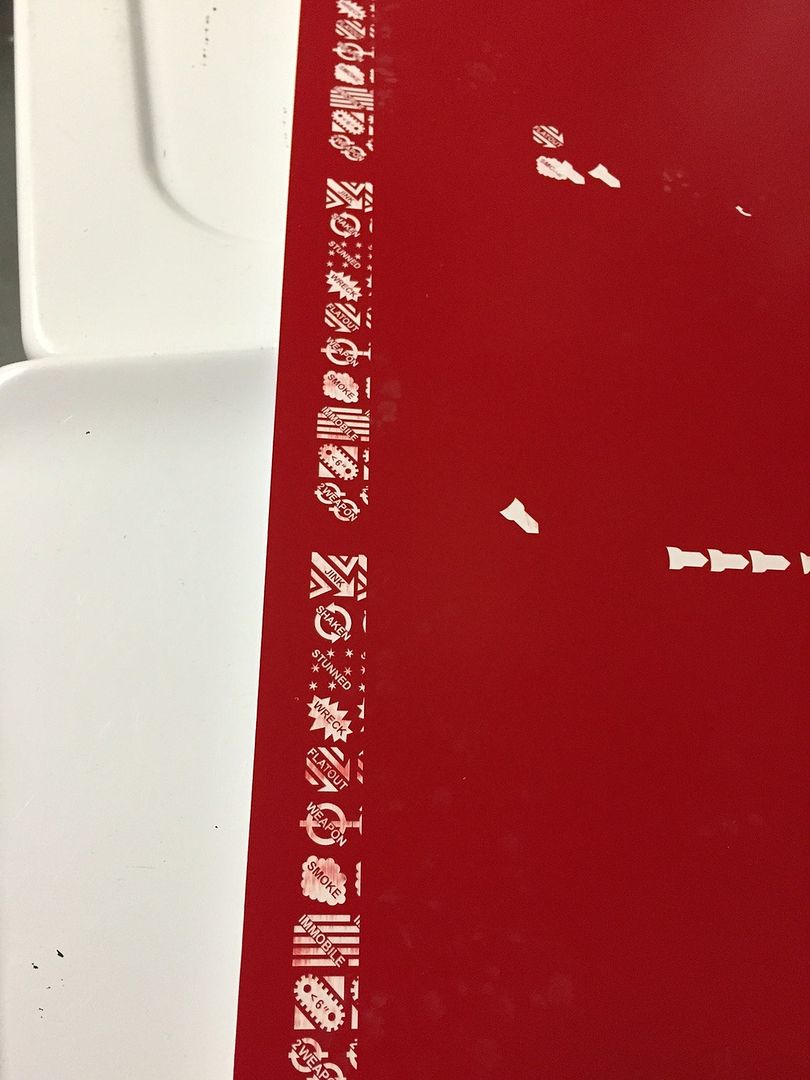
    Image showing the left side (top of image) looks good, but the right side (bottom of image) does not:


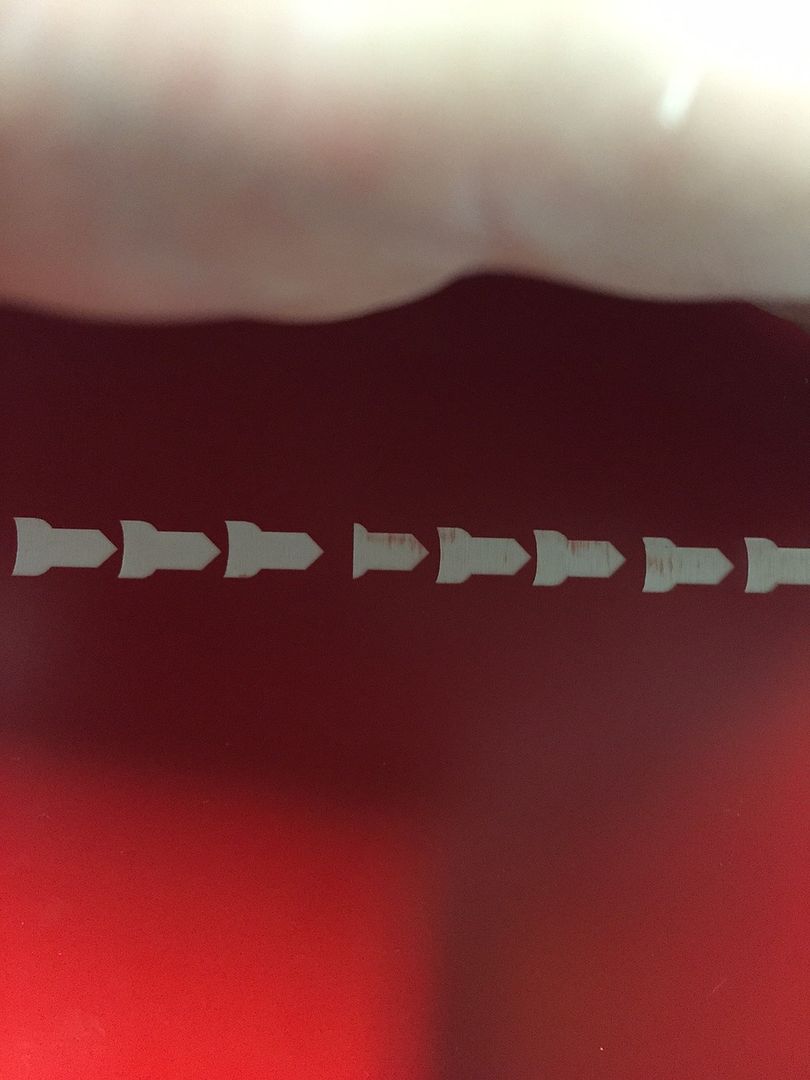
    Image showing some things cut on the right side at different settings, only reallly slow seems to yield good results, whereas on the left faster settings gave good results (keeping the power proportional either way):


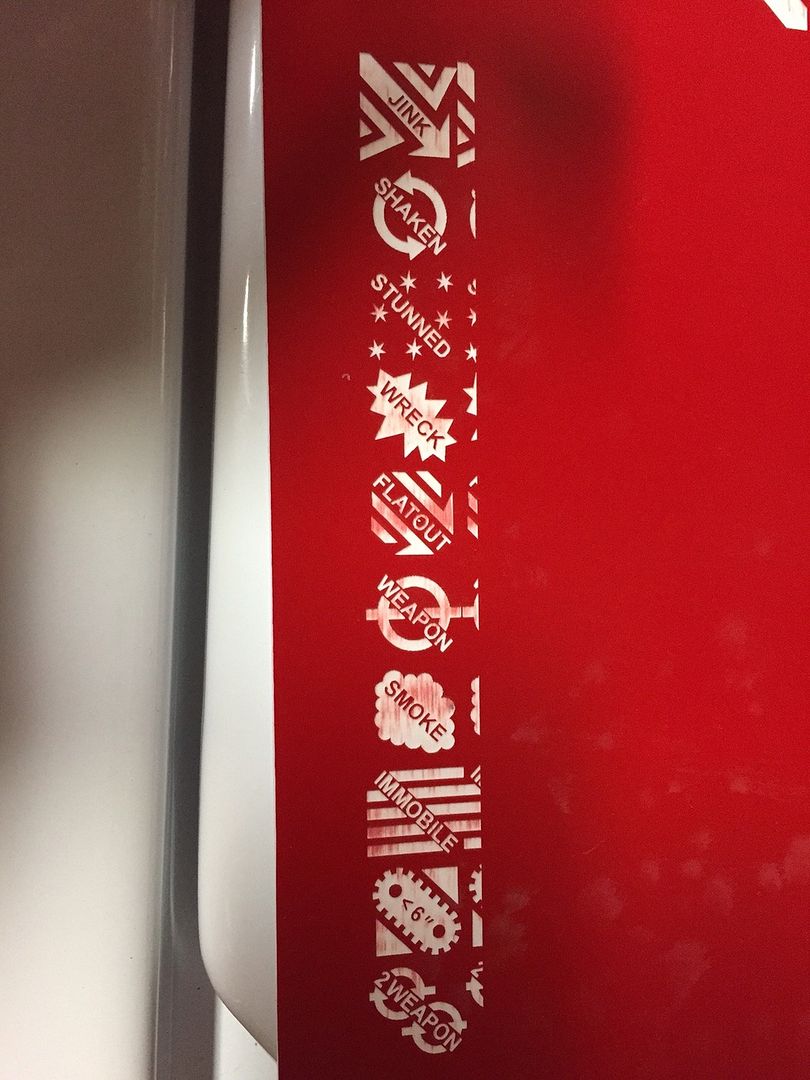
    Image showing the issues I'm having on the right side:


    Thanks for any assistance, let me know if you think it's 1) Settings 2) Bed flatness or 3) Laser alignment, and I'll get to bug checking!

  2. #2
    Join Date
    Mar 2005
    Location
    Gig Harbor, WA
    Posts
    1,157
    Not an expert by any means, but I have found "red"to be the worst of the colors to engrave... I have gotten the same results. I usually end up running the job twice with the 2nd pass at a lower power for clean up.

    Would check the table alignment. Might be new but the driver who delivered it hit every pot-hole in the state getting it to you.
    Mark
    In the Great Northwest!

    Trotec Speedy C25, Newing-Hall 350 (AMC I & HPGL), NH-CG-30 (Carbide Cutter Sharpener)
    Sawgrass 400 Gel Ink Printer, CS5, 5/9/x6 CorelDraw

  3. #3
    Join Date
    Oct 2013
    Location
    United States
    Posts
    1,038
    First guess is not level. Have you set a level on it yet, what does it say? It's inconsistent all over the place from what I can see not just the left side, you're not using enough power/not going slow enough it appears.

    As to the second part of your question on settings. Bump your power up to 100% power, 100% speed, doing a small area. Then back the speed down 5 or 10% at a time till you find the right setting. If you are doing something that doesn't require max power then start at 100% speed and 50% power, and work up 5%-10% power at a time. Be methodical, keep a notebook or spreadsheet of your settings, you'll thank me later when you have to do the job again. In most cases you should be running at 100% power whenever you can, it will speed up your jobs. This is for US lasers if you were running a Chinese those have to run somewhere around 90% max or it affects the tube.
    Last edited by Keith Winter; 06-26-2015 at 8:18 PM.
    Trotec Speedy 400 120w, Trotec Speedy 300 80w
    Thunderlaser Mars-130 with EFR 130w tube
    Signature Rotary Engravers (2)
    Epson F6070 Large Format Printer, Geo Knight Air Heat Presses (2)

  4. #4
    Steve,

    Tech support is open for another hour. I'd recommend giving them a call at (303)215-9171.

    I'd try to help -- but I'm the non-technical arm of our business! My non-technical guess is that Keith is right and you'll resolve your issue by levelling the table.

    Short of that, where are you located? Depending on who your distributor is, you could probably reach out to him yet this evening
    Jeanette Brewer
    Engraving Concepts

  5. #5
    Join Date
    Nov 2006
    Location
    Maple, Ontario, Canada
    Posts
    1,011
    I agree with Mark, red will typically require clean up pass.
    Try to fine tune your settings for optimal results.
    Also make sure sheet is laying flat on the bed. Use magnets to hold it down if you have a steel bed.
    Trotec Speedy 300 - 60w, with Quatro CSA-626 fume extraction
    Xenetech 1625 x2,
    New Hermes TX pantograph, CG4 cutter grinder
    Brady Globalmark2 label printer,
    Assortment of custom tooling , shears & punches, heat bender.
    Software: Xenetech XOT, Corel X3, Bartender label software

  6. #6
    BECAUSE it's new might be the main problem. I hear more horror stories about nothing being adjusted right fresh outta the box...

    With all due respect, checking the table with a level might not be very accurate, the whole machine might not be level-- What you need to do is check the distance between the lens head and the table at the 4 corners and the middle to make sure they're identical.

    Eye --
    Dentical.

    (I love 'My Cousin Vinny')

    The other very likely possibility is the beam may be out of alignment. Could be a mirror issue, could be the X-rail isn't squared to the Y-rails.
    ========================================
    ELEVEN - rotary cutter tool machines
    FOUR - CO2 lasers
    THREE- make that FOUR now - fiber lasers
    ONE - vinyl cutter
    CASmate, Corel, Gravostyle


  7. #7
    Join Date
    Jul 2005
    Location
    Sammamish, WA
    Posts
    7,630
    How many watts? I run at 90-100 speed, 60% power on red and yes, sometimes it will need some cleanup but I only run that part of it a 2nd time. It's not in that corner though, usually just the smallest graphics.The worst thing about red is cleanup, that "dust" doesn't like to come off the white. If you picked it up locally from someone that set it up (as I did in 2004) it should have pretty perfect settings, but shipping by truck cross country can foul it up. Unless they have changed it since, the beam is at the near left corner, so the near right corner has the farthest for the beam to travel, so if out of alignment it would be weak there.


    Sammamish, WA

    Epilog Legend 24TT 45W, had a sign business for 17 years, now just doing laser work on the side.

    "One only needs two tools in life: WD-40 to make things go, and duct tape to make them stop." G. Weilacher

    "The handyman's secret weapon - Duct Tape" R. Green

  8. #8
    Join Date
    Oct 2013
    Location
    United States
    Posts
    1,038
    Kev I agree this is possible. When I say level I mean in all directions. Being a new Epilog, the head SHOULD be all set correctly and everything, but still excellent point and worth checking.

    Quote Originally Posted by Kev Williams View Post
    BECAUSE it's new might be the main problem. I hear more horror stories about nothing being adjusted right fresh outta the box...

    With all due respect, checking the table with a level might not be very accurate, the whole machine might not be level-- What you need to do is check the distance between the lens head and the table at the 4 corners and the middle to make sure they're identical.

    Eye --
    Dentical.

    (I love 'My Cousin Vinny')

    The other very likely possibility is the beam may be out of alignment. Could be a mirror issue, could be the X-rail isn't squared to the Y-rails.
    Trotec Speedy 400 120w, Trotec Speedy 300 80w
    Thunderlaser Mars-130 with EFR 130w tube
    Signature Rotary Engravers (2)
    Epson F6070 Large Format Printer, Geo Knight Air Heat Presses (2)

  9. #9
    Hi guys,

    Thank you so much for the excellent feedback and tips! I spent the weekend checking all 3 possibilities listed out in the OP and based on your feedback. Those of you who suspected the "levelness" primarily were, I believe, correct! Here are the results:

    1. Levelness - I believe this was the primary culprit. The great support guys at Epilog sent me instructions on how to adjust this (it was easy) and I went over checking the height of the cutting head above each corner of the bed until I believe I have it very close to level - MUCH closer than it came set to originally.

    2. Settings - With the bed being more level, I was able to go back to my "fast" settings (which is 75-85% speed and 25-40% power). I may be able to goose this a little faster but it is a vast improvement over what I had to resort to Friday, and these are the settings I've done most of my testing with where I didn't have the levelness issue due to cutting on a small part of the bed.

    3. Laser Alignment - Epilog provides a "bullseye" to check this with, and I put a piece of masking tape over it and marked where the laser was hitting. It hits in the center ring of the bullseye, close to the center but down ever so slightly (maybe 1/32" or so?). It is in this same position when fired in all 4 corners of the bed. So, it is at least consistent, even if not quite perfectly aligned. Does this sound satisfactory to you guys?

    I do think the red material is one of the most challenging colors for this issue, as people mentioned. For now, I'm still only cutting across 14" of the horizontal length of the bed to cut down on the possibility of the issues I saw here, as it's still not perfect if I cut the entire length (although it is Vastly improved). I'm not sure how much of this is just paranoia from what I just experienced, but I am very happy with the results cutting across 14" now.

    ---

    One question regarding the red material or similar materials - do you guys have any additional tips for keeping the "dust" off of the white etchings with this red material, or for example a black-on-white material? I tried soaking it in water and that seemed to do absolutely nothing, I also tried blowing air across it before removing the piece and that also had no effect. Wiping it with alchohol actually stains the white etching by getting the red onto it. I'm worried that when I ship people my pieces, in transit the dust will get on the etchings and they will look worse than when I took them off the machine.

    Finally, those of you referring to a "cleanup pass" for the red material - what settings do you use for this, and do you recommend it even if I'm getting okay results now? Doing something like that might let me more confidently cut across the entire width of the bed, but I'm not sure if there's an additional advantage to doing a cleanup pass over just making the settings as precise as I can for the first pass.

    Thanks so much for the newbie help!
    Last edited by Steve Garber; 06-29-2015 at 9:25 AM.

  10. #10
    We always take 2 passes on red, same settings for both passes.
    Lasers : Trotec Speedy 300 75W, Trotec Speedy 300 80W, Galvo Fiber Laser 20W
    Printers : Mimaki UJF-6042 UV Flatbed Printer , HP Designjet L26500 61" Wide Format Latex Printer, Summa S140-T 48" Vinyl Plotter
    Router : ShopBot 48" x 96" CNC Router Rotary Engravers : (2) Xenetech XOT 16 x 25 Rotary Engravers

    Real name Steve but that name was taken on the forum. Used Middle name. Call me Steve or Scott, doesn't matter.

  11. #11
    Join Date
    Sep 2009
    Location
    Medina Ohio
    Posts
    4,534
    I would give them a higher price for the first 100 then lower it for the next and son till you get the last 100. I have had companies say they want 500 items done but the first batch was for 150 and that is all they needed. It was for a sporting goods chain in down under and there was only 125 stores.

  12. #12
    Join Date
    Oct 2007
    Location
    Cincinnati, Ohio
    Posts
    1,843
    Quote Originally Posted by Steve Garber View Post
    ...3. Laser Alignment - Epilog provides a "bullseye" to check this with, and I put a piece of masking tape over it and marked where the laser was hitting. ...
    This does work with the red dot pointer. No need for tape.
    Tim
    There are Big Brain people & Small Brain people. I'm one of the Big Brains - with a lot of empty space.- me
    50W Fiber - Raycus/MaxPhotonics - It's a metal eating beast!
    Epilog Fusion M2 50/30 Co2/Fiber - 2015
    Epilog Mini 24 – 35watt - 2006 (Original Tube)
    Ricoh SG3110DN
    - Liberty Laser LLC

  13. #13
    Join Date
    Jul 2005
    Location
    Sammamish, WA
    Posts
    7,630
    I found that spraying and polishing before engraving with a microfiber towel and Sprayway window cleaner from Costco helps, and can also be used to clean after. The foaminess seems to lift out the red debris.


    Sammamish, WA

    Epilog Legend 24TT 45W, had a sign business for 17 years, now just doing laser work on the side.

    "One only needs two tools in life: WD-40 to make things go, and duct tape to make them stop." G. Weilacher

    "The handyman's secret weapon - Duct Tape" R. Green

  14. #14
    What I found works great for red (Rowmark lasermax matte anyway) is the Home Depot version of a Magic Eraser, the basic cheepie. Just lightly scuff the engraving under warm running water, and it works pretty good most of the time!

    The reason I tried the HD version is, an actual Magic Eraser is much more aggressive, which made it practically un-useable on BLACK Rowmark, it would shine up the matte finish too easily. The HD eraser is much more forgiving with black, and works great on the red.
    ========================================
    ELEVEN - rotary cutter tool machines
    FOUR - CO2 lasers
    THREE- make that FOUR now - fiber lasers
    ONE - vinyl cutter
    CASmate, Corel, Gravostyle


  15. #15
    I find a quick way to check the table level is to put the manually focus tool in place, then disable the X & Y Axis.
    Now you can slide the lens carriage back and forth and see how consistent the gap is between the tool and the table.

    I also do this if a product has an uneven surface, then I can "Split" the difference for an average focus. These machines
    get jostled around a bit in shipping so it wouldn't surprise if something may be knocked out of alignment.

    An interesting to see how the machine can flex is turn on the red dot pointer, the open the lid and see if it moves. I had
    some workers that were very hard on opening and closing the lid and it would knock it out of alignment from time to time..
    Martin Boekers

    1 - Epilog Radius 25watt laser 1998
    1 - Epilog Legend EXT36 75watt laser 2005
    1 - Epilog Legend EXT36 75watt laser 2007
    1 - Epilog Fusion M2 32 120watt laser with camera 2015
    2 - Geo Knight K20S 16x20 Heat Press
    Geo Knight K Mug Press,
    Ricoh GX-7000 Dye Sub Printer
    Zerox Phaser 6360 Laser Printer
    numerous other tools and implements
    of distruction/distraction!

Posting Permissions

  • You may not post new threads
  • You may not post replies
  • You may not post attachments
  • You may not edit your posts
  •