


After several failed attempts, I was finally able to turn my first live-edged bowl in which I was able to keep the bark on. Would appreciate a critique from anyone willing to look...
Specs:
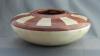
- Wood: Walnut
- Dimensions: 7" wide x 3.5" tall
- Finish: 3 coats of Antique oil, followed by buffing & Renaissance Wax
Pics:
20151006_071604.jpg20151006_071551.jpg20151006_071529.jpg
Thanks for looking!

 Reply With Quote


 .
.
 .
.


