


First picture I made an arrow towards a small rivet that holds the lateral ajusterarm on my Record # 4. I want to remove the arm in order to be able to lap the frog on the surface where the blade is put. But can I get a new rivet somewhere ?
nitte1.jpg
Next picture I made arrows towards the resting points for the frog on the plane bottom. The four restingpoints are very rough in the surface, not milled like on the frog. I used an ink pen to paint the resting points and then I pressed the frog on the points while pushing forth and back, to see how much surface area that connected. I dont know if you can see it on the picture but the frog only scratched on the few tops of the resting points meaning that there is not much connection. I think I can lap it with carborundum powder and oil, but the question is, does it matter at all ?
flader1.jpg
Maybe I should mention that I already bought a Veritas PM-V11 blade and cap iron for this plane.

 Reply With Quote
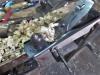

 ).......


