Page 5 of 7 FirstFirst 1234567 LastLast
Results 61 to 75 of 104

Thread: Walnut Cabinet

  1. #61
    Join Date
    Aug 2012
    Location
    Missouri
    Posts
    2,152
    Prashun I don't use the rabbet but doing similar things I use a good straight block clamped in my face vise raised up as high as the rabbet. Lay the work piece flat on the bench and lightly pare away.
    Jim
    ps I do the same thing to clean up a tail that is shortened to cover a drawer bottom groove
    Last edited by James Pallas; 02-09-2016 at 4:35 PM.

  2. #62
    Join Date
    Aug 2013
    Location
    Princeton, NJ
    Posts
    7,294
    Blog Entries
    7
    Prashun,

    I was contemplating your delema...I think you should trim the rabbet after the case is assembled and use the adjoining rabbet as your guide.
    Bumbling forward into the unknown.

  3. #63
    Join Date
    Apr 2007
    Location
    New Jersey
    Posts
    13,725
    Too late. I used your advice and just used a narrow, fresh chisel. it worked fine but I fear I may have not accounted for the proudness of my tails. May have overcut the end.

  4. #64
    Join Date
    Aug 2013
    Location
    Princeton, NJ
    Posts
    7,294
    Blog Entries
    7
    Yeah that's quite possible, you'll know when you do the mock assembly. If it's only a slight bit, I'd probably just trim up the rabbet to account for it with a shoulder plane. Don't take a lot, if it's really far off just leave it. I doubt it will be really far off.
    Bumbling forward into the unknown.

  5. #65
    Join Date
    Feb 2004
    Location
    Perth, Australia
    Posts
    9,491
    Quote Originally Posted by Prashun Patel View Post
    I am rabbeting the backs of the case pieces. I am deathly afraid of paring too aggressively and breaking the pins near the corners of the rabbeted recess.

    Because of this, I haven't chopped a good mark at the stopped end, which is causing blowout when I pare. I would like to rectify this before doing the other 3.

    What tricks do you have?

    Tools at my disposal: chisels, small router plane, patience.
    Hi Prashun

    I have an article on stopped rebates on my website: http://www.inthewoodshop.com/Furnitu...ngForward.html

    Below is the essence of what you are possibly looking for ...

    A warning about the rebates – they are stopped rebates, which is risky to do and not generally recommended for this type of construction. The rebates terminate short of dovetails that lock the two sides via the top rail. It is easy to weaken and damage them. The only reason I am going down this route is to maintain a clean exterior – I want to finish the back of the chest at the same level as the front. The joint will be strong once the parts are glued up.


    This is where the rebate will go …


    The plan is to use a rebate plane. Those who have tried this are aware that planing from one end to the other will create a curve, with the depth deepest in the centre of the side, and tapering off to the ends. Eventually the plane will stop cutting ..


    To plane this successfully, first remove enough waste from each end to enable the rebate plane to continue planing to depth ..


    Do the same at the other side …


    Now you can plane with confidence as the rebate can be taken to full depth along the whole length.


    Those familiar with the Veritas Skew Rabbet Plane will notice that the front knob has been removed (as well as fitting a deeper sub-fence). The knob seems superfluous to me since I cannot find a reason to use it. There is far more control pushing the plane into the rebate, that is from the side.


    What I have discovered is that the place where the knob went makes a handy position for the thumb – better than the fence alongside the edge of the blade … where inevitably I cut myself!


    This is the completed rebate. The rear panel will sit in a frame that fits in the rebate. The sizing of this rebate enables the rear sliding dovetails to be sawn inside it and then hidden behind the frame.

    Regards from Perth

    Derek

  6. #66
    Join Date
    Aug 2010
    Location
    USA
    Posts
    5,582
    Quote Originally Posted by Brian Holcombe View Post
    Prashun,

    I was contemplating your delema...I think you should trim the rabbet after the case is assembled and use the adjoining rabbet as your guide.
    +1 to this. This ensures that the joints are well supported and that the rabbeted corners line up correctly

  7. #67
    Join Date
    Apr 2007
    Location
    New Jersey
    Posts
    13,725
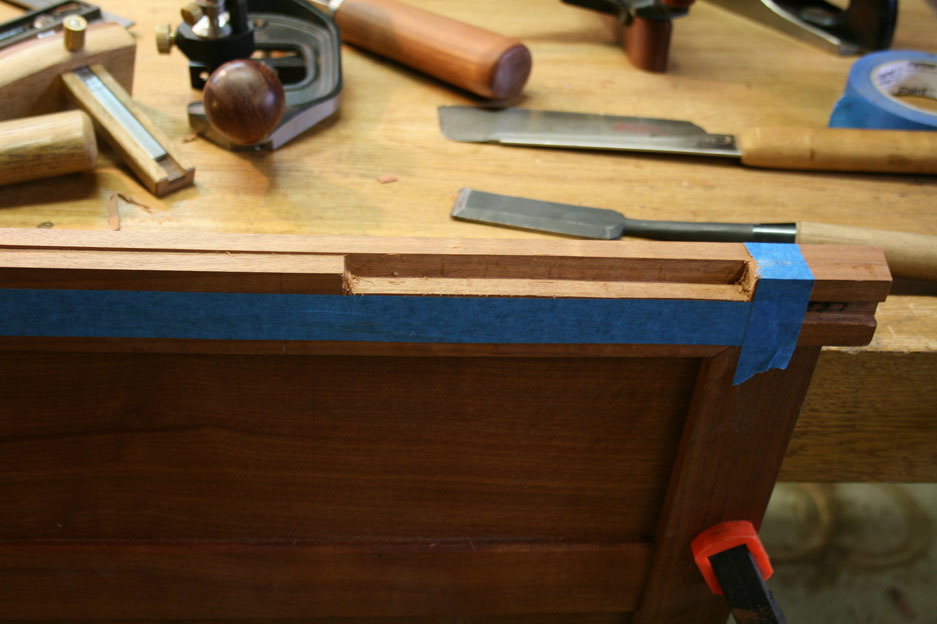
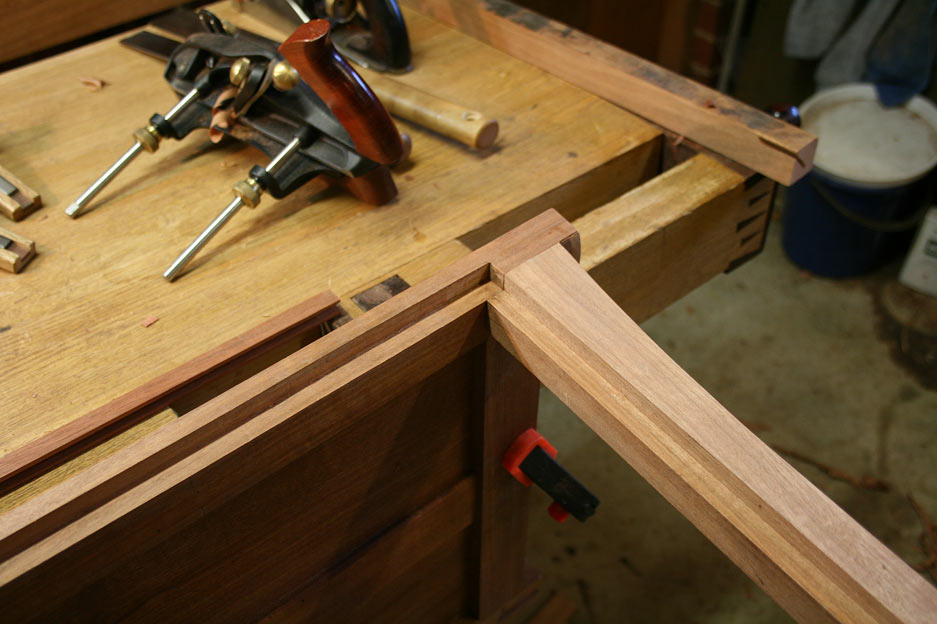
    Thanks for the advice. I'm satisfied with these results. Not Cohen/Holcombe-worthy (yet!) but it worked. I will have a tiny bit of shoulder plane work to re-align the corners once assembled. I think I was wise to do the bulk of the paring while unassembled. It was easy to work from both faces.

    Derek, I agree that rabbeting threatens the integrity of the corner pin/tails. How would you normally address this on a case back that won't show?

    Also, (full disclosure): I did not cut the rabbets with hand tools; they were routed except for the corners.
    Attached Images Attached Images
    Last edited by Prashun Patel; 02-10-2016 at 8:44 AM.

  8. #68
    Join Date
    Aug 2013
    Location
    Princeton, NJ
    Posts
    7,294
    Blog Entries
    7
    Nice work, those will do!

    A rabbet is fine, but personally I would simply make it shallow (like 1/8"). If you set the rabbet in from the case sides on deeper cases you may notice that a 1/8" rabbet has less tendency to crack the outside edge than a deeper rabbet, and really doesn't lose anything in the way of performance.
    Bumbling forward into the unknown.

  9. #69
    Join Date
    Feb 2011
    Location
    Carlsbad, CA
    Posts
    2,230
    Blog Entries
    2
    Quote Originally Posted by Prashun Patel View Post

    Anyway, I love thinking about these things; even if it means the design ends up ill-conceived. It's like playing the lottery; just much more exciting.

    Aw, who am I kidding. I design on the fly this way because I stink at Sketchup.

    Prashun, you are in good company my friend - I'm right there with you! I'm theoretical sure Sketch Up would help me avoid problems that stem from lack of planning (If I had half a chance of knowing how to use it- not likely in my life time!), - but whats the fun in that!

    I'm loving your thread! Great project and even more entertaining write up. Your authentic modesty in describing a build process that is familiar to all of us (certainly to me) is inspirational.

    I look forward to the rest!

    Best, Mike

  10. #70
    Join Date
    Apr 2007
    Location
    New Jersey
    Posts
    13,725
    "You're like MacGyver with Yogurt cups."

    Jebediah-
    I'm more like Gus, the father, from My Big Fat Greek Wedding. Whereas Windex was his duct tape panacea, single-serve yogurt cups were mine...until I discovered Talenti gelato (except, these containers are so nice and perfect, I'm afraid to put anything in them.)

  11. #71
    Beautiful woodworking Patel.

  12. #72
    Prashun

    I would be proud if I had made a piece like that
    Best regards

    Lasse Hilbrandt

  13. #73
    Join Date
    Apr 2007
    Location
    New Jersey
    Posts
    13,725

    Knife hinge installation

    I am fitting the knife hinges on the case now, and have a question about fitting them.

    My doors have been trimmed to exactly fit the top and bottom openings with no gap.

    The hinge pin creates ~1/16" gap between the leaves.

    What kind of gap between door/case should I shoot (literally) for?

    Should the hinge mortises leave the leaves flush?

    Sorry for these basic questions, but oddly, I cannot find that answer anywhere.

    True to form, I glued up the case before mortising the hinges (cue Chris Farley SNL interview skit where he smacks himself in the head.)
    Attached Images Attached Images

  14. #74
    Join Date
    Aug 2013
    Location
    Princeton, NJ
    Posts
    7,294
    Blog Entries
    7
    You'll want to make some room around the doors, so generally I aim for the gap between the doors and between the doors and the case to be the same.

    That being said I find the gap that Brusso sets to be a little on the generous side on the larger sized hinges. I've taken to using the smallest hinges that they offer for small cabinetry and liked that better. You can set the visible hinge flush and sink the non-visible hinge slightly if you feel it improves the look.
    Bumbling forward into the unknown.

  15. #75
    Join Date
    Apr 2007
    Location
    New Jersey
    Posts
    13,725
    Thanks, Brian. My hinges are 3/8". I think I see what you're saying: if I like the gap of the hinge as is, I trim the doors to have that same gap, and then mount the hinges flush. It now seems obvious.

Posting Permissions

  • You may not post new threads
  • You may not post replies
  • You may not post attachments
  • You may not edit your posts
  •