Page 2 of 7 FirstFirst 123456 ... LastLast
Results 16 to 30 of 104

Thread: Walnut Cabinet

  1. #16
    Join Date
    Feb 2004
    Location
    Perth, Australia
    Posts
    9,494
    Fitting some pins. I can't say the results are markedly better than previous attempts, but the process is getting a little easier. Until I get more proficient at fitting 'off the saw', i find it beneficial to work in small stages and break often. It's tedious hunching over a bench (my new bench-on-bench helps with this) and it's tempting to file or chisel off too aggressively in order to force the fit. But anyone can get pretty good results with sufficient patience and delicacy. Breaking often helps maintain that delicacy.

    Jim, another blasphemy alert : My favorite pin-fitting tool is a fine rasp. I notice that the more of these I do, the more I can quickly feel where the adjustments need to be made. ...
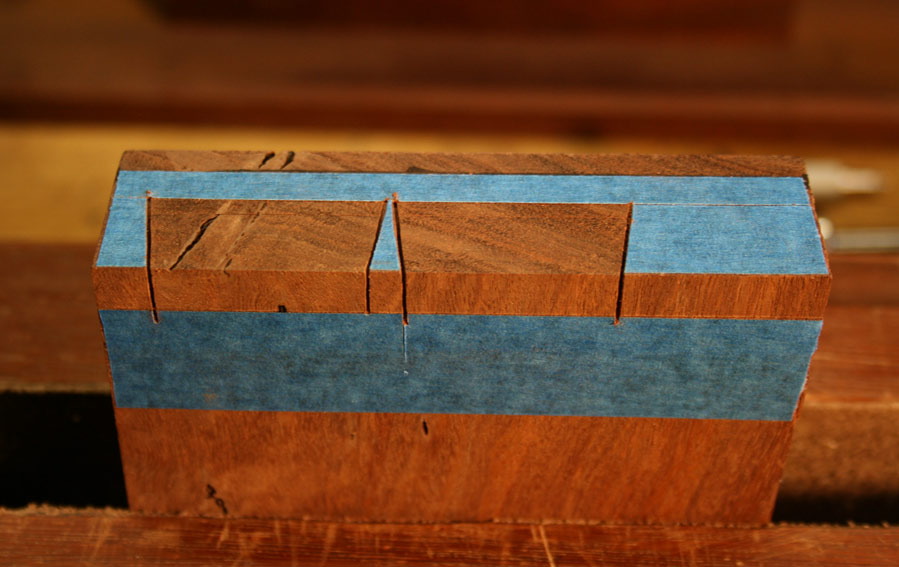
    Prashun, you are not sawing close enough to the line (edge of the tape) ...


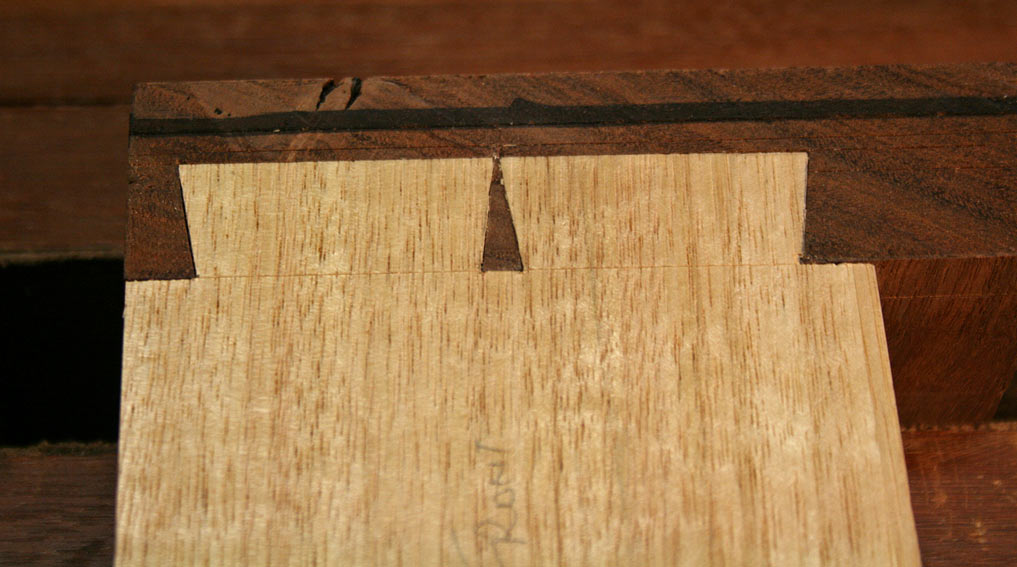
    There should be no need to pare anything.


    I saw a tip from Garrett Hack to use a marking knife to get that waste out too. (Derek, did he steal that too
    )


    I think he got that from Chris Vesper ... or vice versa


    Regards from Perth

    Derek

  2. #17
    Join Date
    Aug 2013
    Location
    Princeton, NJ
    Posts
    7,298
    Blog Entries
    7
    Prashun,

    Couple thoughts for you, I agree with Derek, waste with the saw closer to the bottom. Your first cut is perfect, but at that point I would turn the saw around and trim to 1/16"~ of the base line.

    You can pare or chop to the line from there, in either case, take small bites (like 1/32~) then fit the chisel in the baseline.

    Couple things for when you transfer your marks. When you put the tails on the pin board, if you slightly move the baseline of the tail board over the line then you will mark the pins slightly large, that will help make a nice compression fit right off the saw. Not a whole lot, just a slight bit (like .010")
    Bumbling forward into the unknown.

  3. #18
    Join Date
    Aug 2013
    Location
    Princeton, NJ
    Posts
    7,298
    Blog Entries
    7
    BTW, if you need to press a veneer, just stop by.
    Bumbling forward into the unknown.

  4. #19
    Join Date
    Sep 2008
    Location
    N. Idaho
    Posts
    1,621
    Hello Prashun,

    I've veneered a wall case using clamps and cauls. The case was hung on a rabbeted french cleat, though I would consider keyhole plates next time.

    IMG_0582-1.jpgIMG_7546.jpgIMG_0584-1.jpg
    "You can observe a lot just by watching."
    --Yogi Berra

  5. #20
    Quote Originally Posted by Prashun Patel View Post
    I have it in mind to veneer some plywood. Is that something that's doable without a vacuum press?
    Very doable. I have yet to get a vacuum press and have gotten nice results just fine. Use a few pieces of ply and then some curved cauls. Clamp from the center and work your way out. If you use liquid hide glue (Old Brown Glue), then you can heat it up and remove it to try again later with an iron if it gets messed up the first time around. Just did that last week, but with hot hide glue instead. Leave in the clamps for a full day before taking it out, though. Normal yellow glue is too thin and can come through the pores/veneer and mess with the finish. Had that happen before.

    I generally try to have about double the number of cauls/clamps that Christopher shows in his photos. May not be practical depending on the size, however.
    Last edited by Jeffrey Martel; 01-27-2016 at 1:04 PM.

  6. #21
    Join Date
    Jul 2014
    Location
    folsom, california
    Posts
    104
    prashun,

    it looks like you are using a laminate trim size router? are you using a top mounted bearing to keep in the waste side or eyeballing it? router w/ top bearing idea had not occurred to me til i saw you post.

    i use david barons guide and methods with shim get offset for saw kerf, never have to adjust, they fit right off the saw.

    i made medicine cabinet recently. cut small rabbet in back and lap sided back with thin boards.

    keith

  7. #22
    Join Date
    Apr 2007
    Location
    New Jersey
    Posts
    13,725
    Thanks, Keith. I'll look into David Barron's guide. Always interested in help. It does get easier with practice, though. More than helping me saw to the line, the tape helps me cut straight. I'm amazed how straight my cuts became. Instantly. I find it straightforward (albeit tedious) to tweak a perfectly straight wall - even with a rasp. It's easy to KEEP a straight wall with a chisel or rasp; it's hard for me to MAKE it straight if the saw cut is not perfectly vertical.

    My fourth side actually fit decently off the saw; I just had a tiny bit to file.

    Here's the case so far.
    Attached Images Attached Images
    Last edited by Prashun Patel; 01-27-2016 at 1:36 PM.

  8. #23
    Join Date
    Apr 2007
    Location
    New Jersey
    Posts
    13,725

    Doors

    Here's the wood I'm using for the doors. Of COURSE, in my haste to get cutting, I forgot to trim the top and bottoms of the case to match the door width. I left them long by ~1", which means the opening is too wide for these doors to be fully overlaid as originally planned. So, I am now forced to make the doors inset. This is what I love about this hobby: you have to adapt to problems.

    I am uncertain where I'm going to cut the doors, but am sure that I'm going to work around the figure, not thru it. The challenge will be to make it feel organic while still being appealing.

    Suggestions welcome.
    Attached Images Attached Images
    Last edited by Prashun Patel; 01-27-2016 at 2:24 PM.

  9. #24
    Join Date
    Sep 2008
    Location
    N. Idaho
    Posts
    1,621
    Beautiful book match. What about mounting/floating the 'panels' within the frame using brass rods--would allow a full sized door and provide negative space all the way around?
    "You can observe a lot just by watching."
    --Yogi Berra

  10. #25
    Join Date
    May 2004
    Location
    N Illinois
    Posts
    4,602
    Very interesting thread...Thanks guys.
    Jerry

  11. #26
    Join Date
    Aug 2013
    Location
    Princeton, NJ
    Posts
    7,298
    Blog Entries
    7
    Those doors are going to look fantastic! Nice work on the case!
    Bumbling forward into the unknown.

  12. #27
    Join Date
    Apr 2007
    Location
    New Jersey
    Posts
    13,725
    Brian, i would like to have drawers inside the cabinet in the same flush style as your recent cabinet from your Cabinet Build thread.

    Can you advise how you made your drawers flush with each other while also using a web frame? Are the drawer fronts rabbeted on the back? How did you lay out the dovetails if the drawer fronts are not false?

    keith, i. Am free handing it, but a tiny dado clean out bit could be perfect for this...

    david e, i am using a cheap coping saw with olson saw blades cp301. They work pretty well for me. Buy the blades in bulk and use them like sandpaper.
    Last edited by Prashun Patel; 01-28-2016 at 6:21 AM.

  13. #28
    Join Date
    Nov 2014
    Location
    West Granby CT
    Posts
    777
    Prashun-

    Great thread. Either in this thread, or another, could you snap some pics of how you clean up the baseline with a pin router? That is always the slowest part of the process for me and gives me the most trouble. I'm intrigued by how that is gone about.

    Those front panels are going to look awesome!

  14. #29
    Join Date
    Aug 2013
    Location
    Princeton, NJ
    Posts
    7,298
    Blog Entries
    7
    Prashun,

    Hah.....very carefully

    Couple important things, I made lips on the drawers top and bottom so that both drawers, but to ensure that they did not have one large drawer and the rest small, I made it so that the bottom lip incorporated most of the overhang. The top lip had just enough so that the split would land on the web frame, which also meant making the front of the web frames from the same material as the case.

    The procedure changes a bit when you are building the drawers, because you really cant adjust the height of the drawer sides very easily after the drawers are complete. So what I did was cut the back to width and height, set it all the way back into the cabinet, then put the drawer sides in (also set for height). I used a light to inspect the back corners to ensure that they were completely contacting the drawer backs (and so to avoid having a twist set into the drawers which will make them tight to close). If they needed adjusting I would do so with with a shooting board.

    Cut the joinery at the rear of the drawer and ensure that it operates smoothly, then pull the drawers out of the case enough that you can mark the sides of the drawers. Then cut that joinery.

    If all is well at that point it will require very minimal tweaking or none at all.

    This is complicated on the first one and requires much thought, on the second one it's straight forward.

    And now that I think of it, this is also why I did both sides and the front with drawer slips, it saved me the headache of also adding a groove in the drawer front that would need to line up with the other grooves.
    Bumbling forward into the unknown.

  15. #30
    Join Date
    Apr 2007
    Location
    New Jersey
    Posts
    13,725

    Pin waste

    Jebediah-
    Here's a drawing of how I do it. I used a 1/4" upcut spiral bit. I orient the board with the show face toward me (skinny end of the pins). I clamp a backer to the inside face (I clamped 3/4" stock and it was easy enough to keep the router balanced. I suppose I should be worried about tearout, but it hasn't been an issue on either side. The cuts are 10x neater than I could accomplish (yet) with my chisel skills.

    I set the bit depth just proud of the thickness of the tail board. When you rout, you have to start from the center, and work in concentric, clockwise circles. If you don't, the bit can run on you. If you work clockwise, and with GOOD LIGHT, you can get right up to the line. The more waste you leave at the bottom off your coping saw, the higher the risk of a runaway router (and dust...). Take the time to cope down to 3/16" or less.

    If you do not have confidence sawing the kerfs on the pins, you can even just rout out the entire waste without sawing. In this case, however, you should knife your pins deeply. You can get so close to the line that you don't have to do any paring work besides one, clean pare right on the knife mark. To get a good, accurate pare, I find it important to have a good knife mark. If you have sawed the kerf, this is not an issue.

    If you like sawing (as I'm learning to) then you can use a pattern guided bit (called a mortising or dado cleanout bit). These bits have top bearings and a 1/4" cutting length. So, as long as you cope less than 1/4" to the base, you can clean up the bottom in a single, easy pass, using the straight-sawn walls as a reference for the bearing. I just ordered such a bit. The bits tend to come in 1/2" width, though, so this would only be appropriate for wider tails. Also, you'd have provide relief for the radius of the bit in the backer board. If you don't, the bit won't be able to get into the far corners, which defeats the purpose of this method.

    Truth be told, the manual and delicate effort of 'carving' free hand with the spiral bit appeals to me. I may just stick with that if the new bit doesn't make the job TOO much easier.

    Brian, Thanks for that rich explanation. I'm having trouble visualizing. Will re-read 10x. Do you have any easy to post pictures? I scoured your Cabinet Build thread, but still could not figure it out.
    Attached Images Attached Images
    Last edited by Prashun Patel; 02-01-2016 at 9:04 AM.

Posting Permissions

  • You may not post new threads
  • You may not post replies
  • You may not post attachments
  • You may not edit your posts
  •