Page 1 of 2 12 LastLast
Results 1 to 15 of 18

Thread: Table saw adjustment issues

  1. #1
    Join Date
    Mar 2016
    Location
    Northern Virginia
    Posts
    48

    Table saw adjustment issues

    Hi everyone.

    I've got a problem with my table saw. See this thread if you want to read some history http://www.sawmillcreek.org/showthre...-degree-angles

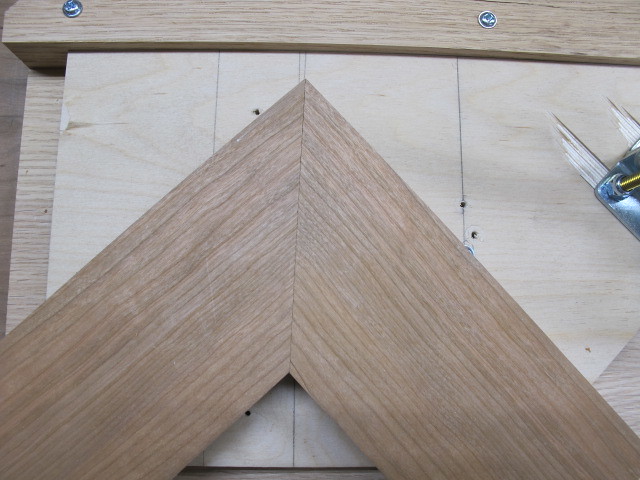
    The thread is about my inability to make perfect 45* cuts on a table saw.

    After reading the kind replies, and watching a lot of youtube videos, here's where I am now:

    Used several types of squares to ensure that blade was exactly 90* to the table surface.
    Did same to ensure that new Incra 1000SE miter gauge was 90* to the blade.

    Made a test cut at 90* There's probably a name for this test, but I can't remember hearing one:
    1. Take a jointed scrap, the wider the better, length not as big a deal (I used a piece of 1x6 pine, about a foot long).
    2. Eyeball the middle of the board (about the 6" mark for me), and use miter to push through a crosscut.
    3. Stand the two pieces up on a flat surface. Stand them on the short edge of the board (that is, the 1" side is touching the table, and the 6" side is facing you. There will be no visible gap between the two pieces.
    4. Take one of the two pieces and flip it over, so that the 1" side which had been facing the ceiling is now on the table. Push the pieces together.
    5. If any daylight shows between the two pieces, your saw (or miter gauge) is out of adjustment. I saw daylight.

    This is where I am. I watched a Wood Whisperer video where the distance from a chosen blade tooth to the miter slot was measured at the front and back of the saw. They should be the same. Mine are not. Not off by much, but enough to be noticeable. The blade is skewed slightly to the left, and therein lies the cause of my problems. I guess.

    So here's the question, as it relates to my contractor's saw (Delta 34-441 - about 25 years old): Do I need to loosen the table top's bolts and re-align the table (as the Wood Whisperer does), or is there an adjustment on the blade's drive shaft I can make? Saw is belt-driven, and I have not looked closely enough underneath the saw to see if the drive shaft for the blade can be adjusted a hair right or left, or if I will be forced to unbolt the table top and tap it with a hammer to bring the blade parallel with the miter groves.

    Any advice, comments or insults would be welcomed!

    Mike

  2. #2
    Join Date
    Jun 2008
    Location
    So Cal
    Posts
    3,775
    So are you saying your saw is not cutting flat 45s off a miter gage.A photo would help.
    A good sharp blade and well tuned saw a decent miter gage is really helpful to bang out perfect miters.
    Don't give up someone will have the answer.

  3. #3
    You do not need to adjust the table, just the trunion. If you pick up a pair of trunion pals and install them first, fine adjustments are much easier to achieve. You can get the trunion exactly where you want it only to have it slide out of adjustment when you tighten the bolts.

    I have been using the old screw in the end of a board trick. Clamp a board to your miter gage. Put a screw horizontally in the end of the board so that the head of the screw is facing the side of the blade (perpendicular). Find your favorite tooth, rotate it to the front of the saw and set the screw so that tooth just grazes the head of the screw. Now rotate the tooth to the back of saw and check it against your miter gage. The screw should graze the tooth just as it did in the front when you're aligned properly.

    If your blade is skewed to the left and you are passing your keeper to the left, the back of the blade is likely shaving a little more off your miter. If you have to live with a slightly skewed blade, have the skew opposite the side you work from.

  4. #4
    Join Date
    Mar 2012
    Location
    Napa Valley, CA
    Posts
    916
    Quote Originally Posted by Eric Schmid View Post
    You do not need to adjust the table, just the trunion.
    Right. A cabinet saw adjusts for blade alignment differently than a contactor's saw. With a cabinet saw. you loosen the bolts that connect the table to the cabinet. With a contractor's saw, you loosen the bolts that connect the trunnion assembly to the table--and it can be fussy and difficult. It's often easiest to leave one bolt snug and use it as a pivot to move the trunnion assembly into alignment with the miter slot.

    But---- that blade alignment issue, while worthwhile to get right, is not your issue. To get a square cut with a miter gauge, the fence on the miter gauge must be square to the path of travel (the miter slot)-- not necessarily square to the blade. (out-of-square to the blade will result in rough cuts and/or burning, but not out-of-square cuts)

    Also, the material must not slip sideways or wiggle (like from a loose fit of the miter bar) during the cut.

    Don't give up. Cutting perfect mitered frames is actually one of the biggest challenges in woodworking and frustrates a lot of people. sometimes the easiest answer is to address the cut with a block plane for final fitting.

  5. #5
    Join Date
    Mar 2016
    Location
    Northern Virginia
    Posts
    48

    Overdue update

    Update on getting the blade 100% parallel to the miter slots on the top of my Delta contractor's saw:

    I bought an inexpensive dial gauge the other day, and slapped together a measuring tool using an old steel miter slot bar, a piece of pine, and some bolts & screws.
    IMG_1727.jpg

    I raised the blade to full height, marked a tooth with a sharpie, and measured a spot at the base of the tooth while it was positioned near the front of the saw. Rotated the blade forward, toward the rear of the saw, and measured again. Don't know if you can see from the attached pic, but the next measurement was out by almost 6 1000ths.

    Loosened three of the four trunnion bolts, and whacked the rear of the trunnion with a rubber mallet. Measured again. Repeated until both front and back measurements were the same. Bingo! Or so I thought...

    Watching the gauge while it was positioned near the back of the saw, I slowly tightened the trunnion bolts. As did, I could see the dial indicator change. The tightening of the bolts caused the alignment to go out, just a bit. When I was done, my zero had changed to 2/1000ths. Next step: buy a PALS kit for my saw.

    Will keep the thread updated for other newbies like me. Thanks to all for your help.

    Mike
    Last edited by Mike Trent; 04-23-2016 at 11:47 PM.

  6. #6
    Join Date
    Sep 2014
    Location
    Atlanta, GA
    Posts
    421
    I find that when adjusting anything to zero will result in movement after tightening the bolts. I went through the same thing when tuning up my sawstop for the first time. I would be off by about .002 after tightening the bolts. I ended up adjusting the pass zero by .002" and that would bring me to near if not dead on zero after I tighten the bolts. Give that a try first before you go buy anything else.

  7. #7
    Join Date
    Feb 2003
    Location
    McKean, PA
    Posts
    15,644
    Blog Entries
    1
    Quote Originally Posted by Mike Trent View Post
    Watching the gauge while it was positioned near the back of the saw, I slowly tightened the trunnion bolts. As did, I could see the dial indicator change. The tightening of the bolts caused the alignment to go out, just a bit. When I was done, my zero had changed to 2/1000ths. Next step: buy a PALS kit for my saw.
    I had the same problem on my Craftsman contractor saw when I adjusted it. What I figured out was happening was the star type lock washers had made indentations into the trunion casting and were sliding right back into those places when I tightened the bolts. I solved the problem by really loosening the bolts rotating the lock washers out of their grooves, snugging down the bolts and then aligning the saw.
    Lee Schierer
    USNA '71
    Go Navy!

    My advice, comments and suggestions are free, but it costs money to run the site. If you found something of value here please give a little something back by becoming a contributor! Please Contribute

  8. #8
    Join Date
    Sep 2006
    Location
    Deep South
    Posts
    3,970
    If you achieve 0.002", my opinion is that is good enough. I have spent hours trying to get it closer than that and was never able to do so. Fortunately, that much error is lost in the overall tolerance stack ups of the mechanical system.

  9. #9
    Join Date
    Mar 2006
    Location
    SoCal
    Posts
    22,512
    Blog Entries
    1
    Quote Originally Posted by Lee Schierer View Post
    I had the same problem on my Craftsman contractor saw when I adjusted it. What I figured out was happening was the star type lock washers had made indentations into the trunion casting and were sliding right back into those places when I tightened the bolts. I solved the problem by really loosening the bolts rotating the lock washers out of their grooves, snugging down the bolts and then aligning the saw.
    I had a similar experience and put a flat washer between the star lock washer and the damaged surfaces. Once I got a good 90* setting I forged ahead with the 45* tuning. I had to concede defeat on the beveled settings. The weakness of the cabinet versus the weight of the motor being tilted would allow me to align for true at 45* or at 90* but, anything in between was a varying degree off based on the amount of tilt.

    This was on an older Delta with cast wings (1970's) and the same held true on an Emerson/Craftsman (a 1980 era 113. saw) contractor format saw. My point is that even after doing all the right things, if you find yourself chasing your tail back and forth; getting true at 90*, getting true at 45* only to have 90* now out, .readjusting for 90* and losing 45* . . . don't kill yourself over it.

    Don't get me wrong; try for the best you can get. Just don't get lost in the process and become frustrated. I finally accepted that I could get a solid 90* and use that confidently. I just found workarounds for my bevel requirements or avoided them if no workarounds were possible.
    "A hen is only an egg's way of making another egg".


    – Samuel Butler

  10. #10
    Join Date
    Dec 2010
    Location
    WNY
    Posts
    9,734
    In the end, cutting perfect 45's on any saw is a challenge. Getting the angle perfect is only half the battle. Then you have to get the blade exactly square vertically. Then if the blade vibrates at all during the cut, for whatever reason, the mating parts won't fit perfectly. Three or four hundred years ago folks didn't have power saws, yet they produced perfect joints of all types, equal to anything made today. How did they do it? Shooting boards.

    A couple of months ago I stopped fretting about perfect fitting mitered joints straight off my saw, bought a hand plane with the sides ground square to the sole, and built a shoot board. Bliss.


    Now I rough cut and shoot one end, knife mark the final length and rough cut it about 1/32" long, and then shoot it to the mark. Mitered frames come out perfect the first time.


    The old way is still a good way.

    John

  11. #11
    Join Date
    Aug 2006
    Location
    Saint Helens, OR
    Posts
    2,463
    I posted via the mobile site version and now it's gone. Interesting. Oh well, I can refine my reply so it makes more sense.

    I have a Ridgid R4511 hybrid TS. It looks like a contractor saw but is a light weight cabinet saw. The main distinction that sets this saw apart from a contractor saw is the trunnion is mounted on the cabinet.

    So while the problem you are experiencing is quite normal, the solution will be be slightly different. Just keep in mind there are three cutting planes. We usually never even think about the third plane, and as long as we keep the blade vertical (90 degrees) and parallel to the miter slot and fence, we're good to go. The third plane is the one that exists along the cutting path, front to back. This plane goes unnoticed because when we set the depth of cut, we measure the blade at the centerline where all three planes intersect. Regardless how or how much the table tilts front to back, this will have no affect on depth of cut. Until we move the blade off vertical. Then this third plane comes into play.

    If you have a truing plate, it will help the task of fixing the problem. Otherwise, a blade will get you there. Set your blade at 45 degrees. Take a 45 degree ruler and measure the angle at the front of the blade and the back of the blade. You will see that one or both are not really 45 degrees. That is because the relationship between the blade and the table along the front to back plane has now come into play. When we measure the blade for an angle cut, we usually measure the center line of the blade (the imaginary line that runs vertically through the arbor), or at least I do.

    Your cutting surface, the table, has to only has to be aligned accurately along two planes when your blade is perpendicular to the table top. The blade needs to be parallel to the miter slot and the table top needs to be perpendicular to the blade. For every cut where the blade is set to 90 degrees90, your good to go with these two alignments.

    Once you start tilting the blade off 90 degrees, you introduce the third axis. The third axis that normally doesn't come into play is the axis the tilt of your table top from front of the blade to the back of the blade.

    Since you are using a contractor saw, your trunnions are mounted under the table top. What you need to do is figure out if you need to lower the front or rear trunnion.

    Here is an exaggerated example that might help you visualize the issue if you do not understand what I'm talking about.

    If you put a 1/8" washer between each trunnion mount and the table, at the back of the table you will be 'tilting' or lowering the blade axis to where the table is actually tilting upward in relation to the level center line of the blade. In other words, the wood enters the blade but as the material is pushed through, you are now pushing the wood uphill. Slightly, very slightly, but the angle is off enough to prevent you from making an accurate cut.

    There was a formula for calculating how thick the shim should be and it worked like a charm for me. But play around a little and you should be able to get pretty close.
    Last edited by Greg Peterson; 04-24-2016 at 2:17 PM.
    Measure twice, cut three times, start over. Repeat as necessary.

  12. #12
    Join Date
    Jun 2006
    Location
    The Hartland of Michigan
    Posts
    7,628
    I never got satisfactory 45º cuts until I got my DeWalt RAS.
    Never, under any circumstances, consume a laxative and sleeping pill, on the same night

  13. #13
    Join Date
    Aug 2006
    Location
    Saint Helens, OR
    Posts
    2,463
    Quote Originally Posted by Myk Rian View Post
    I never got satisfactory 45º cuts until I got my DeWalt RAS.
    I got very good results with my DeWalt RAS, too. However, since I did not use it very often and it was messy as all get out (dust) I could not justify the space it occupied in my limited hobby sized shop.

    I was able to tune my TS to cut very accurate miters with the blade set at 45 degrees. Getting the same level of accuracy out of a contractor saw might be a tall order, but I think it is possible. In the past I've read peoples reasons for the miter inaccuracies in contractor saws was due to flex in the trunnion. I think the trunnion can be shimmed to bring the cutting plane into alignment with the table for these types of cuts with a couple of properly sized shims.
    Measure twice, cut three times, start over. Repeat as necessary.

  14. #14
    Join Date
    Mar 2016
    Location
    Northern Virginia
    Posts
    48
    Quote Originally Posted by Hoang N Nguyen View Post
    I find that when adjusting anything to zero will result in movement after tightening the bolts. I went through the same thing when tuning up my sawstop for the first time. I would be off by about .002 after tightening the bolts. I ended up adjusting the pass zero by .002" and that would bring me to near if not dead on zero after I tighten the bolts. Give that a try first before you go buy anything else.
    Did exactly as you suggested today, and I may have found success! Still, it took me an hour to do this, and I've gotta think that a PALS system would have cost me less time, all for <$50.

    Quote Originally Posted by Greg Peterson View Post
    Until we move the blade off vertical. Then this third plane comes into play... Set your blade at 45 degrees...
    For my particular project (frames) I need the blade at 90. Once this saw is trued-up. I'm going to put a big sign next to the tilt adjustment that says "DO NOT MOVE!"

    Quote Originally Posted by John TenEyck View Post
    In the end, cutting perfect 45's on any saw is a challenge. Getting the angle perfect is only half the battle. Then you have to get the blade exactly square vertically. Then if the blade vibrates at all during the cut, for whatever reason, the mating parts won't fit perfectly. Three or four hundred years ago folks didn't have power saws, yet they produced perfect joints of all types, equal to anything made today. How did they do it? Shooting boards.

    A couple of months ago I stopped fretting about perfect fitting mitered joints straight off my saw, bought a hand plane with the sides ground square to the sole, and built a shoot board. Bliss.

    Now I rough cut and shoot one end, knife mark the final length and rough cut it about 1/32" long, and then shoot it to the mark. Mitered frames come out perfect the first time.
    I've been told online and in person to cut the last piece long, and finish that last angle by hand. Have also read about shooting boards, but have no idea what that means. My ignorance is showing here, I know. I can Google that term and learn what I need to do, but any quick comments would be appreciated.

    I should also mention here, for future idiots reading this (like me), that the tension from the belt drive on a contractor's saw is a factor. I removed the belt because it blocked a trunnion bolt. Got everything set perfectly, then re-attached the belt. The resulting weight of the motor and tension of the belt took me from <1/1000ths to 4/1000s. Ugh.

    Thanks to all who replied for helping this newbie!

    Mike

  15. #15
    Join Date
    Sep 2014
    Location
    Atlanta, GA
    Posts
    421
    Quote Originally Posted by Mike Trent View Post
    Did exactly as you suggested today, and I may have found success! Still, it took me an hour to do this, and I've gotta think that a PALS system would have cost me less time, all for <$50.


    For my particular project (frames) I need the blade at 90. Once this saw is trued-up. I'm going to put a big sign next to the tilt adjustment that says "DO NOT MOVE!"


    I've been told online and in person to cut the last piece long, and finish that last angle by hand. Have also read about shooting boards, but have no idea what that means. My ignorance is showing here, I know. I can Google that term and learn what I need to do, but any quick comments would be appreciated.

    I should also mention here, for future idiots reading this (like me), that the tension from the belt drive on a contractor's saw is a factor. I removed the belt because it blocked a trunnion bolt. Got everything set perfectly, then re-attached the belt. The resulting weight of the motor and tension of the belt took me from <1/1000ths to 4/1000s. Ugh.

    Thanks to all who replied for helping this newbie!

    Mike
    I should have mentioned I have a sawstop and adjusting the blade to the miter slot is super easy. I just loosen the 4 bolts at each corner of the table and turn the adjustment bolts on the saw to move it. It doesn't require me to bang on my table with a mallet or anything like that so it's super easy to do.

    A shooting board is used with a hand plane to fine tune a cut once it comes off a saw. It's just a board with a piece of wood screwed along 1 edge to form a perfect 90* or 45*. You cut your wood at the saw than butt it up to the shooting board with the end of your wood sticking slightly off the edge. You than use a hand plane laid on it's side and make a few passes. You end up with a perfectly 90 or 45 degree end on your wood that needs no sanding.

Posting Permissions

  • You may not post new threads
  • You may not post replies
  • You may not post attachments
  • You may not edit your posts
  •