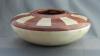
9 inch BLM burl, dyed
I have not posted here in a long time and thought I might again join in and see what is here again
Ron


 [OP]
Member
[OP]
Member
9 inch BLM burl, dyed
I have not posted here in a long time and thought I might again join in and see what is here again
Ron
Quite the dye job Ron looks very nice!
 Member
Well, for one thing there are a couple of morning glories like I have never seen before!
Veni Vidi Vendi Vente! I came, I saw, I bought a large coffee!
 Member
I would sure like to see it up close and personal.
C&C WELCOME
 Member
That's gorgeous! Love the detail and separation of the colors. Method?
Jim
 Member
Very nice job on both of these pieces Ron. Keep the pics coming....especially your vases.
Member Turners Anonymous Pittsburgh, PA
Contributor
Magnificent!
"All that is necessary for the triumph of evil is that good men do nothing."
If you want to know what a man's like, take a good look at how he treats his inferiors, not his equals.
[OP]
Member
Jim Silva I used transtint dye with DNA and sprayed the outer edge with the lathe running. Then applied blue right from the bottle, after it dried I then sanded it back. Applied red transting let it dry sanded it back some and then added more blue from the bottle. I added the blue with dye and paper towel then sanded back the last time. Finished with 10 coats of lacquer and polished it back with micro mesh Hope this helped you
[OP]
Member
Jim i apply the dye and sand it back. I first did the rim with blue and DNA using a airbrush. I then applied blue on the balance, let it dry and sand it back. Then added red let it dry and sand it back. I only sanded as much as I needed to getting the effect I wantedOriginally Posted by Jim Silva

Member
Ron, it is almost breathtaking it's so good looking, but, there's only one dish is there not? The first pic is of the inside, and the second pic is of the exterior, right? I see that some of the earlier posters, think they are looking at two separate dishes. Then again, maybe I'm wrong.
Len
[OP]
Member
Len no you are right. Many think it is two different pieces but they are not. Not sure what happened but the bottom did not take the dya the same as the top. ?? Don't understand but that is the way it is. Ron
 Contributor
Wow. Mind = blown.
---Trudging the Road of Happy Destiny---
Contributor
Outstanding, Ron!
Grant
Ottawa ON
Member
Looks very delicate........Nice
Contributor
Nice concept, the color really adds to the look of fragility.
 Posting Permissions

 Reply With Quote