


I am starting a new thread because I need to add a significant amount of new information to my older gennou thread, but if I just appended the old thread, most people would just blow it off as more chitchat. So here goes.
History
We all grew up using hammers with handles designed to fit a fictional person. These handles were designed to be easily mass-produced, and to look great hanging on the hardware store wall. Most importantly, the product development gurus and marketing departments of the tool conglomerates told us (and continue to tell us) that the tools they design to grace the Borg's shelves are perfect in every way.
Modern people have all but forgotten how to make a proper tool handle, but it wasn't always that way. If you want to check for yourself, look through the old tool catalogs and see how axe handles have become curvier and much thicker over the last 80 years. Notice how the grain of the wood is totally ignored. These changes have not resulted from efforts to make tools more functional or to achieve superior ergonomics, but once again, to make it easier to mass-produce handles from lower-quality materials, while apparently improving the outward appearance.
The handle described below is an interpretation of the gennou handle developed over several centuries by the Anaya carpenters of Japan. The gentleman that taught it to me 30 something years ago is now in his late 90's, and was around when the Anaya trade was still vibrant. The decision of whether it is more aesthetically attractive or not I will leave to you.
Ergonomic Factors
1. Handle Length: There is a handle length best suited to your body, the way you work, and the work you plan to do. Figure it out. It will take some trial and error. Some general guidelines follow, but are only a starting point.
2. Handle Grip Area Dimensions: Ditto No.1 above.
3. Head/hand orientation: The human body does its best work with a hammer or gennou when the plane of the flat striking face is the very close to the bottom edge of the wrist at impact.
4. Head Angle: The human body tends to rotate the gennou's head during the swing, but standard handle design blithely ignores this indisputable fact. We need to deal with this.
The Guidelines
"The Code is more what you'd call "guidelines" than actual rules." Captain Barbarossa
Overall Length
I could spend a lot of electrons describing why, but time does not permit, so take my word that the handles of all your gennou and hammers should have a similar grip configuration, and most especially, the same overall length measured from the end of the handle (butt) to the center of the striking face.
It is true that, assuming the same angular velocity, additional head speed can be obtained by using a longer handle. Golf clubs use this principle. If you are a golfer, you know how hard it is to get really good with those 14 clubs, all with different length handles. Perhaps, like me, you have experienced the occasional slice, or chili dip, or even the dreaded Adolf Hitler. Different length handles change everything.
Unlike the Game of Pings, when using a hammer to cut a mortise or chop dovetails, we do not have the luxury of modifying our stance, waggling the hammer, staring into the distance like Clint Eastwood to estimate how hard to swing, or talking with our Bag Rat about the best line or whether to use a 7 or 9 iron.
If you need more power when using a hammer or gennou, don't use a longer handle, use a heavier head. In this way, your precision, speed, rhythm, and efficiency will improve, and all your gennou's and/or hammers will become part of your hand working without conscious thought or even the need to see the gennou or hammer.
As seen in the photo below, with the head held in a flat palm (not a fist), and the fingers wrapped over the head, the butt just touches the bicep tendon. In my case, by total coincidence, this is 12". I am not a big man at 5'8", nor do I have big hands. This is another of those guidelines.
Grip Dimensions
The grip is important. Don't plan on choking up on the handle. The swing is the swing. The drawing below has the dimensions for my medium-sized gennou. For larger ones, I make the grip/butt bigger. For lighter heads I use a smaller grip/ butt. The size of your hands, and the number of your fingers, will dictate this shape, so I suggest you make your first gennou handle from an inexpensive wood like hickory or ash (can be bought cheaply as an axe handle from the Borg) instead of expensive ebony or bubbinga, and make the grip area oversized. Then use the handle for a few weeks or months, shaving it down little by little until you achieve the perfect fit.
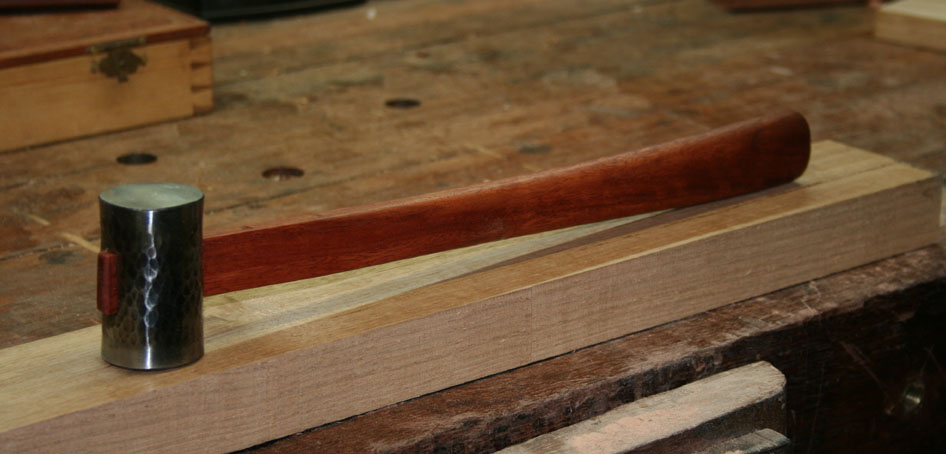
I like my handles to flair towards the gennou's front edge, but some people like them straighter. Personal preference. Whatever you choose, the toe of the handle's front edge should not extend past the plane of the head's flat striking face.
Head Angle
Contrary to what the tool department at Monkey Wards taught us, it is the nature of the human body for the wrist to lead the hammer head during the swing, with the result that, if the handle is oriented perpendicular with the center of the head, the hammer's face will hit the nail or chisel handle at an angle. Test this for yourself. Color the face of your hammer or gennou with an inkpad, marking pen, or Dykem, then use it to cut a mortise, checking the striking face and chisel handle frequently. You will notice that the color is scrubbed off the bottom half of the hammer's or gennou's face first, and that the ink marks on the chisel are off-center. This means that impact forces are acting to kick the chisel out of alignment, decreasing accuracy, and beating up your hand. This wasted impact force also ruins your rhythm (pendulum theory) and slows your work down.
Clearly, to maximize transfer of energy to the cutting edge, and to minimize both wasted energy and the off-center forces that kick our chisel out of proper alignment, the centerline of the head needs to be oriented closely in-line with the centerline of the chisel or nail at the instant of impact.
When gripping the hammer (across the palm and not in a fist; See the pictures of my grip in my previous Gennou post), your pinkie should just fit between the front edge of the handle and the plane of the flat striking face. This means that if you place the gennou on a flat tabletop as shown in the drawing, and press straight down on the head so the face is flush with the tabletop, the toe of the handle will either be floating above the tabletop, or perhaps almost touching, while your pinkie will fit neatly between handle and table. Please refer to the drawing below.
After you have finished your handle, do the inkpad test. If the center of the striking face is scrubbed clean first, and center of the chisel handle becomes inked first, then you have the right angle. If not, some adjustment may be necessary.
Handle Curvature
This curvature is a matter of personal preference, but it also has a structural purpose as well. That said, some people prefer to make the handle straight, and to accommodate the change in angle at the point where the handle exits the head's eye. This is entirely acceptable, but realize that you will need really tough wood for a handle made this way to be durable. I prefer to deal with this change in angle in a smooth curvature. I think it looks better. I know it fits my hand better. And my engineering background tells me that I want to avoid sudden transitions that induce stress concentrations, especially when grain runout is possible. But this is not a rule, only a guideline, as Captain Barbarossa would say.
Tasting the Pudding
How do you know if your handle works?
First, of course, is the ink transfer test described above.
Next, you need to determine if your efficiency and accuracy have improved. This may take some time, but you will probably notice that your mortise work goes faster, and the holes are cleaner (assuming your chisels are worthy).
Here is an experiment you should try. It is called the blind swing test. It will require a lab assistant. A sexy outfit is preferred, maybe leather, maybe lace. After you have used the gennou with its new handle for a few weeks, set it on your bench within reach, and close your eyes. Have your assistant, perhaps a friend, or neighbor, or girlfriend, or wife, or even a bench kitty (but never your neighbor's girlfriend's wife's dog) change the gennou's orientation by turning it over, upside down, sideways, or whatever. Next, with your eyes still closed, grab the gennou with your hammer hand, and grip it properly.
If your grip is shaped as shown in the drawing with a flat at the back edge and a radiused front edge, you should be able to instantly orient the handle in your hand without any fumbling.
Then, with your eyes still closed, swing the gennou at the end of a stick of wood gripped in your off-hand fist, like it is a chisel. You should be able to strike the stick with the flat end of the gennou solidly and squarely on the first, or perhaps second try. Brian Holcombe did the first time. Perhaps it was some virtue exuded by his planing robe and embroidered planing slippers? Enquiring minds want to know.
If you miss the stick consistently, it may be you are not yet accustomed to the handle, or it may be that you need to make it shorter or longer. Perhaps the grip needs to be adjusted. It is absolutely worth figuring out.
Fitting Handle to Head
The handle's tenon is a friction fit in the eye. NO WEDGES.
If the eye is sloppy, true it with a file. If is curved a bit inwards (convex) at the center, no problemo, but if the walls are concave or twisted, some filework is called for. The better gennou blacksmiths, such as Kosaburo (Hasegawa san RIP) and Hiroki (Aida san), made/make their eyes very precisely centered, properly shaped, and very clean. This is a difficult thing to accomplish, and one detail mass-produced gennou consistently get wrong.
Sadly, there are a few famous Japanese blacksmiths that make gennou heads that are beautiful works of art on the outside, but sloppy on the inside. The most common defect is twist. Other medium-grade but well-know brand names have even worse QC problems such as centering problems or acute skiwampus. Such problems are difficult to deal with. Caveat emptor, Skippy. But so long as the eye is centered and square, judicious filework will alleviate most internal problems.
Shave the handle's tenon just a hair fat, and hammer it into the eye. It will take a lot of heavy blows, and there is risk of actually breaking the handle due to the stresses. The dome at the handle's butt is absolutely essential to this operation. You will regret it if you neglect to make it.
Do not be a country bumpkin and perform kigoroshi on the tenon. Kigoroshi works fine on softwoods, but simply damages and weakens hardwoods. There has been a lot of engineering research in Japan at the University level on the art of kigoroshi, and the facts are indisputable. I don't have time in this post to discuss the history and reasons behind this technique.
Don't use wedges. They will weaken and split the handle. Remember, you are making a high-quality tool, by hand, for a high-quality craftsman (thee). This is not piece-work in a Guangzhou factory.
I know that some of you have been taught, by people you respect, to let the tenon project from the eye. This is a matter of personal preference, but in my very well informed opinion, it makes as much sense as gluing AstroTurf onto the hood of a Porsche. I recommend you either cut the tenon flush, or leave it slightly recessed in the hole. The recessed tenon makes it easy to tap the handle a bit deeper and tighten it up when dry weather comes and shrinks the tenon.
If the tenon becomes loose, immediately fix it. Like right now. You can either tap the tenon further into the eye, or shim the tenon with quality paper. Cotton rag typing paper is best, and newspaper is worst. This will fix most problems.
Finishing the Handle
My sweat and/or skin oils reacts with some varieties of wood. Walnut turns my hands purple. My hands quickly turn oak black. So I apply a finish to my handles both to keep them looking nice, but more importantly, to slow changes in the handle's moisture. I have an involved finishing process I use which I do not have time to describe here. But I recommend you at least soak several coats of 100% thinned polyurethane into the wood over several days, sanding with wet/dry sandpaper while the wood is still wet, letting the slurry harden after each soaking coat. After wet sanding the last time down to bare wood, wipe off all the finish and slurry from the wood's surface. Be sure to seal the grain at the butt and eye tighter than a submarine's hatch. This is an understated but very durable and effective finish. Or you can leave the wood bare. Neither Captain Barbarossa nor I will say aught.
GennouHandleDwg85Kosaburo20160415.pdfKosaburo60Arm.jpgKosaburo60&120LengthComp.jpgKosaburo60HitsuCU.jpgKosaburo120HitsuCU.jpg

 Reply With Quote


 ).
).