Results 1 to 13 of 13

Thread: Poplar Bed Build- Part 2

  1. #1
    Join Date
    Feb 2011
    Location
    Carlsbad, CA
    Posts
    2,230
    Blog Entries
    2

    Poplar Bed Build- Part 2

    This is the second part of a poplar bed build for our oldest son.

    The horizontal rails are 6/4 and have a “cloud lift” profile on the bottom edge. Here is sawing out the profile and ripping the long edge in the center.


    Next are the panels for the headboard. Although I have a shooting board, for wide panels like this I prefer to put the work piece in my face vice and let gravity work for me in planning the end grain.


    Panels sized to final dimension, finish planing of the show surfaces and raised panel treatment completed. I didn’t take any pictures of the panel raising but it went fairly quickly with a combination of rabbit planes and a panel raising plane I made that actually worked!


    The panels are captured between the bottom and middle rails. I glued these pieces up separately so I could make sure the shoulders of the vertical stiles were aligned/straight, before gluing on the top rail and corner posts.
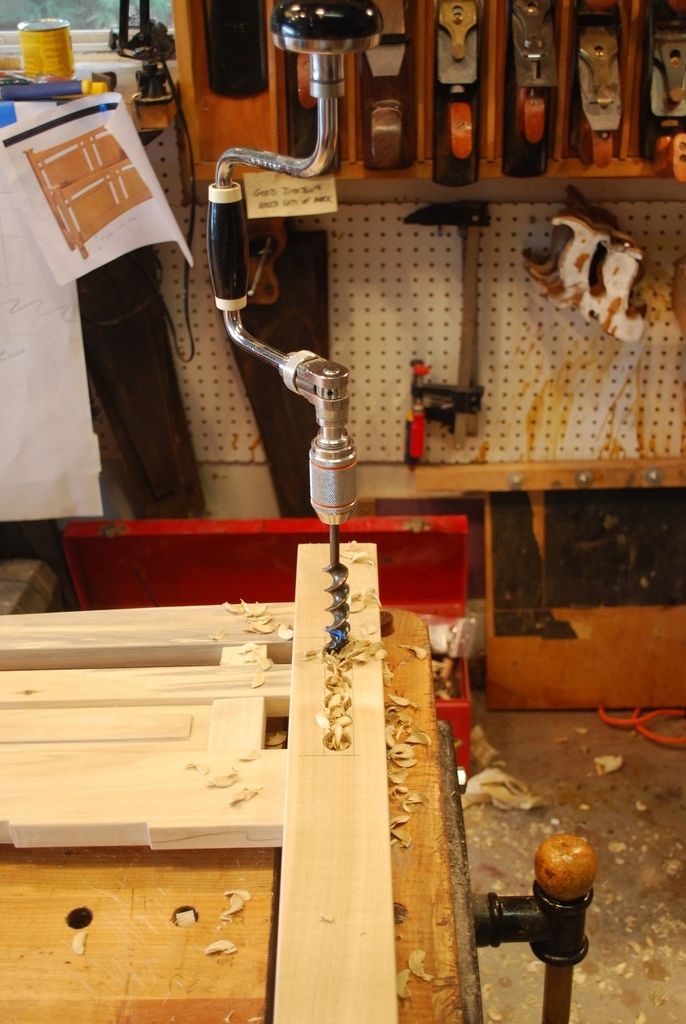


    Here’s mortising the bedposts for the side rails. For long mortises like this I actually get better results with the brace & bit versus the drill press. I find the auger bits easier to align with the sidewalls of the mortice.


  2. #2
    Join Date
    Feb 2011
    Location
    Carlsbad, CA
    Posts
    2,230
    Blog Entries
    2
    Here are the headboard and footboard after glue up. There are small caps that go on top of the bedposts but those will be added last after finishing.


    Side rails are about 80” long, 6/4. This is a shop made, single iron plane with a fairly heavily cambered blade. It takes nice thick shavings which makes the process go fairly quickly.


    I’m using morticed, “Hook like” bed hanging hardware to attach rails to head/footboard. For a little extra stability I cut stub Tennon’s on the end of the side rails and mounted the hooks on the end of the tennons.


    It took quite a bit of fiddling with excavating the mortises behind the hanger plates the hooks fit into, and the length of the Tennon’s on the side rails to strike a balance between getting a decent fit at the shoulder of the tennons, and still allowing the hooks to fully engage. Next time bed bolts!

    Here’s some pictures of the four caps for the top of the corner posts. Their mortised on the bottom to fit over the top of the post and have sort of a 4 sided taper to a point on top.


    I decided to saw the rabbits as workpieces were too small for planing. To avoid leaving any saw marks, I made the cuts a little shallow and split out the waste.


  3. #3
    Join Date
    Feb 2011
    Location
    Carlsbad, CA
    Posts
    2,230
    Blog Entries
    2
    4 sided taper for the tops of the caps; I sawed the rip dimension (with the grain) and paired the cross grained surfaces with a chisel and block plane for cleaning up.


    Finish is based on advice here from a number of helpful folks on SMC: Watco Natural oil/varnish, wipe on gel stain and semi-gloss polyurethane varnish. The color matched fairly well a coffee table I made earlier and some of the figure is still visible.
    After the paste wax went on it actually looks pretty decent, but I still really sweat adding color and much prefer transparent finishes. Since the budget called for this bed to be made out of poplar versus a hardwood, I’ll settle for how this turned out.


    Thanks for looking.

    All the best, Mike

  4. #4
    Join Date
    Aug 2013
    Location
    Princeton, NJ
    Posts
    7,296
    Blog Entries
    7
    Nice work Mike, the project is coming along well. I see your Kanna is getting put to use!

    Just saw the finished pics, the project came out nicely and I like the look of that finish.

    One comment if I can be so bold; the support legs, I've mostly seen them done with one long support running front to back, which is then supported in the center or near the center with one or two legs. Then they are invisible from the outside.
    Last edited by Brian Holcombe; 06-21-2016 at 7:09 PM.
    Bumbling forward into the unknown.

  5. #5
    Join Date
    Jun 2005
    Location
    San Diego (North Park)
    Posts
    63
    GREAT CRAFTSMANSHIP, Mike!! I really appreciate your photo logs of projects. Very inspirational! Your son will treasure this heirloom.

    Don

  6. #6
    Join Date
    Oct 2004
    Location
    SoCal
    Posts
    866
    V ery well done Sir! Appreciate all the pics, I do.

  7. #7
    Join Date
    Jul 2014
    Location
    Edmond, Oklahoma
    Posts
    1,751
    Mike,

    Very nice!

    Stew

  8. #8
    Join Date
    Feb 2011
    Location
    Carlsbad, CA
    Posts
    2,230
    Blog Entries
    2
    Quote Originally Posted by Brian Holcombe View Post

    One comment if I can be so bold; the support legs, I've mostly seen them done with one long support running front to back, which is then supported in the center or near the center with one or two legs. Then they are invisible from the outside.


    Brian, yours is a fantastic idea, thanks for your typically insightful suggestion! It wasn't until I looked at these pictures that I realized the side to side supports are unnecessarily too visible from the ends of the bed. This is a characteristic blow it for me – I rush to finish a project just because I like to keep my hands busy, without thinking about what it will look like– I hate when that happens! If I knew how to link to a scene of Homer Simpson slapping his forhead and saying " Doouughh!", this is where I would put it.

    I will try and put something together just as you suggest, which will make me regret the nasty work of building these supports out of Doug Fir 2 x 4 even more. Realistically I have no room to complain; I routinely have projects a that end up as firewood. This will just be another in a long list.

    If this is my biggest problem today, I'm a lucky guy!

    BTW, many thanks to John Kananis and Fred Skelly for their super helpful advice about finishing for this project, which is always a challenge for me. Actually "advice" doesn't fairly describe their contribution, I pretty much relied on doing exactly what they suggested and I'm absolutely confident I would have totally blown it without them. Thanks guys for your help!

    All the best, Mike
    Last edited by Mike Allen1010; 06-21-2016 at 8:36 PM. Reason: credit where it's due

  9. #9
    Join Date
    Aug 2010
    Location
    USA
    Posts
    5,582
    Quote Originally Posted by Brian Holcombe View Post
    Nice work Mike, the project is coming along well. I see your Kanna is getting put to use!

    Just saw the finished pics, the project came out nicely and I like the look of that finish.

    One comment if I can be so bold; the support legs, I've mostly seen them done with one long support running front to back, which is then supported in the center or near the center with one or two legs. Then they are invisible from the outside.
    Mike, I LOVE EVERYTHING except the center supports.
    Very nice project!

  10. #10
    Join Date
    Oct 2010
    Location
    Australia
    Posts
    2,534
    Nice work Mike; reminds me somewhat of the replacement bed base I built for my teenage daughter 2 years ago. The earlier base was purchased brand new, but after 2 to 3 years of use, the poorly supported slats were beginning to bow in the middle. She's only a slim lass. The bed ends were recycled from the original base.

    The bed ends are affixed separately to the base to allow them to be removed during transit.

    Stewie;


    Last edited by Stewie Simpson; 06-21-2016 at 9:57 PM.

  11. #11
    Join Date
    Aug 2013
    Location
    Princeton, NJ
    Posts
    7,296
    Blog Entries
    7
    Mike, glad to hear that my comment was well received and it does not take away from your project, which is absolutely gorgeous! Your son is no doubt happy to be receiving his new bed, I'm sure.
    Bumbling forward into the unknown.

  12. #12
    Mike - as always, fantastic work. Thanks for taking the time to share the pictures and process.

    Bob

  13. #13
    Join Date
    May 2015
    Location
    NJ
    Posts
    1,405
    Hey, Mike - thanks for the kudos, much appreciated but you did all the work, all Fred and I did was type a few sentences. Looking great; can't wait to see what you do with the center support. Also, try a coat (next time) of sanding sealer between the oil and the gel (it will help a lot).

Posting Permissions

  • You may not post new threads
  • You may not post replies
  • You may not post attachments
  • You may not edit your posts
  •