Page 1 of 2 12 LastLast
Results 1 to 15 of 17

Thread: Project: Bee Hive Comb Frames

  1. #1
    Join Date
    Mar 2003
    Location
    SE PA - Central Bucks County
    Posts
    65,874

    Project: Bee Hive Comb Frames

    Ask any apiarist (beekeeper) who makes their own woodenware (hive components), including those in our midst here at SMC, and they will tell you that the one thing they don't "make" themselves are the frames that go in the hive where the bees make comb. It's the one thing that most folks buy, either as unassembled "kits" or built and ready to use. The level of labor required for making them from scratch is huge...and I can attest to that personally based on this little project. Professor Dr. SWMBO buys them, too, but I decided that for "grins and giggles", I'd make up some from scratch as an exercise in thinking through a project with some interesting dimensional requirements and joinery. And coincidentally, we wanted a few that were different that the majority we use already for some particular purposes...these would be "foundationless"...meaning there is no pre-supplied surface of wax or plastic that defines the comb structure for the bees. They get to "roll their own" with these frames which sometimes has benefits.

    This is a frame style with a pre-installed foundation for reference (from a supplier on-line catalog):


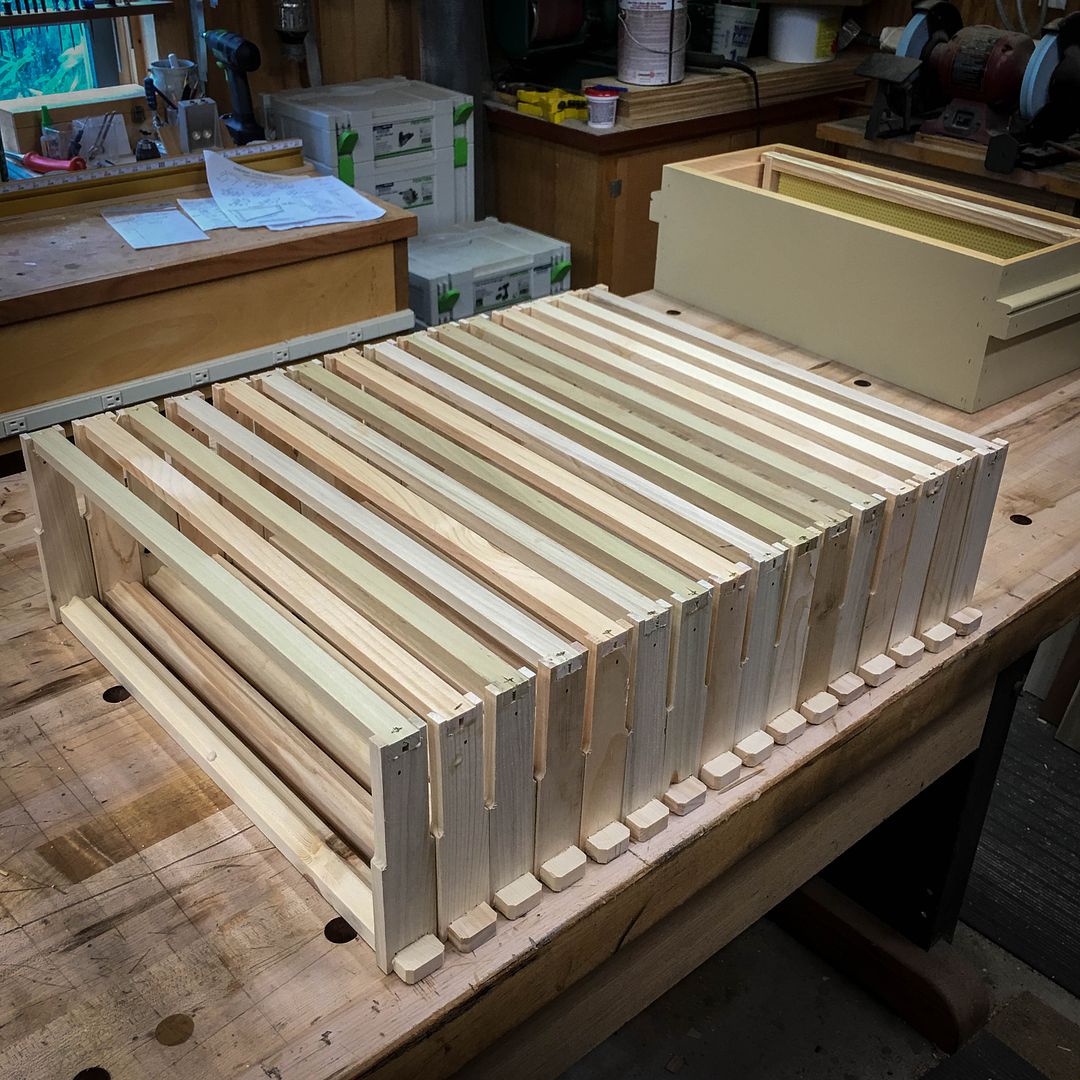
    What I build here in this project looks like that, but doesn't have the yellow or black sheet of "foundation" installed; rather, there will be a milled feature on the underside of the top bar where the diligent bees (who are all girls, BTW ) can easily attach natural comb. I'm creating a set of 16 of these frames and it also involves building some jigs.

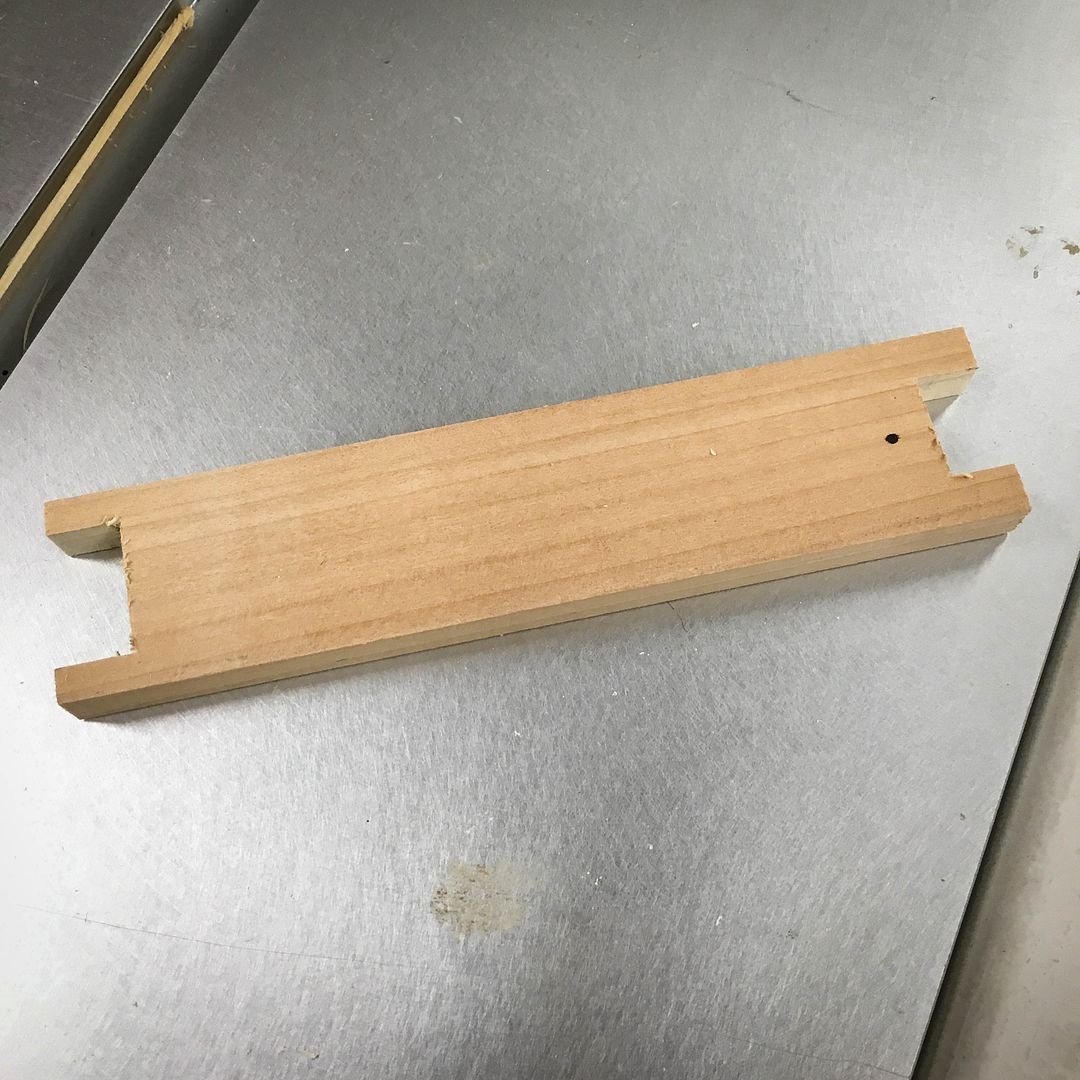
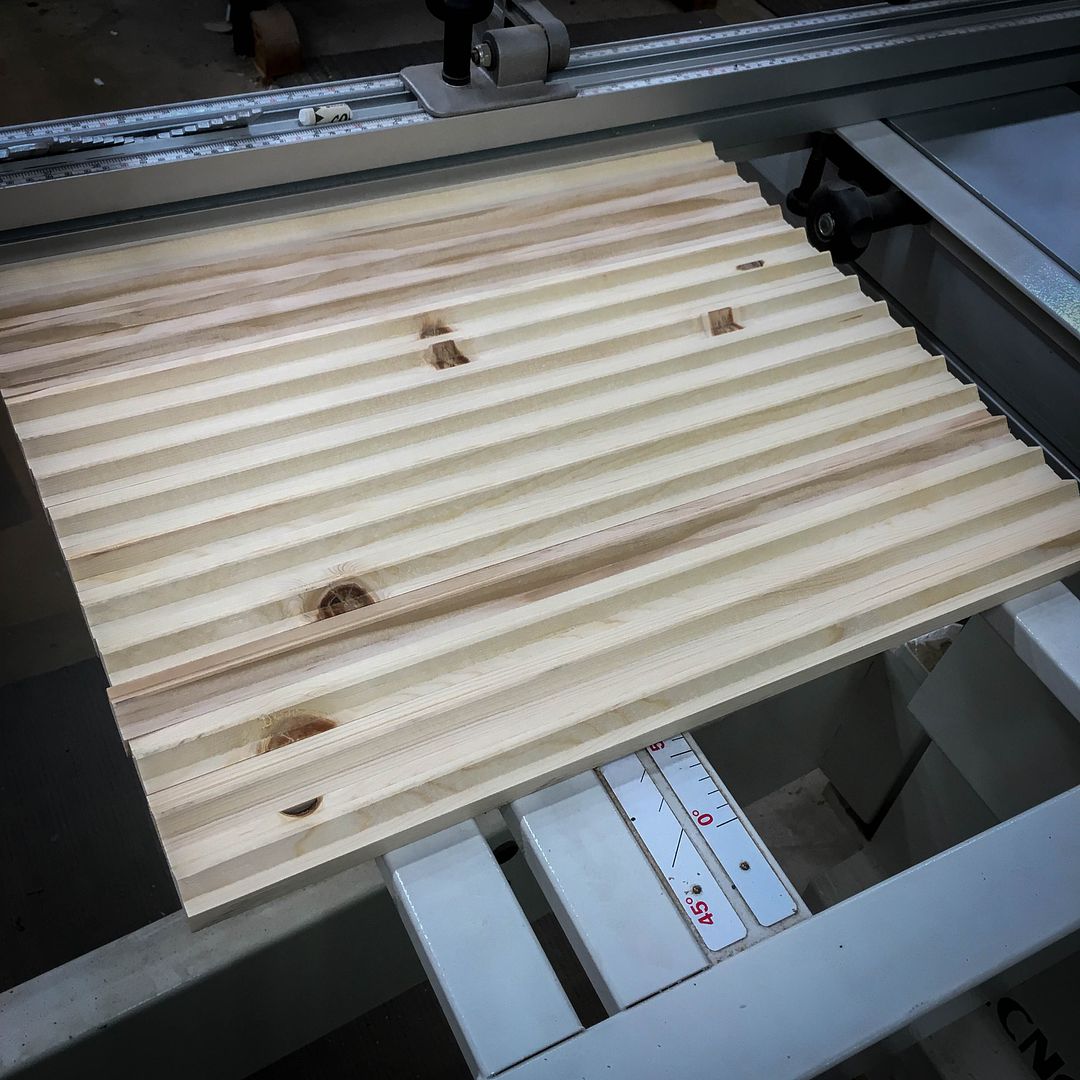
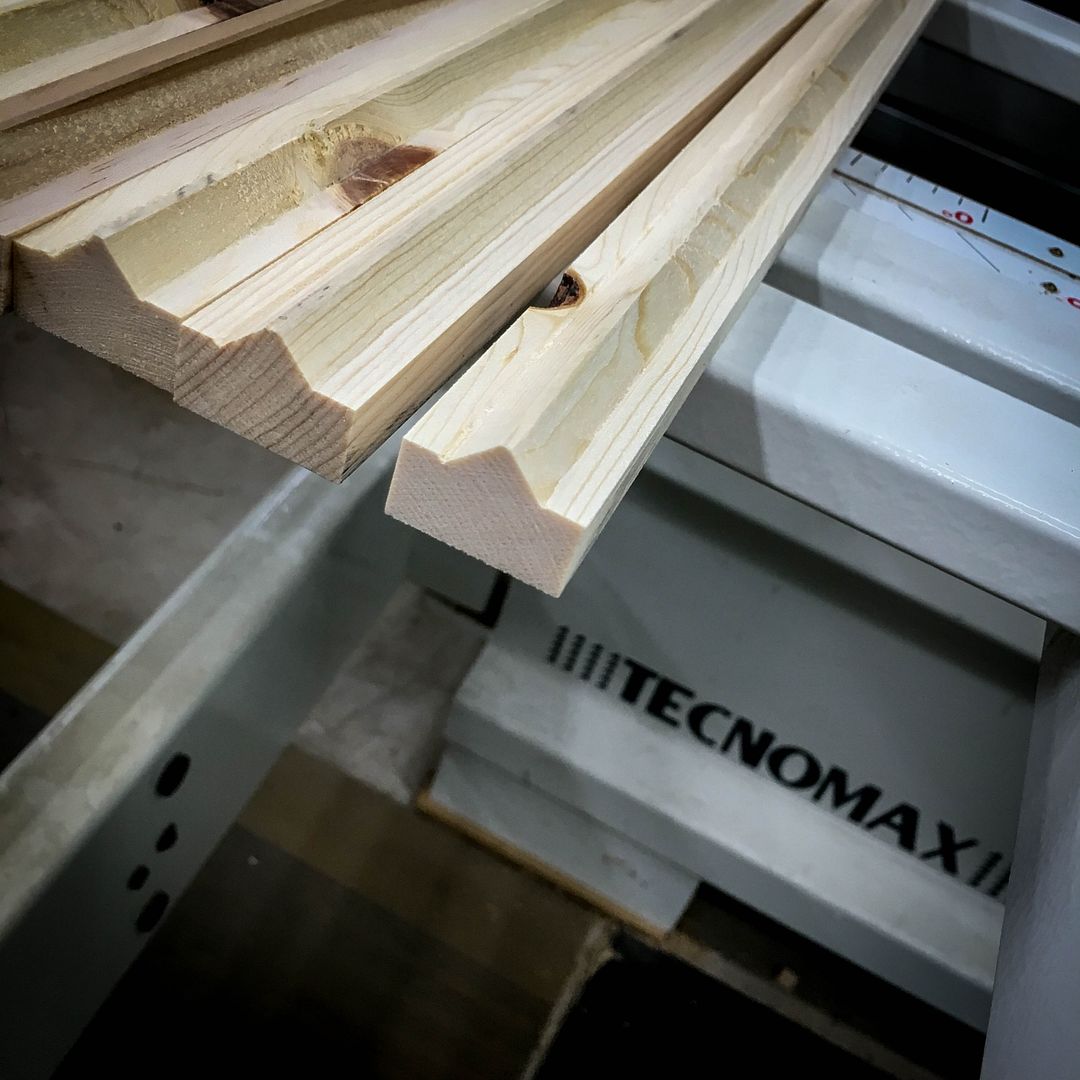
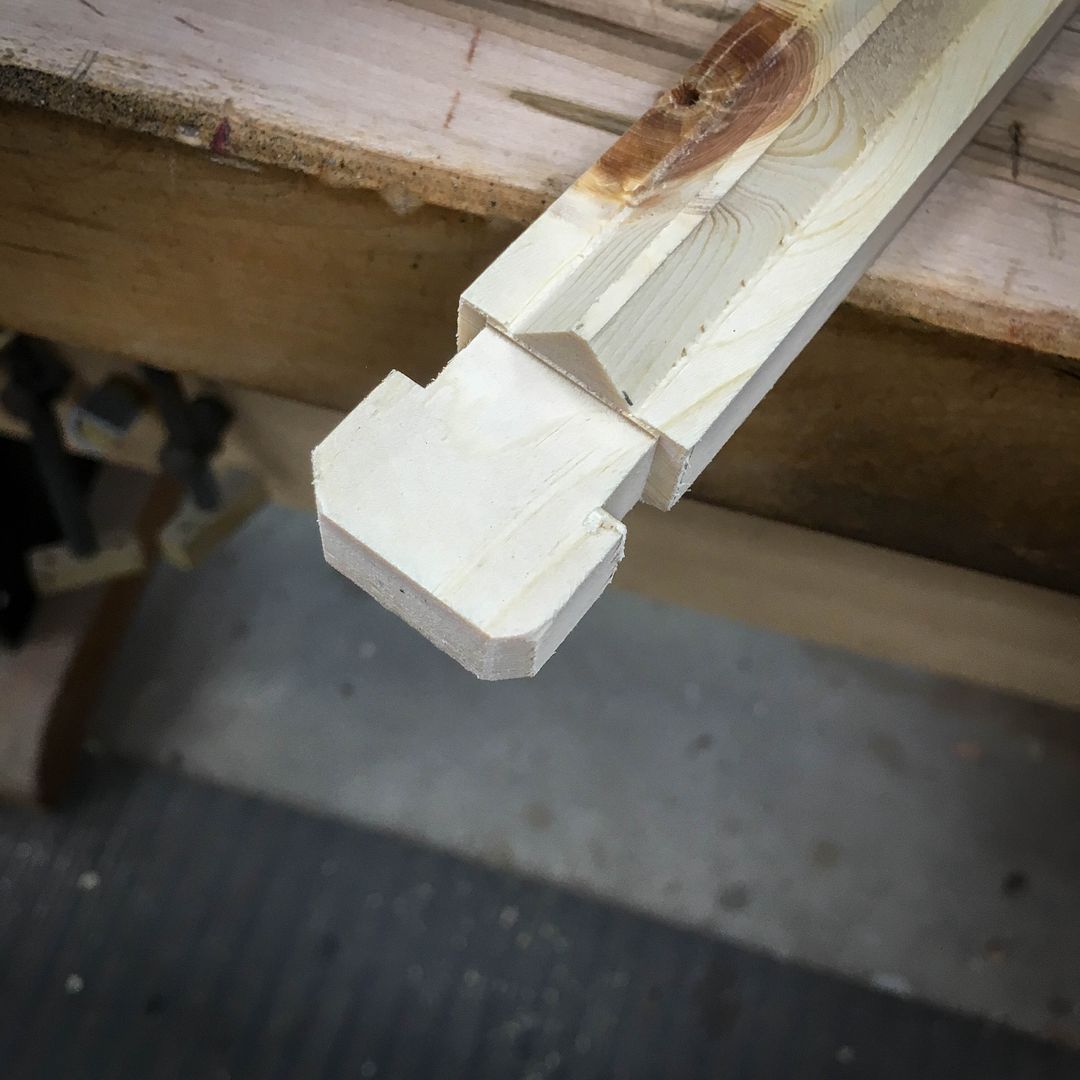
    These are the top bars for the frames. They start out at 3/4" thick and 1 1/16" wide. Using a 45º veining bit in the router table set 1/4" high from the table top, two passes were made off-set from the center to provide about a 1/16" wide flat spot with sloping sides on what will be the underside of the top bar.


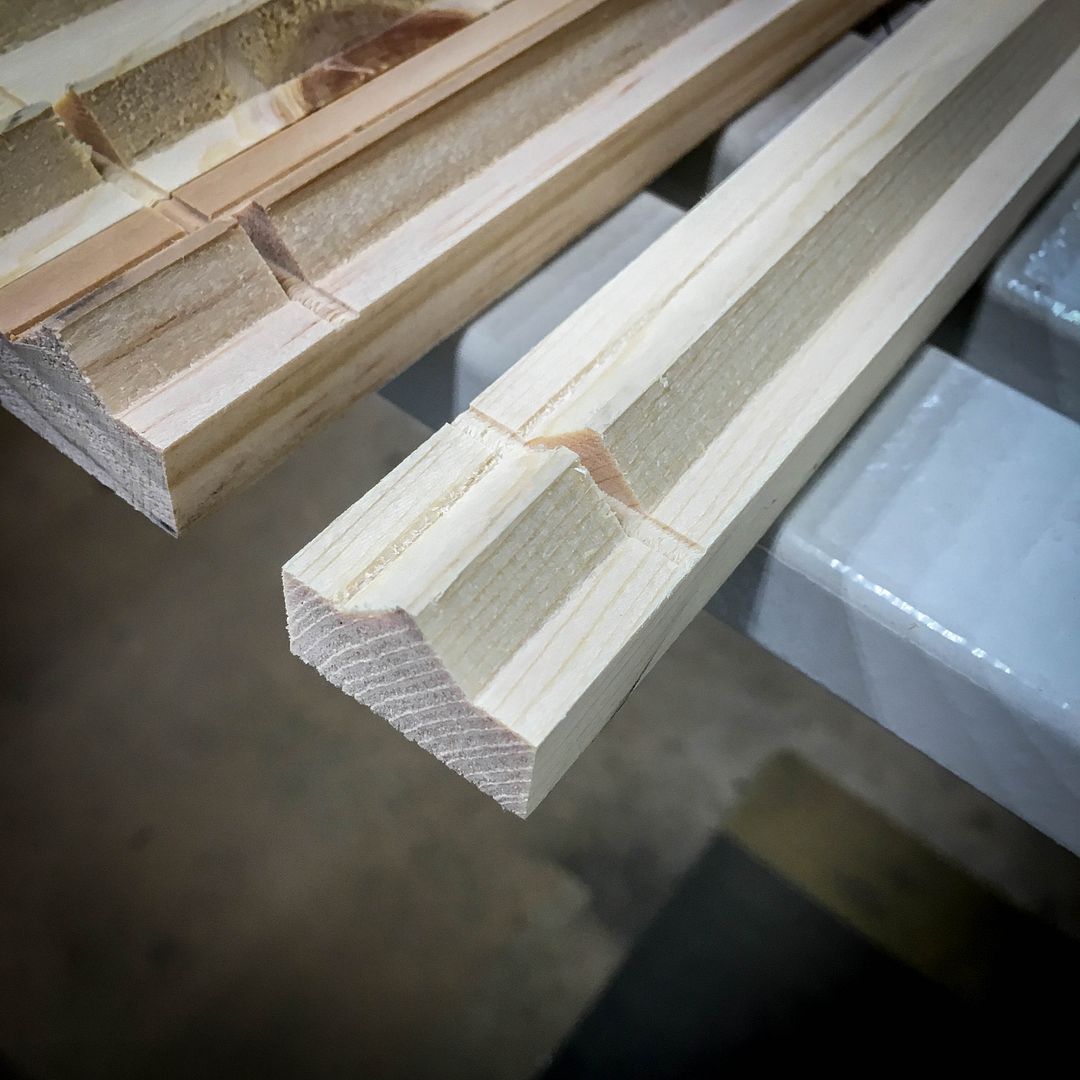
    That first step left material along the edges of the top bars that had to be removed...it was subsequently done by running the pieces along the saw fence with the blade raised just hight enough to clip off the excess material and leave those edges at about 1/2" thick. This is the end result for the profile:


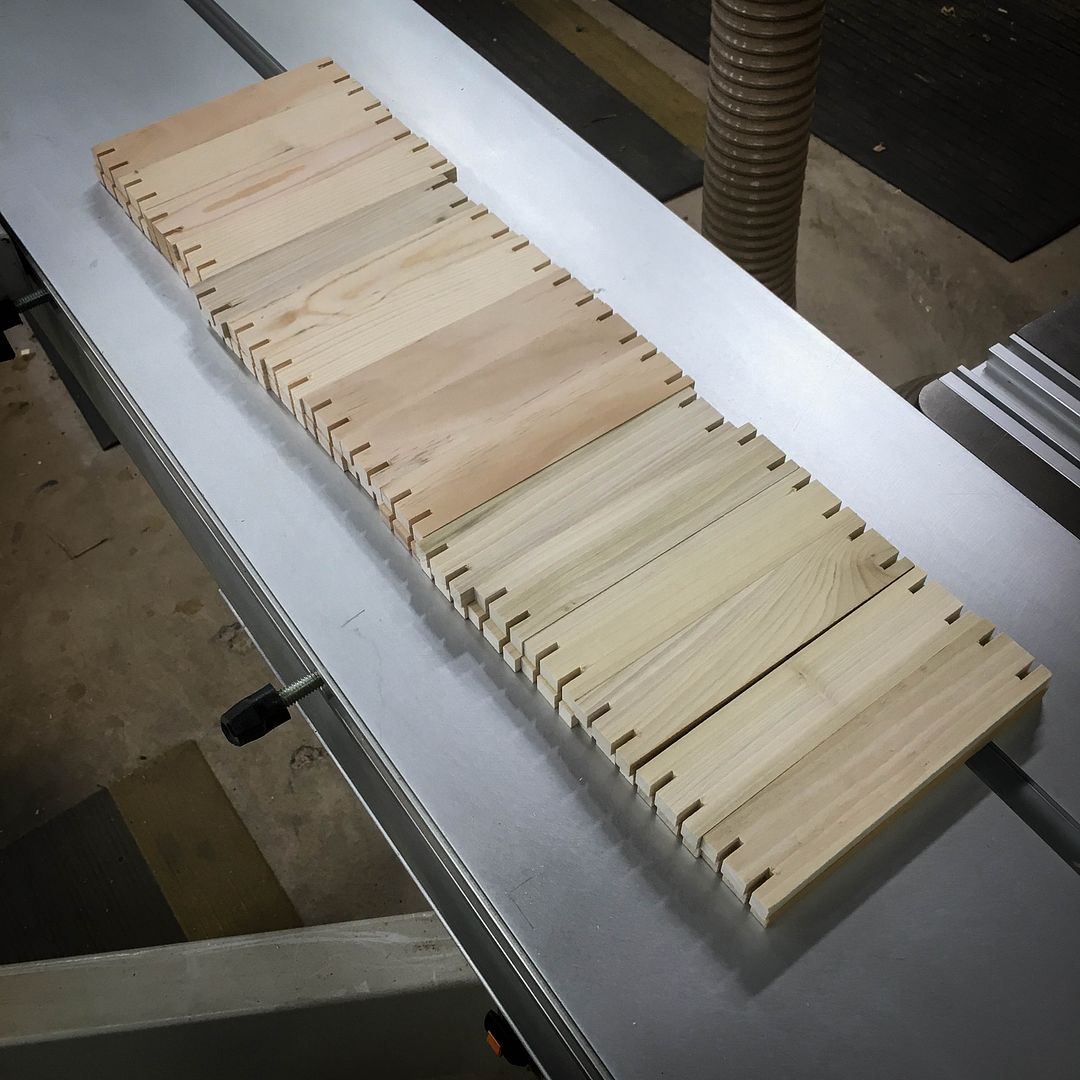
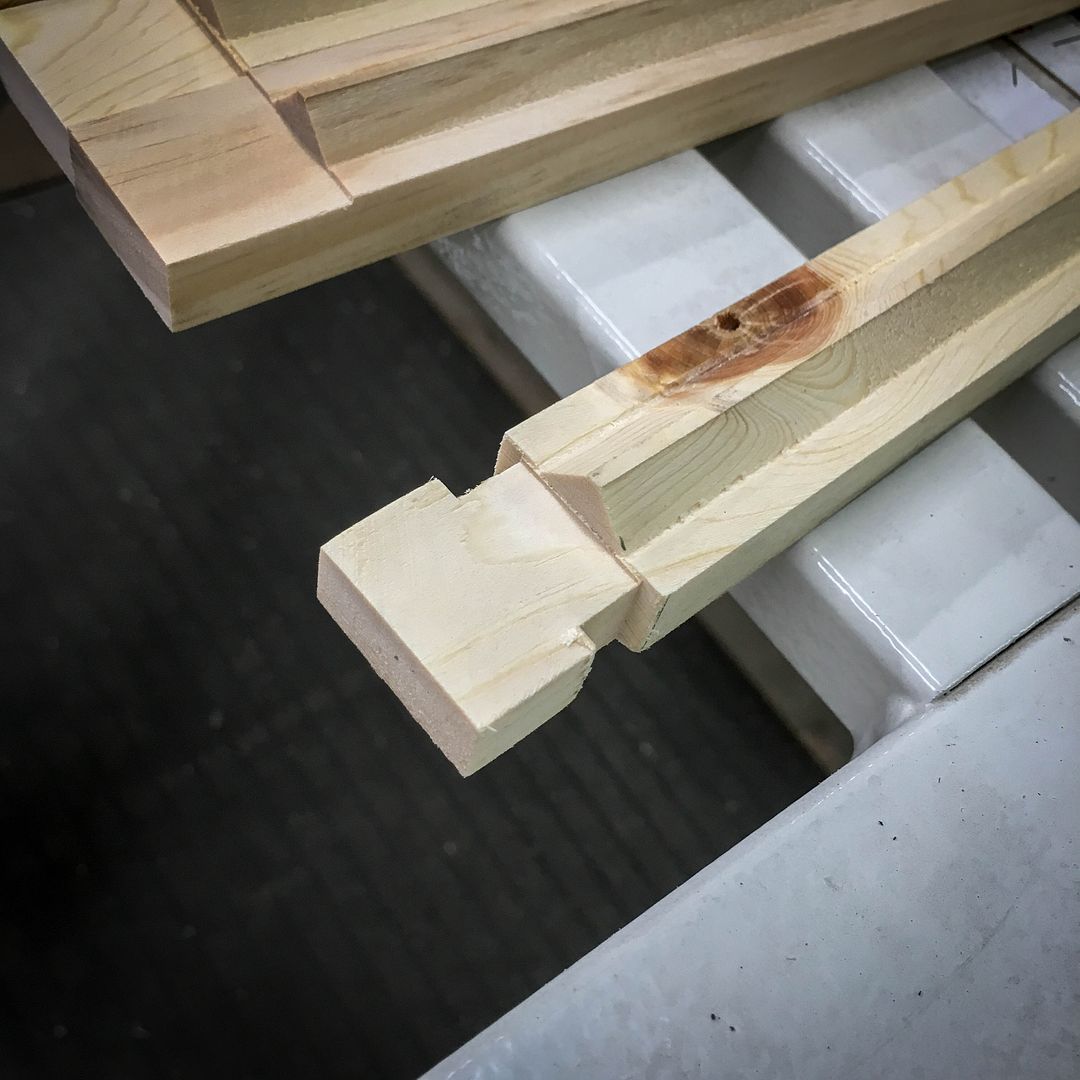
    Subsequent to that, a scoring cut was made using the miter bar to define material that would be removed to make the ends of the bar 1/2" thick:


    Using a jig that holds the workpiece securely and provides a larger area for support, each end of the bars was trimmed to the scoring line with the resultant 1/2" thickness:


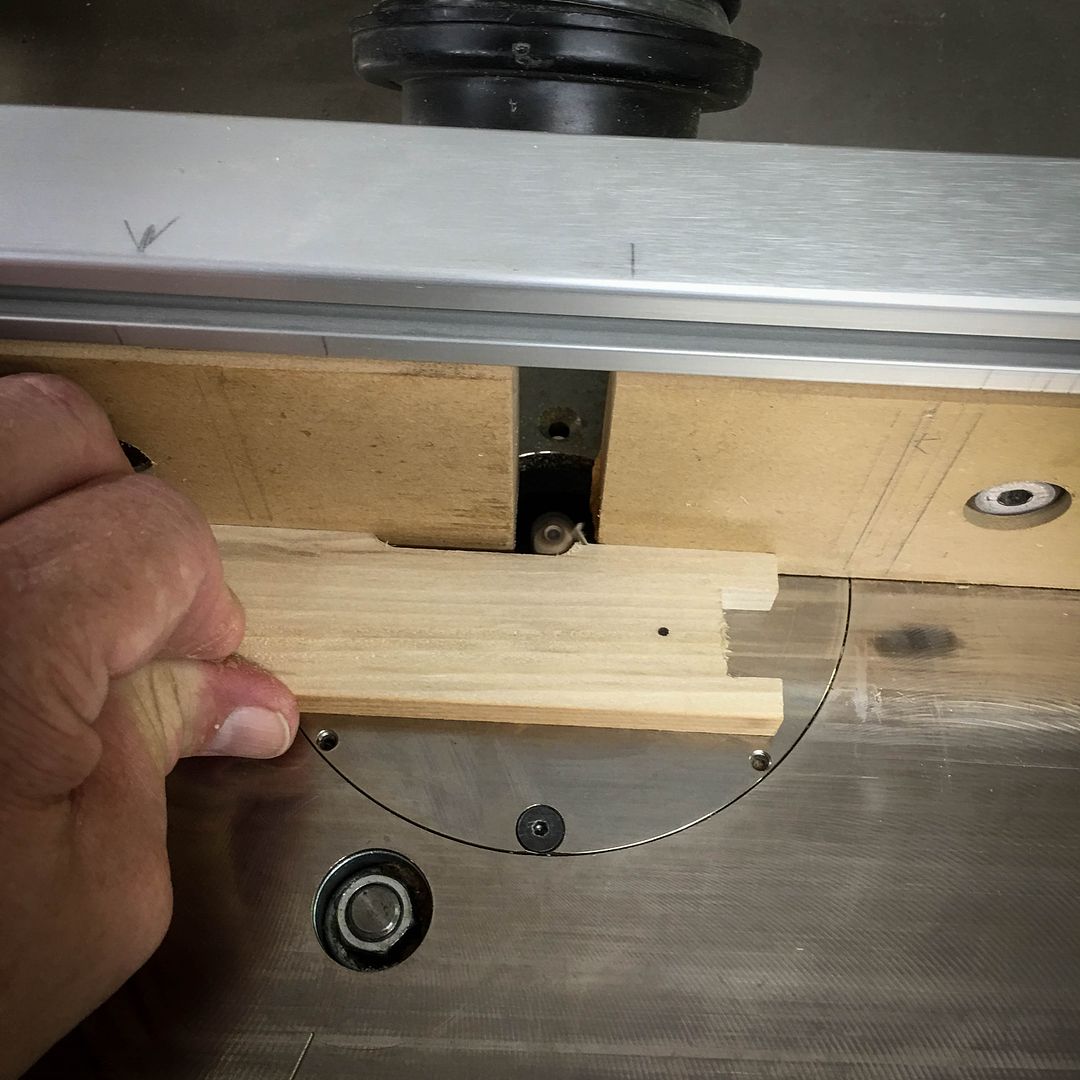
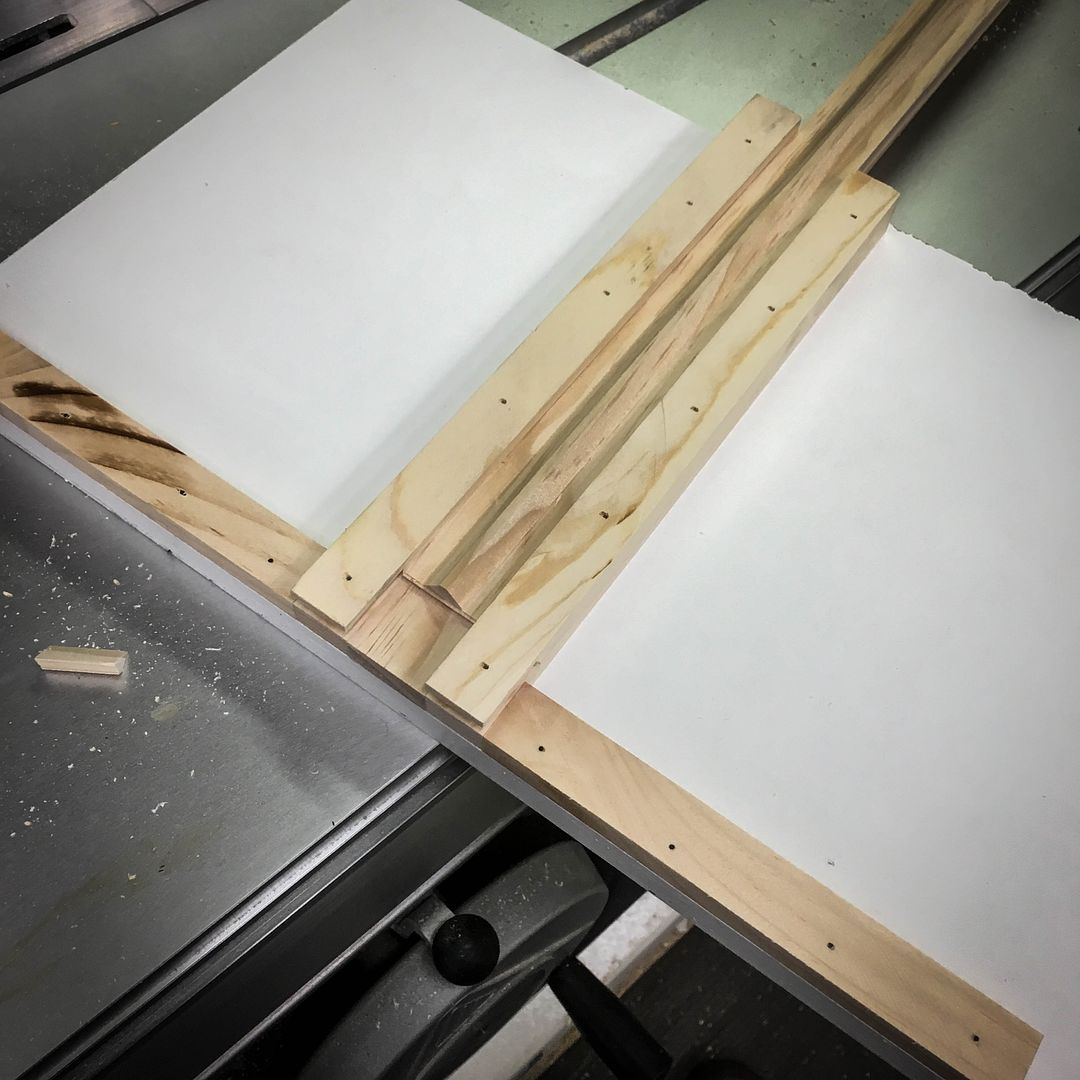
    This is the jig used to allow a 3/8" wide by 3/32" deep groove to be place on the sides of the top bar to key in the end pieces that you'll see created in a bit. In all honesty, this was the one operation that I mistakenly did after milling the profile on the bottom of the bars...it would have been much easier to do this step first. I just wasn't thinking things through. Fortunately, there was enough material to keep the piece stable when the "pointy" profile was toward the jig fence:


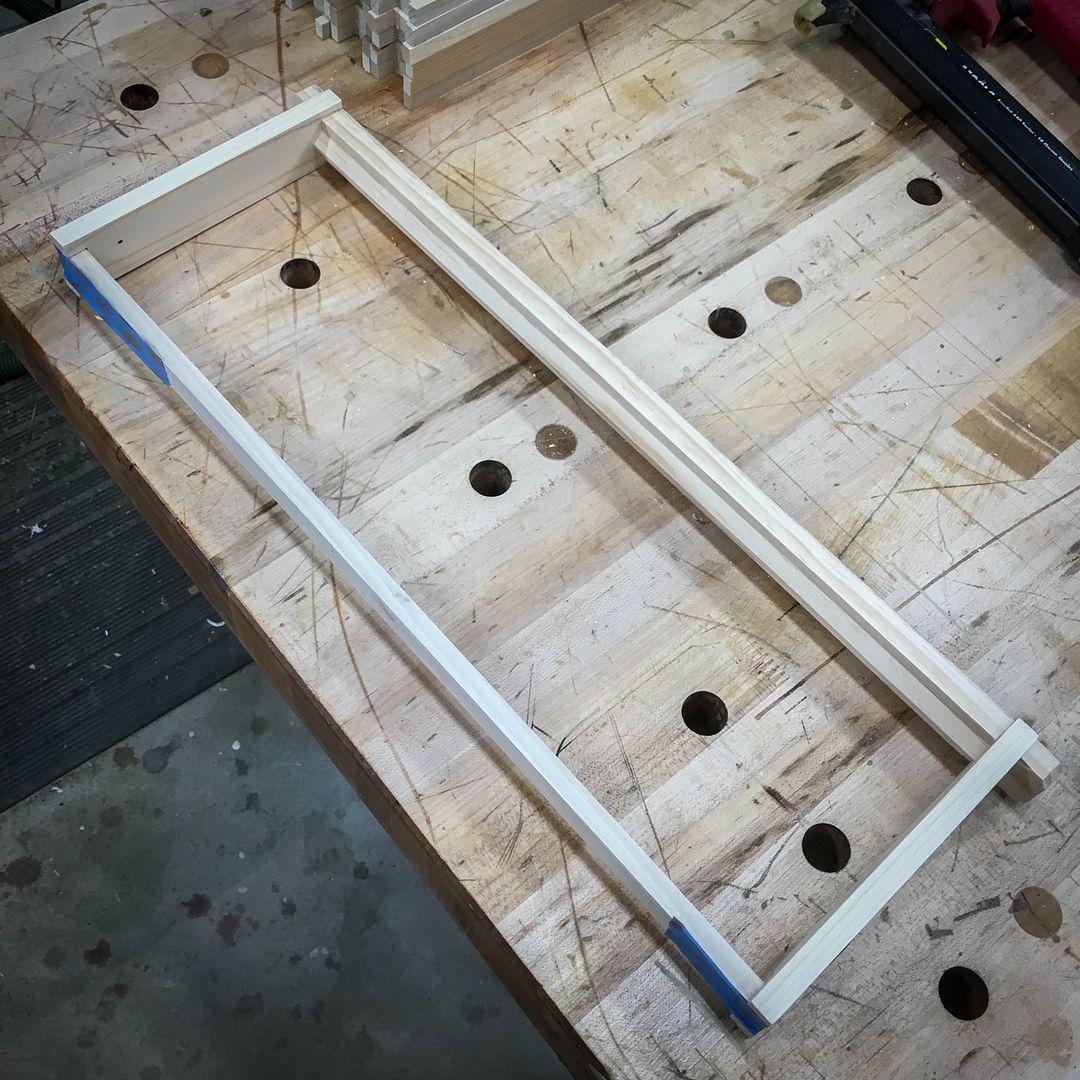
    The result from this operation is this:


    Finally, to complete the top bars, the corners were knocked off at the miter saw in a two step process...45º angled right catches two opposing corners and then flipping to 45º left got the other two opposing corners. Stop blocks were set to make this a quick, repetitive and safe operation.


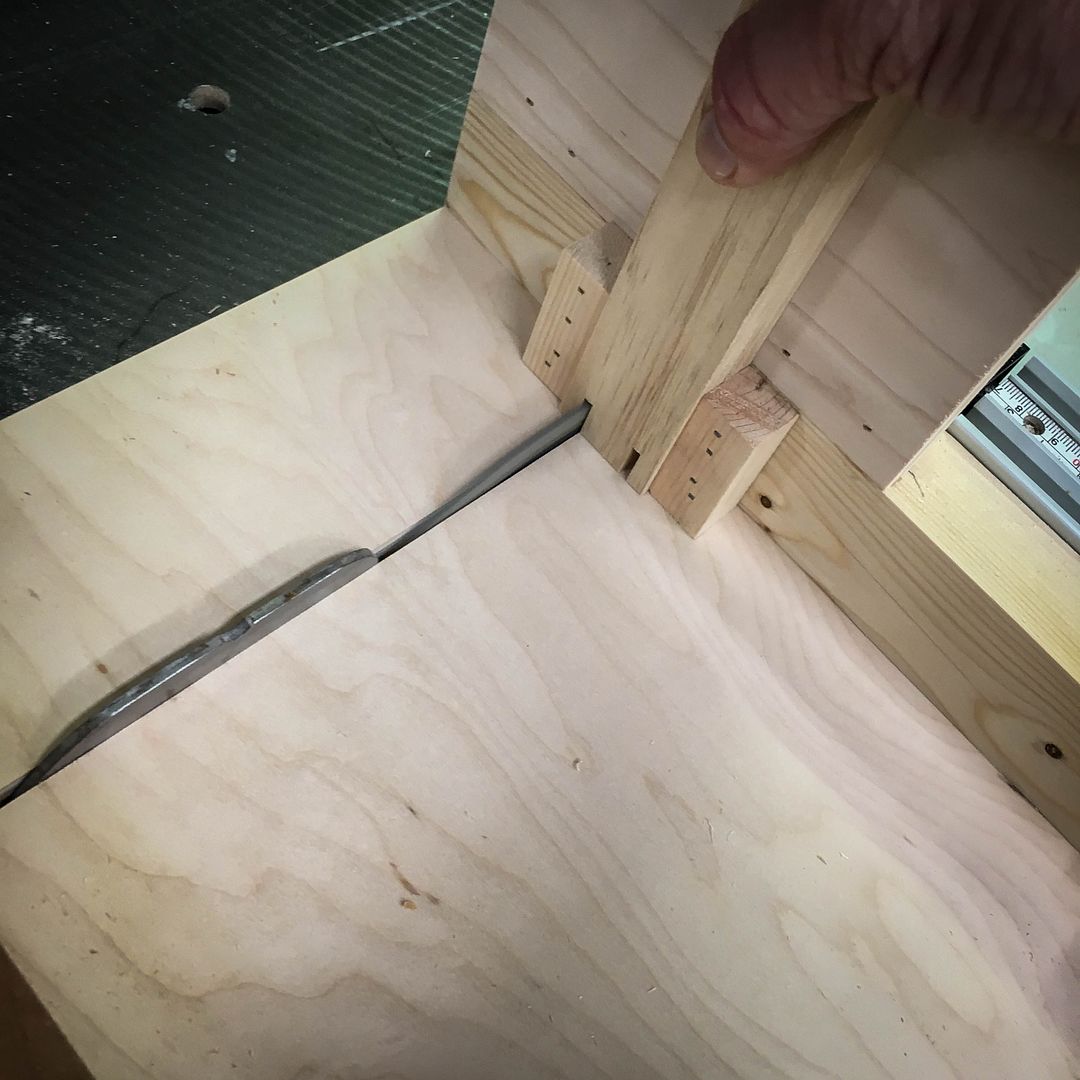
    The end pieces needed to be notched to fit into both the top bar and to contain a bottom bar...so it was "build a jig time". These cuts define the width of the notches and are cut to the depth that the notches will be. This is the "top" notch which is wider so it can slip around the top bar while being contained by those small notches made in the top bar earlier at the router table


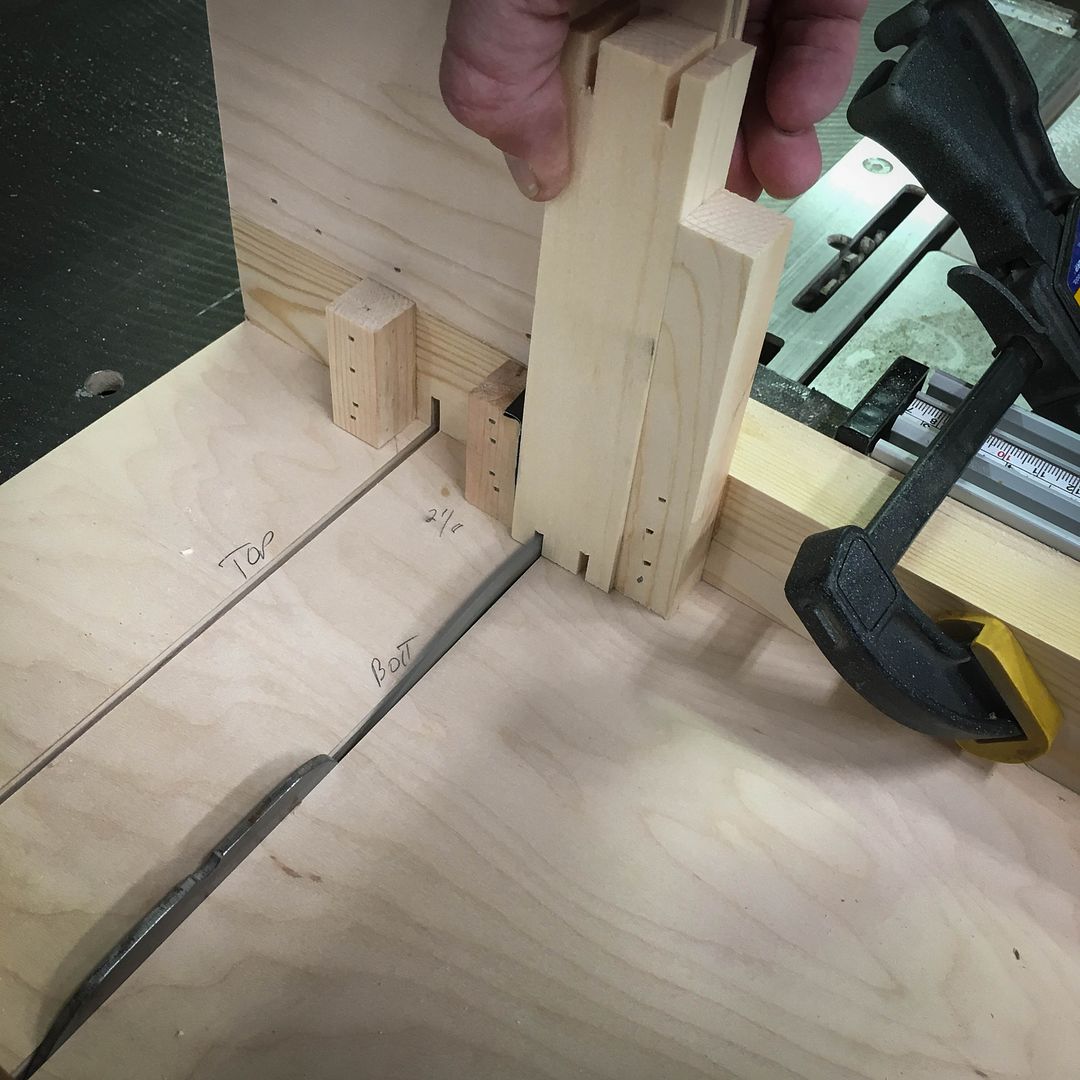
    By moving the jig over an exact amount, a second slot could be cut to use for the notch definition for the "bottom" of the end pieces. Notations were made on the jig for the exact settings of the stops on my miter bar so this could be repeated in the future if I decided to abuse myself again and make more of these things...


    At this point, there are 32 of those end pieces ready to have the notches cut out using a coping saw with the workpiece held in the bench vice. I marked the "bottom" ends of all of these on both sides with a simple black dot with a sharpie to be sure that there was no mixup with a later operation at the router table
    --

    The most expensive tool is the one you buy "cheaply" and often...

  2. #2
    Join Date
    Mar 2003
    Location
    SE PA - Central Bucks County
    Posts
    65,874
    Notch completed and you can see the mark I mentioned


    Just for kicks...a dry assembly "to be sure"...the connection of the ends to the top bar is very snug which is exactly what is needed


    One last operation was required on the end pieces and that was to relieve the edges on the lower half of the sides. This is to create proper "bee space" (about 3/8") between the frames so that bees can transit easily between things. Any wider than that, however, and they "build stuff". Who knew that math and measurement were critical to honeybee management?


    I didn't show creation of the bottom bars, but they are basically 3/8" thick and 3/4" wide. Easy to make. They do have a 1/8" wide sawkerf groove down the middle of the "top" of them to provide opportunity for adding a thin bar of wood to aid in anchoring comb. That same groove would normally be used to anchor the foundation shown in the very first photo up above. It only takes a second to cut it.


    At that point, it was time to assemble the frames. Glue and 1" narrow crown staples did the deed. The ends fit so snugly into the top bar that I didn't need to make a jig to hold things as is desired with many of the commercial unassembled "kit" frames for for when putting hundreds of them together 10 or 20 at a time.


    And that, my friends, was an interesting and fun project...that I don't intend to repeat often. But it was a good woodworking experience and that's why I did it...
    Last edited by Jim Becker; 07-03-2016 at 9:04 PM.

  3. #3
    Join Date
    Feb 2003
    Location
    McKean, PA
    Posts
    15,644
    Blog Entries
    1
    Jim, I would be interested in seeing the progress that the bees make on those frames as they draw out comb.
    Lee Schierer
    USNA '71
    Go Navy!

    My advice, comments and suggestions are free, but it costs money to run the site. If you found something of value here please give a little something back by becoming a contributor! Please Contribute

  4. #4
    Join Date
    Feb 2003
    Location
    McKean, PA
    Posts
    15,644
    Blog Entries
    1
    Since you made a jig to hold the parts in a vertical position to make the two saw cuts, why not use a dado blade with that jig and save the time cutting each piece with the jig saw?
    Lee Schierer
    USNA '71
    Go Navy!

    My advice, comments and suggestions are free, but it costs money to run the site. If you found something of value here please give a little something back by becoming a contributor! Please Contribute

  5. #5
    Join Date
    Mar 2003
    Location
    SE PA - Central Bucks County
    Posts
    65,874
    Quote Originally Posted by Lee Schierer View Post
    Since you made a jig to hold the parts in a vertical position to make the two saw cuts, why not use a dado blade with that jig and save the time cutting each piece with the jig saw?
    Simple answer...I don't own a dado blade anymore. While my MiniMax slider "can" accomodate one (many sliders cannot), i decided to use other methods rather than build custom table inserts. The jig took about five minutes to build.
    --

    The most expensive tool is the one you buy "cheaply" and often...

  6. #6
    Join Date
    Mar 2003
    Location
    SE PA - Central Bucks County
    Posts
    65,874
    Quote Originally Posted by Lee Schierer View Post
    Jim, I would be interested in seeing the progress that the bees make on those frames as they draw out comb.
    This particular design for the top bar is an alternative to the old "put pieces of popsicle sticks" in the slot of a standard frame method for foundationless frames. It's hard to come by commercially based on my searches and made for a woodworking opportunity. Ali wants to try some foundationless with one of our colonies and we needed some for a swarm trap, too. I will let you know how things work out...it may be awhile, however...as all three colonies got additional space recently and there may or may not be additional expansion this season.
    --

    The most expensive tool is the one you buy "cheaply" and often...

  7. #7
    Join Date
    Jun 2008
    Location
    So Cal
    Posts
    3,775
    That's some sweet work for a sweet treat!

  8. #8
    Join Date
    Mar 2003
    Location
    SE PA - Central Bucks County
    Posts
    65,874
    Quote Originally Posted by Andrew Hughes View Post
    That's some sweet work for a sweet treat!
    The "sweet treat" will have to wait until the second year...the colonies have to build up enough to survive the winter, so any honey they do produce will stay in the hives for food unless we have an unusually good start. I have to say...this is an absolutely fascinating activity and I'm glad that Professor Dr. SWMBO got involved. It's something that also fits her own personality, being heavily involved in science in her work and her natural inclination to learn new things constantly and deeply.

    Of course, the other interesting thing is that if you ask 10 beekeepers a question...you'll get back (at least) a dozen different answers.
    --

    The most expensive tool is the one you buy "cheaply" and often...

  9. #9
    That's a lot of work. Congratulations for taking that on. What I did with the top bar (when I made a few frames) was cut a groove into the center of the bar and inset a piece of wood into the groove. It doesn't have to come to an arris (as you did), a piece of wood about 1/8" thick works fine for the bees to attach the comb to.

    Less work and less loss of wood.

    Mike
    Go into the world and do well. But more importantly, go into the world and do good.

  10. #10
    Join Date
    Mar 2003
    Location
    SE PA - Central Bucks County
    Posts
    65,874
    Quote Originally Posted by Mike Henderson View Post
    That's a lot of work. Congratulations for taking that on. What I did with the top bar (when I made a few frames) was cut a groove into the center of the bar and inset a piece of wood into the groove. It doesn't have to come to an arris (as you did), a piece of wood about 1/8" thick works fine for the bees to attach the comb to.

    Less work and less loss of wood.

    Mike
    I originally was going to do that, Mike, since it would be easier and faster. But then I considered that I wanted to try something more complex "lust because". Thinking through how to create that profile was a good learning experience which theoretically can benefit other projects later. I assure you that if I ever do make any more frames...and there's little incentive to do so with them costing about a buck and a half to buy unassembled...I'd take the easier road now that I've done the "windy" one.
    --

    The most expensive tool is the one you buy "cheaply" and often...

  11. #11
    Join Date
    Feb 2013
    Location
    Duvall, WA
    Posts
    706
    "...an interesting and fun project...that I don't intend to repeat often..."

    But now that you've got the experience doing it and the jigs to make it easier, how can you resist?

    Seems like it was at least a good distraction from your usual projects.

  12. #12
    Join Date
    Mar 2003
    Location
    SE PA - Central Bucks County
    Posts
    65,874
    Mike, that's a good question and I'll clarify...I wouldn't make them again for "general" use, but I would make a few if there was a specialized need. These things are major-labor intensive and even the material (if I were buying rather than using scrap) costs more than just buying the commercial, production made frames for a buck and a half unassembled. That said, it was indeed a really good experience for both technique and thinking things through.
    --

    The most expensive tool is the one you buy "cheaply" and often...

  13. #13
    Join Date
    Aug 2012
    Location
    Missouri
    Posts
    2,152
    Hi Jim, that is very interesting. I have seen hives and frames before but never realized how complicated the frames are. Never bothered to look closely at them. Maybe I'll pay more attention in the future, without the bees around.
    Jim

  14. #14
    Join Date
    Feb 2008
    Location
    E TN, near Knoxville
    Posts
    12,298

    bees this year?

    Jim, how are your hives doing this year? After a banner year last year I've had all kinds of issues this summer. One hive went to almost nothing then went queenless so I combined it with another.

    One went queenless and I didn't catch it in time so I had laying workers. I used the double screen technique to let a strong hive take care of the laying workers and bought new queens, then ended up combining that hive anyway with another.

    With two new queens in hand ($25 each plus shipping!) I did one split from an overloaded hive (both are doing well) which then left me with a spare queen. Rather than split another strong hive I decided this late in the season I'd rather keep the strong hive than split into two weaker hives so I gave away the second queen to another beekeeper more desperate than me!

    Last year I had 28 gallons of honey, mostly from one hive. A couple of years ago I had gone to double-deeps plus a shallow for the brood chambers which takes away from the honey but sure gives the bees plenty for overwintering. Since the nectar flow this year has been so bad I'm unlikely to get more honey than we use ourselves. On the positive side, my original purpose for starting beekeeping years ago is fulfilled - I see plenty of bees in my crops!

    How are yours doing? Are the top bars working out? Fantastic (and moderately insane) wood work, BTW! :-)

    JKJ

  15. #15
    Join Date
    Mar 2003
    Location
    SE PA - Central Bucks County
    Posts
    65,874
    John, it's been an interesting start to this wonderful activity. The first colony was from a package of Italians shipped up from Georgia. First queen didn't make it very long. Second queen didn't make it very long, either, but at least produced for awhile. At that point, we let the bees figure it out. That colony is queen-right now and (slowly) building back up. The good news is that with the breaks in brood, the mite count is...zero. Second colony was from a nuc from a local beek who is working with another beek on generating stronger "local genetics" matched to our county. It's doing gangbusters and is pretty incredible to watch. Dark bees and the queen knows her stuff. Third colony is from a master beekeeper next county over and also is more "local genetics". It's doing very well. Not quite as "dark" as number two, but close. Since this is first year and there's been a lot of comb building required, we're just doing what we can to help them prepare for overwintering. Maybe next year will bring a little honey for us.

    You're not alone with the wonky year...a reasonable number of folks who post online in various locations have indicated the same. The weather has been, well...you know...

    We have not tried the new frames yet, but we'll slip a few in next time we need to add a box. That had been done for all three colonies just prior to my doing this (insane...I agree) project.

    Colony 2 and 1 ( two days ago when it was REALLY hot for our area)


    Colony 3
    --

    The most expensive tool is the one you buy "cheaply" and often...

Posting Permissions

  • You may not post new threads
  • You may not post replies
  • You may not post attachments
  • You may not edit your posts
  •