Page 1 of 2 12 LastLast
Results 1 to 15 of 18

Thread: Removing Nub in Bottom of Goblet

  1. #1
    Join Date
    Jan 2006
    Location
    Chicagoland
    Posts
    2,802

    Removing Nub in Bottom of Goblet

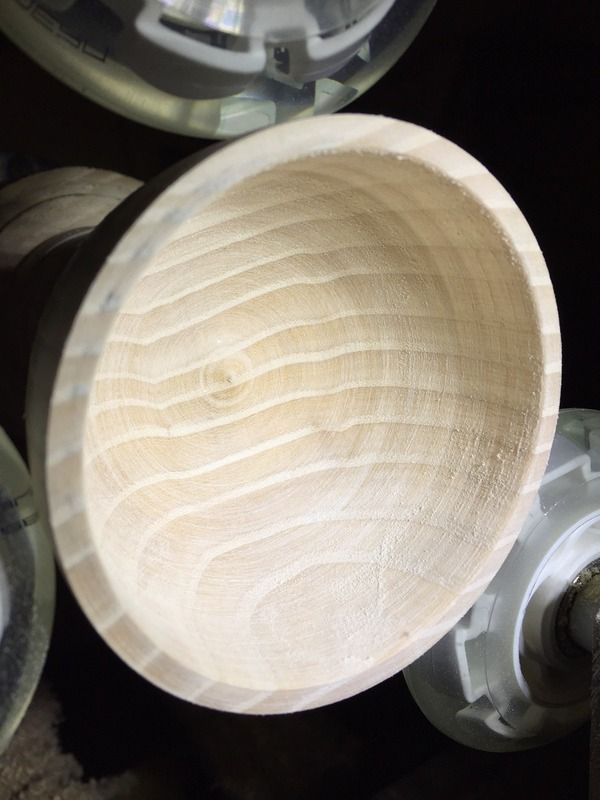
    My son is getting married next May. I want to make a wedding goblet for my son and his bride to be. I'm practicing on a piece of ash. I've about got the inside hollowed out but I don't know how to get rid of the nib in the bottom. I've done several bowls in the past but this thing is small (3" dia.) and can't find the right tool yet.

    Any help appreciated.

    Thanks,

    Mike


  2. #2
    Join Date
    Sep 2015
    Location
    San Diego, Ca
    Posts
    1,647
    Mike,
    I'd do two things:
    1. Use a freshly sharpened round nosed scraper with a good burr to get rid of most/all of the nub.
    2. I'd use a 2" diameter foam sanding pad in a drill to get rid of what remains. I have a hook & loop sanding pad and just cut out various grits of Abranet that sticks just fine to the sanding pad. I've also made some smaller custom sanding pads (like 1" diameter) using a valve stem from a lawn mower or a rod epoxied into wooden disk. Then I attach (aggressive double back tape) a piece of medium density foam (HF foam work mats) with curved outer edges. It is powered by a drill or sanded linear fashion by hand. It works fine.

  3. #3
    Join Date
    Jan 2006
    Location
    Chicagoland
    Posts
    2,802
    Quote Originally Posted by Brice Rogers View Post
    Mike,
    I'd do two things:
    1. Use a freshly sharpened round nosed scraper with a good burr to get rid of most/all of the nub.
    2. I'd use a 2" diameter foam sanding pad in a drill to get rid of what remains. I have a hook & loop sanding pad and just cut out various grits of Abranet that sticks just fine to the sanding pad. I've also made some smaller custom sanding pads (like 1" diameter) using a valve stem from a lawn mower or a rod epoxied into wooden disk. Then I attach (aggressive double back tape) a piece of medium density foam (HF foam work mats) with curved outer edges. It is powered by a drill or sanded linear fashion by hand. It works fine.
    Thanks. I tried my round nose scraper but overhang on the tool rest was too much. I just built a steady and it doesn't allow me to get the banjo as close as I'd like to the piece. For that nub I can probable forego the steady. I have Vince's 2" pads and disks but probably need to take your suggestion to make custom smaller pads.

    Mike

  4. #4
    Join Date
    Jan 2009
    Location
    Williamsburg,Va.
    Posts
    12,402
    Sometime get one of those tool rests that are bent into an "S" curve. I make tools like that for myself. Does require welding to the vertical post that goes into the base casting.

  5. #5
    Small cutting edge and light cuts will get it IF you have not yet turned the stem. If the stem is short and sturdy, it may be OK but it the stem is already long or slender, sanding may be the only solution.
    _______________________________________
    When failure is not an option
    Mediocre is assured.

  6. #6
    Join Date
    Jan 2006
    Location
    Chicagoland
    Posts
    2,802
    Quote Originally Posted by Dennis Ford View Post
    Small cutting edge and light cuts will get it IF you have not yet turned the stem. If the stem is short and sturdy, it may be OK but it the stem is already long or slender, sanding may be the only solution.
    The stem is pretty stout right now - about 2" dia..

  7. #7
    Join Date
    Feb 2008
    Location
    E TN, near Knoxville
    Posts
    12,298

    hand scraping

    I usually fix the nub by hand with the lathe off with this amazing new tool:

    scraper_PB054025_s.jpg

    Actually, I cut the end of a larger curved cabinet scraper about 1/7th of a century ago so I could get it into tight places. It worked so well I eventually acquired a variety of mostly small card scrapers and used them on most turnings (inside and out, lathe on and off) instead of coarse sand paper:

    scrapers_.jpg

    With the lathe OFF, scrape the nub away going mostly with the grain. Then sand with some fine paper.

    This is the way I do all bowls and things. Sharpened properly, the little scrapers will also quickly smooth out any ripples on the bottom. With surprisingly little effort the bottom of the inside is flawless:

    elm_box_inside_IMG_5352.jpg

    Before I started using these little scrapers I did the same thing with a curved, gently curved, or round-nosed conventional handled scraper, again with the lathe off. The little scrapers are easier to use (for me) if there is enough room to access the nub.

    BTW, for anyone interesting I always turn goblets like this:
    - turn the blank round,
    - shape the outside of the cup (that's the part you will see first) approaching the narrow diameter needed at the stem but not narrowed completely,
    - hollow the inside of the cup while the thing is well supported by rest of the thick blank,
    - sand and maybe even finish the outside and inside,
    - finally thin the stem, shape the base and finish.
    This provides good support of the cup untill the end. Doing the outside cup shape first lets me then hollow the bowl as thin as I want. Doing a thin wall the other way may require a compromise on the outside shape to fit the inside shape.

    JKJ

  8. #8
    Join Date
    Feb 2008
    Location
    E TN, near Knoxville
    Posts
    12,298

    just for fun, profiles

    Oh, BTW, just for fun - another idea for a couple's present is a pair of profile goblets/boxes. Have you seen those? I made some for my son and his wife:

    profile_PC134124es.jpg profile_PC244147es.jpg profile_comp.jpg

    JKJ

  9. #9
    Join Date
    Mar 2005
    Location
    Spokane, Washington
    Posts
    4,021
    Love 'em!

    Dan
    Eternity is an awfully long time, especially toward the end.

    -Woody Allen-

    Critiques on works posted are always welcome

  10. #10
    Join Date
    Jan 2006
    Location
    Chicagoland
    Posts
    2,802
    Quote Originally Posted by John K Jordan View Post
    Oh, BTW, just for fun - another idea for a couple's present is a pair of profile goblets/boxes. Have you seen those? I made some for my son and his wife:

    profile_PC134124es.jpg profile_PC244147es.jpg profile_comp.jpg

    JKJ

    Thanks for the scraper tip. Where did you get such an assortment? Those profile goblets are really nice (I better not show them to my wife).

    Mike

  11. #11
    Join Date
    Feb 2008
    Location
    E TN, near Knoxville
    Posts
    12,298
    Quote Originally Posted by Mike Goetzke View Post
    Thanks for the scraper tip. Where did you get such an assortment? Those profile goblets are really nice (I better not show them to my wife).
    Thanks! But oh no, I already sent the photos to mikegoetzkeswife@hedbetterdoexactlywhatisayorelse. com. Sorry.

    Not long after I made the first one I found a set of small scrapers in Alanta at Highland when it was Hardware. Much later I noticed Woodcraft carried a set. Some are I grind from larger scrapers for certain sizes or just to reshape the profile. I use them on bowls, boxes, and spindles, holding them in the air away from the tool rest. The best are probably made from high quality larger scrapers since they are thicker and seem to have better steel.

    Just don't do what one guy did years ago when we discussed this on another forum - held a large scraper in a form which turned into a food processor when he dropped it.

    I like using these far better than power sanding since I can get a good surface while preserving fine detail AND they don't make clouds of dust. In some cases they are slower than sanding, sometimes faster. They are especially good on the wings, front and back, of non-round things like this plate/platter where the vibration from cutting air almost always make some rings or irregularities. They are sometimes good for figured wood that might otherwise tear out. With a well-turned and scraped surface I can start with finer sandpaper, often 320 or finer.

    penta_maple_ellis_IMG_5435.jpg

    For a piece like this I might leave it in the chuck but remove the chuck from the lathe and sit in a comfortable chair to work on it.

    JKJ

  12. #12
    Join Date
    Jan 2006
    Location
    Chicagoland
    Posts
    2,802
    Thanks for all the help. I used a round nose scraper and some sandpaper.

    Another question - while looking online for stem shapes I found a few goblets with interlocked rings. How is this done? Do you break a ring and glue it back together?

    Thanks

  13. #13
    these are very cool, John.

  14. #14
    After you turn the profile, I suggest that you start by boring out the center of the goblet or whatever with a large Forstner bit. Drill to a 1/4" less than the desired depth. Use an extension if necessary. Widen out the hole to the desired wall thickness, Now you will have a dimple instead of a nub, but it will be easier to remove than the nub.

    Doug.

  15. #15
    Join Date
    Feb 2008
    Location
    E TN, near Knoxville
    Posts
    12,298
    Quote Originally Posted by Prashun Patel View Post
    these are very cool, John.

    Why thank you!


    I realized just now I could have added yarn or something to the bottom of the female's hat/lid for some hair. Next time. :-)

    JKJ

Posting Permissions

  • You may not post new threads
  • You may not post replies
  • You may not post attachments
  • You may not edit your posts
  •