Mine's a mini Sharpie pen & pencil combo I bought a couple of years ago. I don't see it listed now. With your high Z, any of them would work well.


 Moderator
Mine's a mini Sharpie pen & pencil combo I bought a couple of years ago. I don't see it listed now. With your high Z, any of them would work well.
Please help support the Creek.
"It's paradoxical that the idea of living a long life appeals to everyone, but the idea of getting old doesn't appeal to anyone."
Andy Rooney
 [OP]
Contributor
[OP]
Contributor
I've been away for a few days but only because I had to rebuild my main graphics computer, which is also the same computer I use for posting on forums and for e-mail. But I have not been idle, rather I've managed to spend countless hours on Fusion 360 tutorial videos just so I could cut four pockets on the spoil board. This is cutting edge stuff!! LOL!
Anyway, here's the video -
David
CurlyWoodShop on Etsy, David Falkner on YouTube, difalkner on Instagram
Contributor
Too small of a tool for one. Also, feed rate general rule.... 1% of tool diameter per tooth, so an 1/8" end mill a good starting place is .00125" per tooth per rev, so a two flute would be .0025" per rev at say 20,000 rpm would be about 50ipm. Plunging would be about 25% to 33% of that. Always try to use the biggest tool and shortest length you can.... for example that end mill could have been stubby and chucked up a lot tighter, makes a world of difference.
Brian Lamb
Lamb Tool Works, Custom tools for woodworkers
Equipment: Felder KF700 and AD741, Milltronics CNC Mill, Universal Laser X-600
[OP]
Contributor
Thanks, Brian! That is a 1/8" two-flute end mill though it likely looks smaller in the video. The first 'plunge' was not expected. In the simulation it appeared to start at the surface and cutting slowly in a small circular motion and feeding down slowly. I ran it without a bit and eyeballed the path but it didn't look like it was going to plunge that far or I wouldn't have run it that way. I had originally planned for the cut to include the 0.201" (#7 drill bit) hole for tapping 1/4-20 so that's why the small bit and that's why the plunge in the first attempt.Originally Posted by Brian Lamb

The second time, when it actually worked, I took the 0.201" hole out of the picture and just had it cut the pocket. I had greatly changed the parameters before I had Fusion 360 generate the tool path and I watched it about a dozen times without a bit but somehow the bit changes things. When it had the bit in place it seemed much faster than when it didn't - optical illusion, I guess.
Fusion 360 set the feed at 24 ipm, feed per tooth at 0.001", plunge at 30 ipm, and the RPM at 8000 for this bit and I didn't change any of that. Of course, it looks much faster moving in the video because I increased the video speed on pockets 2-4 but pocket 1 is at real time speed.
I imagine for the foreseeable future I'll learn something every time I fire the machine up or generate a tool path - at least I hope I learn something every time!
David
CurlyWoodShop on Etsy, David Falkner on YouTube, difalkner on Instagram
Contributor
Don't just blindly trust any CAM software.... you have feed rates close to right for 20,000 rpm and you ares running 8000, no wonder you snapped it off, that's triple the chip load. And you always plunge slower than you feed.
Brian Lamb
Lamb Tool Works, Custom tools for woodworkers
Equipment: Felder KF700 and AD741, Milltronics CNC Mill, Universal Laser X-600
[OP]
Contributor
The other reason I snapped it off is that I plunged it a full 1/2" into the MDF - LOL! It's going to take me a while to know when the CAM software isn't giving me what I really need. Way back when I was a machinist at teen years to early 20's and running machines by hand this never happened. My built-in CNC mechanism just knows you can't do that. This machine ain't that smart!
David
CurlyWoodShop on Etsy, David Falkner on YouTube, difalkner on Instagram
Moderator
One of the beauties of Vectric's V-Carve & Aspire cad/cam software (and others, I'm sure) is that it gives you an animated preview of exactly how the tool paths will run, and you can easily fine tune them if needed.
"It's paradoxical that the idea of living a long life appeals to everyone, but the idea of getting old doesn't appeal to anyone."
Andy Rooney
[OP]
Contributor
Fusion 360 also does that but I guess I wasn't paying attention to the right things. I've double checked with the machine and the software and neither wants to share in the blame so I guess it's all on me! LOL!
David
CurlyWoodShop on Etsy, David Falkner on YouTube, difalkner on Instagram
[OP]
Contributor
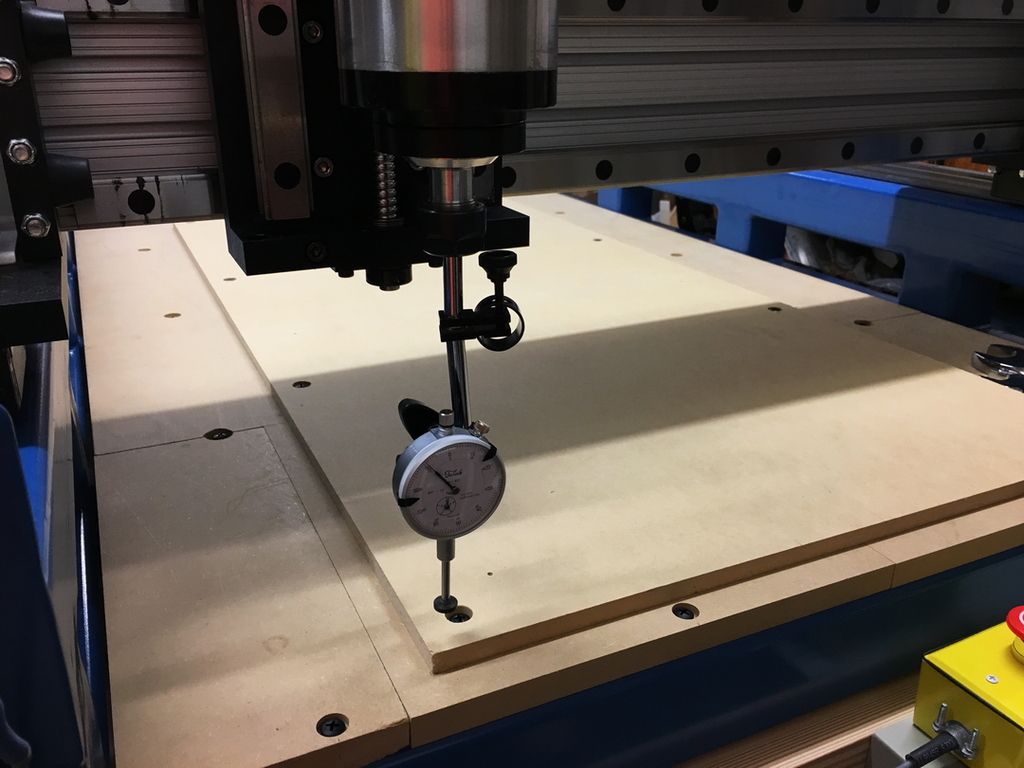
I was setting up to cut a 24"x24" board when it occurred to me that I had not checked the table for coplanar accuracy. This is the initial test and it's out enough that I need to correct it before going much further.
Here's the setup I used -
David
CurlyWoodShop on Etsy, David Falkner on YouTube, difalkner on Instagram
[OP]
Contributor
This isn't really part of the build except that it's a natural progression to at least show the CNC machine working, so I thought a little project was in order. The build isn't 100% complete, though, but close enough to begin using the machine. I still need to get the VFD talking to the software (Modbus, connected via USB adapter - right now I have to open the electrical enclosure and use the keypad to turn the spindle on/off and change speeds), I need to make an auto-zero touch plate for the Z axis, need to figure out how to mount the Z- axis proximity sensor, and I truly need a dust shoe - really, really need a dust shoe!!
A little background on the project - I'm building acoustic guitars which means right now I build more templates, fixtures, forms, and jigs than guitars. One of the tools frequently used is a radius dish or a set of radius dishes for different guitars. People frequently call them 'flattop guitars' but most aren't even close to flat. The top and back have radii ranging from 12' to 65' or more. The radius helps keep the guitar stable, makes it stronger, and helps with the sound (very basic explanation). What I'm using is a 28' radius for the top and 15' for the back so last August Sandy and I got out in the driveway and made some MDF dust, lots of MDF dust. I know the dishes aren't cut perfectly so this looked like a good project to start the CNC on its path to production.
The video is a little longer than most I've posted but still tolerable at 8 1/2 minutes and starts with cutting the first radius dish by hand and progressing to cleaning them up on the CNC. It's interesting to note that the DC is much louder than the CNC and also how the mic picks up sound - the radio isn't as loud in the room as it sounds on the recording and the fans for the enclosure aren't that noticeable but they are in the recording. The hearing protection I wear is for the DC, though, because it is annoying and just loud enough that I won't run it without ear plugs.
David
CurlyWoodShop on Etsy, David Falkner on YouTube, difalkner on Instagram
Member
If your table isn't flat get a fly cutter and surface it
Moderator
Now you're having fun! I'm a fan of the Kent dust shoe. I wouldn't want to be without it.
https://www.kentcnc.net/nc/standard-...dard-dust-shoe
"It's paradoxical that the idea of living a long life appeals to everyone, but the idea of getting old doesn't appeal to anyone."
Andy Rooney
[OP]
Contributor
Already did, Jerome - thanks! I didn't see any reason to cut so much off when I could shim and get it closer before surfacing the entire board.
David
CurlyWoodShop on Etsy, David Falkner on YouTube, difalkner on Instagram
[OP]
Contributor
Yep - having a blast, Bruce! I've had 3 recommendations this morning for commercial dust shoes and they're all for the Kent dust shoe so it must be a good one.
David
CurlyWoodShop on Etsy, David Falkner on YouTube, difalkner on Instagram
 Administrator
David,
Looks like you have a really nice machine. All of the work and planning has paid off, I hope you enjoy your upcoming projects and the changes the machine will bring to your fabrication routines.
Great Job!!!
 Posting Permissions

 Reply With Quote