Results 1 to 11 of 11

Thread: Chester County Dresser Build-Part 3 Done

  1. #1
    Join Date
    Feb 2011
    Location
    Carlsbad, CA
    Posts
    2,230
    Blog Entries
    2

    Chester County Dresser Build-Part 3 Done

    This is the last part for the build of a Chester County Dresser in Poplar from one of Glen Huey’s books. Dimensions are ~60” tall x 44” wide x 23” deep. There are two previous threads for the initial part of the build. Now that the carcass and drawers are done, there’s only a little bit of actual woodworking left before the dreaded finishing process. As you’ll see, I dread finishing for a good reason!

    There are 4 full width drawers, so these each get a divider to reinforce the plywood drawer bottom.


    Cutting the plywood drawer bottoms on the saw bench with an inexpensive pull saw. These impulse hardened teeth work well in this ¼” plywood.


    Similar dividers and plywood for the carcass back.


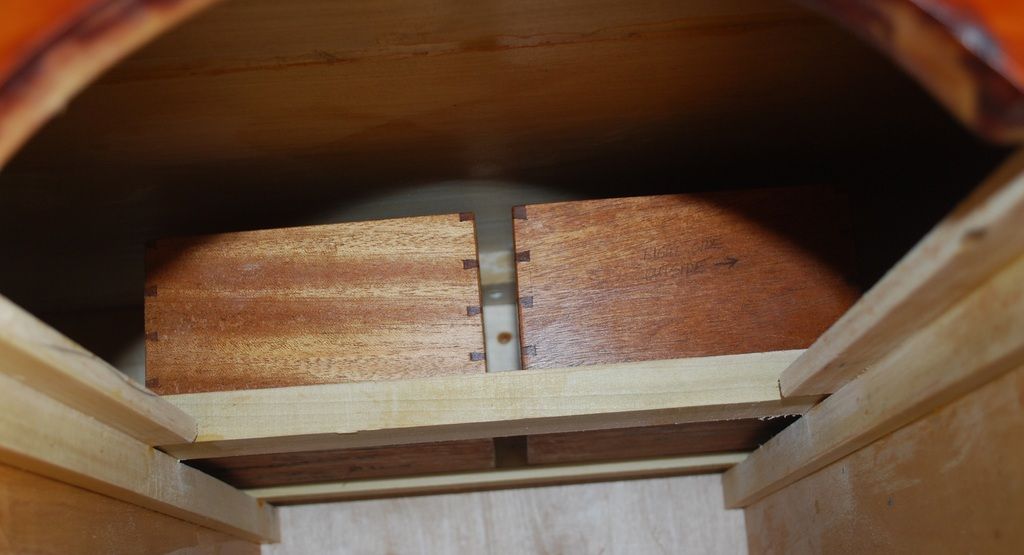
    Laying out the dovetails for two mahogany hidden drawers about 6” x 6” by 4” tall.


    The drawer bottom is simply nailed on and slightly proud of the drawer sides to serve as a runner that allows the drawers to slide in grooved rails.


    Would have been much smarter to make and fit these drawers before I put the carcass top and back on- duh! I wanted to leave these for last so I would have one last chance to make some shavings before finishing. This turned out to be a bad plan because the drawers fit tighter than planned, leading to a painful job reaching through the drawer openings to try and scrape/sand/plane the runners to the correct width- had to cover a few blood stains.


  2. #2
    Join Date
    Feb 2011
    Location
    Carlsbad, CA
    Posts
    2,230
    Blog Entries
    2
    I built this dresser to match a bed (also in Poplar) for our oldest son, so I planned to use the same finish: First step, Watco oil/varnish – I think this brings out the figure a little bit. After allowing a couple days to dry, it looked pretty good.


    Next I put on a sealer and the following day added the wipe on gel stain. Somewhere in here things went terribly wrong! As you can see in the pictures, it came out super blotchy. The drawer fronts didn’t take nearly as much color as other parts of the carcass.


    http://i1078.photobucket.com/albums/...ps8iroq0bx.jpg


    In my panic, I tried to add more stain to blend things together. It ended up looking like a bad paint job with the figure obscured by the pigment in the gel stain! I have no idea why this went off the rails so badly. It’s the same product/process I used for the bed and seem to work out okay there. Why this time it was a train wreck? – I have no idea. Seriously no clue whatsoever!


    So after 6 hours spent desperately trying to work with the gel stain to even out the finish, getting stain all over myself (note to self – next time don’t get the latex disposable gloves) and some very colorful language, my only choice was to sand/scrape off the stain and try again. As you might imagine this was an epic PITA! All the time I spent in construction getting cleaned, hand plane surfaces went out the window as I spent another six hours scraping and sanding to get back to this:


  3. #3
    Join Date
    Feb 2011
    Location
    Carlsbad, CA
    Posts
    2,230
    Blog Entries
    2
    This time I went with a dye that went on effortlessly, dry quickly and gave a more uniform overall color, not great but better. By this time I was really ready to be done with this project!


    After a few coats of blonde shellac and some paste wax it turned out okay.


    Poplar works well with hand tools and is certainly much less expensive than cherry, walnut, mahogany etc. Nonetheless, next time I go with a traditional cabinet hardwood that doesn’t require any coloring!
    Thanks for looking.


    BTW, I edited my pictures in photo bucket so they were oriented correctly, but when I paste the link here to SMC they get turned around – any suggestions?

    All the best, Mike

  4. #4
    Join Date
    Aug 2012
    Location
    Missouri
    Posts
    2,152
    That's a nice recovery Mike. Looks good, surly could have been better. I guess I would not have finished the way you went about it. I would be unsure if everything would dry enough to recoat. I've have never been very successful putting stain over anything but shellac and then just a wash coat of shellac. Were you trying to use the stain more like a glaze? I'm not being critical I just don't know.
    Jim

  5. #5
    Join Date
    May 2015
    Location
    NJ
    Posts
    1,391
    Hey Mike: She's a beauty - very nice build and you overcame that mess well. Am I understanding correctly that you went with oil (Which Watco product? Danish oil?), then varnish, then sealer and then the gel stain? If so, eliminate the varnish until the last step. Also, which sealer are you using; if you're not mixing your own then Bull'seye is the only one I've found consistency with (not that I've tried them all). How did you apply the sealer?

    EDIT: One other thing - what was the drying time between each coat and the humidity level where it was drying?
    Last edited by John Kananis; 08-23-2016 at 11:05 PM.

  6. #6
    Join Date
    Aug 2010
    Location
    USA
    Posts
    5,582
    Overall I think your dresser project was a success. I can appreciate the stress and frustrations involved with the finishing however and think you did a nice job of overcoming the problems with the gel stain. I can say that I often let my projects sit for a while as I mull how exactly I can finish them without messing up what craftsmanship I managed to accomplish. To me this is always the most stressful moment in any project (except those with a natuarl finish like oil, shellac, etc.). Any time I need to use a stain I start trembling. I think your son will be very happy with it overall.

  7. #7
    Join Date
    Feb 2011
    Location
    Carlsbad, CA
    Posts
    2,230
    Blog Entries
    2
    Quote Originally Posted by John Kananis View Post
    Hey Mike: She's a beauty - very nice build and you overcame that mess well. Am I understanding correctly that you went with oil (Which Watco product? Danish oil?), then varnish, then sealer and then the gel stain? If so, eliminate the varnish until the last step. Also, which sealer are you using; if you're not mixing your own then Bull'seye is the only one I've found consistency with (not that I've tried them all). How did you apply the sealer?

    EDIT: One other thing - what was the drying time between each coat and the humidity level where it was drying?


    Hey John,

    I appreciate the advice and suggestions.

    I applied "Watco Natural", I believe this is an oil/varnish blend, but I don't know for sure. My experience is this soaks into the wood, which I think sort of highlights the figure/grain but dries "in" the wood, rather than "on" it, like a typical surface coat.I let this dry for two days.

    Then I put on General Finishes "Seal -a - Cell" clear wipe on finish. I applied sparingly with a rag, but thought I got full coverage of all surfaces. I let this dry overnight.

    To this point I hadn't yet added any color. When I rubbed on General Finishes "Georgian Cherry gel stain", which I believe is an oil-based product (the directions say cleanup with mineral spirits?). This was when I had all the trouble trying to get an even color/tone. It was typically around 80° during the day and may be 70s at night. We typically don't have much in the way of humidity in San Diego, but I'm not really sure what it was.

    Now that I think about it, when I used this finish with the matching bed, I don't think I added the sealer, I just put the gel stain directly over the Watco oil/varnish. For the bed I worked in fairly small patches and was able to get a pretty even color. I only added sealer on this dresser because I thought it would make it easier to get an even color. I guess that's what I get for the thinking! John you make a good point; I guess if the sealer wasn't completely dry then that might account for why the gel stain went on so unevenly – right?

    My "go to" finish (when not trying to add any color, which I always try to avoid) is Watco followed by shellac and it usually works fine.

    I really appreciate any and all comments and suggestions. For fairly utilitarian pieces like this dresser, I would like to be able to consider using poplar again in the future just because it is so much less expensive than traditional hardwoods. I think when I did the initial estimates of board feet required,the lumber cost to make this dresser in cherry was north of $750 here in Southern California. My problem with poplar is the Boss thinks it looks a lot better with stain. Given the difficulty I had finishing this piece, that's not something I want to do again.

    All the best, Mike

  8. #8
    Join Date
    Feb 2014
    Location
    NE Florida
    Posts
    304
    What dye product did you use?

  9. #9
    Join Date
    Feb 2011
    Location
    Carlsbad, CA
    Posts
    2,230
    Blog Entries
    2
    Christian, I used the General Finish "vintage Cherry, dye stain" water-based because it's what they had on hand at Rockler. I prefer solvent-based dyes because they don't raise the grain like water-based dyes, and have always had good luck with them. If you feel comfortable mixing your own color you can use Transtint liquid dye diluted in alcohol/lacquer thinner to make your own color. Please don't take my word for it as I'm clearly terrible at finishing and I wouldn't want my comment to cause you any troubles.

    BTW, the finishing forum here on SMC has a lot of great information and some real experts who are very helpful with questions.

    Best, Mike

  10. #10
    Join Date
    Feb 2014
    Location
    NE Florida
    Posts
    304
    Quote Originally Posted by Mike Allen1010 View Post
    Christian, I used the General Finish "vintage Cherry, dye stain" water-based because it's what they had on hand at Rockler. I prefer solvent-based dyes because they don't raise the grain like water-based dyes, and have always had good luck with them. If you feel comfortable mixing your own color you can use Transtint liquid dye diluted in alcohol/lacquer thinner to make your own color. Please don't take my word for it as I'm clearly terrible at finishing and I wouldn't want my comment to cause you any troubles.

    BTW, the finishing forum here on SMC has a lot of great information and some real experts who are very helpful with questions.

    Best, Mike
    Thanks for the info.

  11. #11
    Join Date
    May 2015
    Location
    NJ
    Posts
    1,391
    Mike: Watco is good stuff but I have no experience with the sealer you used, if not the Zinsser product, you could use straight shellac - the key is to ensure each stage cures before adding the next. As far as the gel stain, I never use anything to remove aside from a lint-free cloth if necessary; that being said, I prefer multiple thin coats of gel stain than the saturate and remove method. Last thing, when adding the sealer, I tend to put more on end-grain than long-grain but again this is with a lint-free cloth a little bit at a time. Hope some of this was useful.

Posting Permissions

  • You may not post new threads
  • You may not post replies
  • You may not post attachments
  • You may not edit your posts
  •