Results 1 to 13 of 13

Thread: interesting wood that looks...blah

  1. #1
    Join Date
    May 2008
    Location
    Mountain Home, AR
    Posts
    547

    interesting wood that looks...blah

    I posted a couple of pics the other day asking for some advice on sanding the inside of my holly stump hollow form. I have that part licked, but despite the swirling grain, inclusions and holes the wood just looks dull and uninteresting. There's no depth to the grain and no chatoyance. I had the bright idea to treat it with some black aniline dye and sand it back to pop the grain, but now it just looks gray and uninteresting, plus the tearout is accented - not all in a bad way, but I still have some sanding to do. I'm going to sand it back a bit more and hope the gray lightens up some, but I don't know what else to do to really bring out the character of the wood as it really doesn't have any depth.

    I think my first step is to get rid of the gray color. I don't think it goes very deep, but is there a way to bleach it or dissolve it?

    As for the final treatment I had planned to give it a few coats of DO and buff to a satin finish, but what what would y'all do? Dye it a more interesting color? Bleach it? Strategic inlacing to fill some of the smaller voids/inclusions? Maybe a gloss lacquer finish instead?

    This is before sanding and black dye:


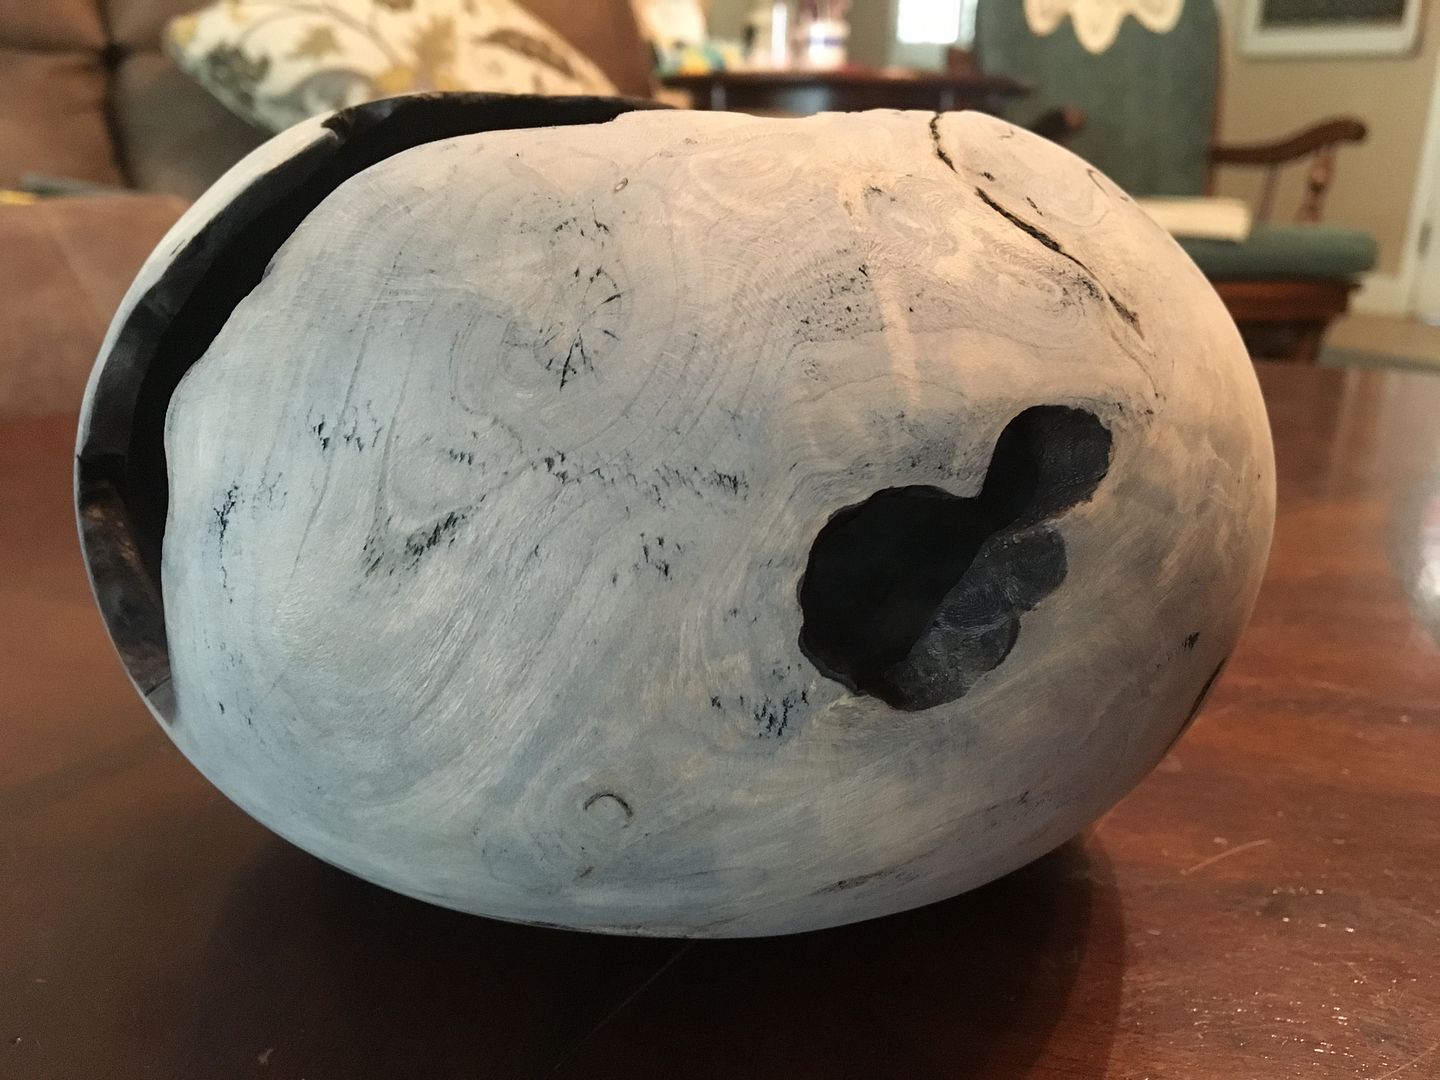
    This is after sanding and dye:


  2. #2
    Join Date
    Sep 2015
    Location
    San Diego, Ca
    Posts
    1,647
    Wes, have you either wetted it down or applied some solvent to see what the grain might look like? From the pictures, the sanded surface doesn't seem to have a lot of grain, but perhaps that is a little deceiving in its dry condition.

  3. #3
    Join Date
    Feb 2008
    Location
    E TN, near Knoxville
    Posts
    12,298
    Quote Originally Posted by Brice Rogers View Post
    Wes, have you either wetted it down or applied some solvent to see what the grain might look like? From the pictures, the sanded surface doesn't seem to have a lot of grain, but perhaps that is a little deceiving in its dry condition.

    I usually use Naptha for surface "preview". It's amazing how well it brings out any figure and shows what the surface would probably look like with oil. Dries quickly, doesn't effect wood.


    Wes, it looks like tearout is a challenge on this piece. Did you use a sanding sealer? If this piece is already off the lathe, too late, but for next time: if the wood is difficult, I might apply a coat or three of lacquer or shellac-based sanding sealer before the finish cuts. The first coat is thinned so it soaks in well. Let dry, apply again, thinned or unthinned. Sharpen to a razor, make a cut and if still tearing out apply more sanding sealer, resharpen and cut again. A razor-sharp gouge and the finest if cuts is necessary.

    If the piece is already off the lathe I still might apply sanding sealer before sanding. If the grey you mentioned is a result of the dye and can't easily be turned away, deep sanding might be needed. I prefer to use a random orbital sander (I use the pneumatic Grex with 2" pads.)

    I prefer to wet sand open grained wood. If finishing with oil I apply a good squirt of oil then sand with a relatively coarse grit. The slurry it makes will fill in the pores and even some of the tearout and small voids. Let dry, repeat with more oil. Repeat as needed. When surface finally starts to look good wet sand with finer grits.

    BTW, when turning and I run into tearout that a "whisper" cut with a razor-sharp gouge cannot fix, turning it wet can sometimes help. For punky wood or truly horrible tearout (and the wood is worth it) I soak the wood with thin CA glue, let set, turn, and repeat. No accelerator. (Be careful, the wood might get very hot and avoid the fumes.) This will stabilize the wood - I've had punky wood so soft I could stick my thumb nail into it. After repeated CA treatment the surface ended up hard and as smooth as glass. If the CA won't fix it, I throw the wood away and get some better wood!

    I am personally not a fan of filling cracks and voids with inlace, metal, or any other contrasting substance. I don't like the look but some people do. I have also seen pieces years later where the unmoving filler eventually separated from the seasonally moving wood. Probably more likely with thick wood.

    JKJ

  4. #4
    Join Date
    May 2008
    Location
    Mountain Home, AR
    Posts
    547
    Quote Originally Posted by John K Jordan View Post
    I usually use Naptha for surface "preview". It's amazing how well it brings out any figure and shows what the surface would probably look like with oil. Dries quickly, doesn't effect wood.


    Wes, it looks like tearout is a challenge on this piece. Did you use a sanding sealer? If this piece is already off the lathe, too late, but for next time: if the wood is difficult, I might apply a coat or three of lacquer or shellac-based sanding sealer before the finish cuts. The first coat is thinned so it soaks in well. Let dry, apply again, thinned or unthinned. Sharpen to a razor, make a cut and if still tearing out apply more sanding sealer, resharpen and cut again. A razor-sharp gouge and the finest if cuts is necessary.

    If the piece is already off the lathe I still might apply sanding sealer before sanding. If the grey you mentioned is a result of the dye and can't easily be turned away, deep sanding might be needed. I prefer to use a random orbital sander (I use the pneumatic Grex with 2" pads.)

    I prefer to wet sand open grained wood. If finishing with oil I apply a good squirt of oil then sand with a relatively coarse grit. The slurry it makes will fill in the pores and even some of the tearout and small voids. Let dry, repeat with more oil. Repeat as needed. When surface finally starts to look good wet sand with finer grits.

    BTW, when turning and I run into tearout that a "whisper" cut with a razor-sharp gouge cannot fix, turning it wet can sometimes help. For punky wood or truly horrible tearout (and the wood is worth it) I soak the wood with thin CA glue, let set, turn, and repeat. No accelerator. (Be careful, the wood might get very hot and avoid the fumes.) This will stabilize the wood - I've had punky wood so soft I could stick my thumb nail into it. After repeated CA treatment the surface ended up hard and as smooth as glass. If the CA won't fix it, I throw the wood away and get some better wood!

    I am personally not a fan of filling cracks and voids with inlace, metal, or any other contrasting substance. I don't like the look but some people do. I have also seen pieces years later where the unmoving filler eventually separated from the seasonally moving wood. Probably more likely with thick wood.

    JKJ
    Thanks for the thoughts guys! I'm concerned that applying some thinner or DO might only cause the gray to bleed and further muddy the appearance, though I do like to wet sand with DO. I may try both on small areas and see what happens.

    And yes, tearout was awful on this piece. High-angle shear scraping cleaned up most of it, but that cursed dye really accents the remaining problem areas. The piece warped a bit since the last time I cut on it so I went ahead and parted off the tenon so I wouldn't be tempted to turn it any thinner. No more lathe sanding or cutting on this piece.

  5. #5
    Join Date
    May 2008
    Location
    Mountain Home, AR
    Posts
    547
    I smeared a little DO on the bottom just to see what would happen and I think I will be happy with the results. Maybe a little darker than I planned, but a little oil really did uncover the grain pattern, and I now see how the dye helped make it stand out. Was just hard to see without oil. Surprising! Can't wait to see what the finished piece looks like!


  6. #6
    Join Date
    May 2008
    Location
    Mountain Home, AR
    Posts
    547
    Meant to post this pic. The one above is mostly mineral spirits. This one is a better before/after shot.

  7. #7
    Join Date
    May 2016
    Location
    Appleton, WI
    Posts
    110
    Wow, that got a LOT darker! It looks awesome in the after pictures, Wes!

  8. #8
    Join Date
    May 2016
    Location
    Northeast PA
    Posts
    527
    That is going to be one cool looking bowl! I think the dye was just the ticket to get the grain to stand out
    ---Trudging the Road of Happy Destiny---

  9. #9
    Wes, you may know this, but black on most amber tone woods will produce a green hue in areas and that may be what you are after. The black dyes contain a lot of blue and that and the amber result in green. One can add a diluted red and that will produce a brown tone from the green. Or, start with the black, then yellow (get a lot of green), then red and you will end up with some beautiful brown tones. You may have to play with the red applications - stronger in some areas and more diluted in others.

    Nothing pops figure like dye!! I love using it on my figured woods.

  10. #10
    Join Date
    Feb 2008
    Location
    lufkin tx
    Posts
    2,054
    I was hoping you would give up on this trashy wood and offer it for giveaway. Magnificent piece of wood--you did well. You might try saving a piece of the scrap when you round up your blank for experimenting with sanding, dying and finishing. you never know about wood. Like John sez--red and especially yellow really brigten up woods especially used with sanding between coats and used as a light wash coat.

  11. #11
    Join Date
    Apr 2016
    Location
    Asheboro,NC
    Posts
    133
    Can't wait to see this when finished.

    Jay

  12. #12
    Join Date
    May 2008
    Location
    Mountain Home, AR
    Posts
    547
    Thanks guys! I'm anxious to see the finished product too. My cutoffs have already gone to a cousin that pretty much only turns pens. He got some fantastic pieces. But I still have the trunk and butt end that I will be roughing out in a few days.

    Oh, and this was the smaller of my 2 holly stumps I haven't cracked the other one open yet - wanted to see if it was worth the effort first. Should be able to get 2 3 blanks out of the other stump. May invest in a carbide hollowing tool before I tackle that one though. Even my Thompson gouges dulled within seconds hitting all the grit inside the wood. Took way too long, but was worth it.

  13. #13
    Join Date
    May 2008
    Location
    Mountain Home, AR
    Posts
    547
    I finally finished the piece and presented it to my mom this weekend for her birthday...in June. She loved it, and even more-so when she figured out it was from one of the holly bushes she had removed this summer.

    Before I post pics, I wanted to thank y'all for the inside sanding suggestions. I made a flap wheel from an old 80gr belt and a 120gr mop from the 3m rubber-backed paper from the blue borg. Both worked awesome. There was still some tearout I couldn't get rid of, but with the black dye and natural appearance it looks like it belongs there.

    The finish is several coats of DO, Beall buffed and followed by a coat of Ren Wax. Just posted it to FB a bit ago and have the next 2 sold if and when I get to them. Ha!


Posting Permissions

  • You may not post new threads
  • You may not post replies
  • You may not post attachments
  • You may not edit your posts
  •